- Member DIN
- S133
Hey guys 'n' garls,
Long time no see
Since I was really busy with my job and moving to another place, I was -unfortunately- not able to visit this forums constantly.
Anyways, I decited that it's time for another build, which isn't as usual as you might think.
It all started with a friend of mine, who purchased one of those vacformed armor kits by Westerfield Studios which was -of course- unassembled and unpainted.
A while after he recieved the armor, my friend got really bored and unmotivated to go on with the assembling process.
And thats where I came in. He sold it to me for a fairly good price, considering the current prices on the Westerfield Website.
However, this thread is about to share the finishing-process on that armor with you guys, so you're all invited to write some critiques, tips, opinions and what not.
So yeah. Let's get started!
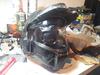
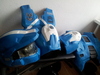
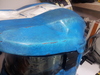
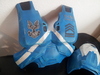
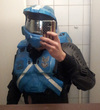
First of all I payed most attention to the helmet, which I recieved partially assembled. However here's a pic of it fully assembled

Note: I used Hotglue to assemble the armor, which works pretty well. Only thing to mention is, that you really have to keep an eye on the glues temperature, cause otherwise it may melt down the armor-pieces.
The part of the brim, which conmnmects directly to the visor was not included and had to be done by hand btw.
To seal the glueing edges, I used epoxy putty.
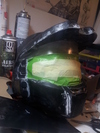
Once this was done, I dremeled down the epoxy to give the helmet a nice and smooth look. Frogtaped the visor as well.

As you might have noticed, I also added some detailing,made out of pvc sheet.
Thats it for now Hope you like the progress so far
Long time no see
Since I was really busy with my job and moving to another place, I was -unfortunately- not able to visit this forums constantly.
Anyways, I decited that it's time for another build, which isn't as usual as you might think.
It all started with a friend of mine, who purchased one of those vacformed armor kits by Westerfield Studios which was -of course- unassembled and unpainted.
A while after he recieved the armor, my friend got really bored and unmotivated to go on with the assembling process.
And thats where I came in. He sold it to me for a fairly good price, considering the current prices on the Westerfield Website.
However, this thread is about to share the finishing-process on that armor with you guys, so you're all invited to write some critiques, tips, opinions and what not.
So yeah. Let's get started!
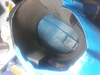
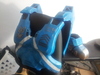
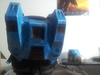
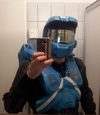
First of all I payed most attention to the helmet, which I recieved partially assembled. However here's a pic of it fully assembled
Note: I used Hotglue to assemble the armor, which works pretty well. Only thing to mention is, that you really have to keep an eye on the glues temperature, cause otherwise it may melt down the armor-pieces.
The part of the brim, which conmnmects directly to the visor was not included and had to be done by hand btw.
To seal the glueing edges, I used epoxy putty.
Once this was done, I dremeled down the epoxy to give the helmet a nice and smooth look. Frogtaped the visor as well.
As you might have noticed, I also added some detailing,made out of pvc sheet.
Thats it for now
Hope you like the progress so far