stateofdan
New Member
Happy new year all!
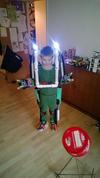
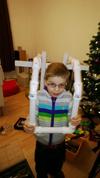
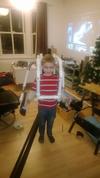
So over Christmas and new year i thought a little simple project would be the order of the day. So i thought about doing an Aliens heavy lifter for my son would be the way forward.
While not strictly Halo, many of the techniques I used to construct the details have been learnt on here, so i thought I would share. In fact if it weren't for the 405th i doubt i would have thought about doing it!
The basic premise was to get a bunch of plumbing gear from the hardware store to build a frame and then use roof guttering to make the armoured parts. Then a bunch of trips to the pound shop to get lights and detailing etc. Foamies were used to add detail to the guttering to make it look more armoury. The total project was about £45 and has taken a few days due to managing kids and a cold
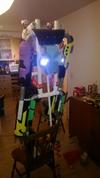
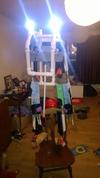
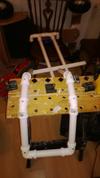
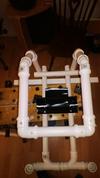
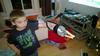
The back and overhead cage:
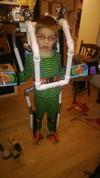
Using 1 1/4 in pipe and standard waste fitting I built the back frame and the overhead cage. I have used screws to keept he frame fix and a bit of MDF along the top of the back frame for better fixing properties for the arms.

Overhead cage is attached to the back frame up rights with a bolt to make a hinge

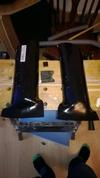
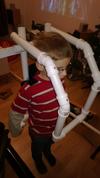
To make shoulder rests i used a bit of gutter made two cuts and then fired up the trusty old hot air gun! this stuff is surprisingly malleable and makes me wonder what parts of halo armour could be made out of it.

This worked pretty well, later i added foam inside and a foam collar for comfort, plus i had to add supports as the plastic gutter could not take the weight of the frame.

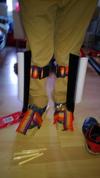
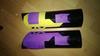
Forearm construction:
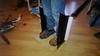
The forearms are straight gutter pieces, lined with foam and given a dowel handle:

After lots of consideration over complex claw like arrangements i went with something simpler. Using a short peice of 1 1/4" pipe, a bit of pipe lagging, dowels and cable ties I came up with this nice arrangement.

By pulling the cable ties the claws would close and the whole thing would fit nicely inside two bits of gutter to form a tube. A strap was added to keep it all in place.

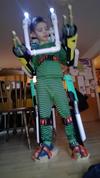
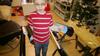
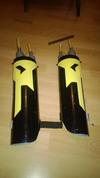
Arms:
The upper arms were simply 1 1/4" pipe, more gutter, pipe insulation and dowel. The pipe insulation was inserted 1" into the pipes at each end and duck taped. to make the shoulder connections a dowel was inserted into the lagging and taped then screwed to the MDF bar across the back.

Guttering was added to the upper arms and across the back. you can also see I have mounted two head torches onto the overhead cage.

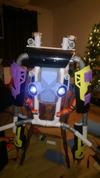
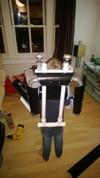
It was at this point i went a bit nuts and thought "you know what? This needs more details!" so out came the 5mm foamies and a considerable amount of time, effort and hot glue! But i think the details are worth it")
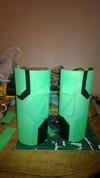
Inner forearm vent:

outer forearm details:

upper arm details:

End of Part 1 due to picture limit
So over Christmas and new year i thought a little simple project would be the order of the day. So i thought about doing an Aliens heavy lifter for my son would be the way forward.
While not strictly Halo, many of the techniques I used to construct the details have been learnt on here, so i thought I would share. In fact if it weren't for the 405th i doubt i would have thought about doing it!
The basic premise was to get a bunch of plumbing gear from the hardware store to build a frame and then use roof guttering to make the armoured parts. Then a bunch of trips to the pound shop to get lights and detailing etc. Foamies were used to add detail to the guttering to make it look more armoury. The total project was about £45 and has taken a few days due to managing kids and a cold
The back and overhead cage:
Using 1 1/4 in pipe and standard waste fitting I built the back frame and the overhead cage. I have used screws to keept he frame fix and a bit of MDF along the top of the back frame for better fixing properties for the arms.
Overhead cage is attached to the back frame up rights with a bolt to make a hinge
To make shoulder rests i used a bit of gutter made two cuts and then fired up the trusty old hot air gun! this stuff is surprisingly malleable and makes me wonder what parts of halo armour could be made out of it.
This worked pretty well, later i added foam inside and a foam collar for comfort, plus i had to add supports as the plastic gutter could not take the weight of the frame.
Forearm construction:
The forearms are straight gutter pieces, lined with foam and given a dowel handle:
After lots of consideration over complex claw like arrangements i went with something simpler. Using a short peice of 1 1/4" pipe, a bit of pipe lagging, dowels and cable ties I came up with this nice arrangement.
By pulling the cable ties the claws would close and the whole thing would fit nicely inside two bits of gutter to form a tube. A strap was added to keep it all in place.
Arms:
The upper arms were simply 1 1/4" pipe, more gutter, pipe insulation and dowel. The pipe insulation was inserted 1" into the pipes at each end and duck taped. to make the shoulder connections a dowel was inserted into the lagging and taped then screwed to the MDF bar across the back.
Guttering was added to the upper arms and across the back. you can also see I have mounted two head torches onto the overhead cage.
It was at this point i went a bit nuts and thought "you know what? This needs more details!" so out came the 5mm foamies and a considerable amount of time, effort and hot glue! But i think the details are worth it
Inner forearm vent:
outer forearm details:
upper arm details:
End of Part 1 due to picture limit
Attachments
-
 WP_20131230_002_zps7cd2c3a7.jpg48.1 KB · Views: 294
 -
 WP_20131230_003_zps665ff8fc.jpg54.1 KB · Views: 280
 -
 WP_20131231_004_zps2d0e532c.jpg47.7 KB · Views: 285
 -
 WP_20131231_003_zps5d1bb862.jpg49.4 KB · Views: 303
 -
 WP_20131231_002_zps9b940557.jpg76.5 KB · Views: 282
 -
 WP_20140101_012_zps370bb71f.jpg52.3 KB · Views: 290
 -
 WP_20131231_006_zpsc9c0fbd2.jpg53.8 KB · Views: 279
 -
 WP_20140101_007_zpsa4a6091b.jpg60 KB · Views: 310
 -
 WP_20140101_008_zps5ab6fb18.jpg54.9 KB · Views: 308
 -
 WP_20140101_016_zpsfbb40f21.jpg46.4 KB · Views: 290
 -
 WP_20140101_017_zpsb4cb374e.jpg40.7 KB · Views: 291
 -
 WP_20140101_019_zpsd5c9e1d1.jpg38.7 KB · Views: 282