Destiny Custom Warlock Helmet

Status
Not open for further replies.

Togo

New Member
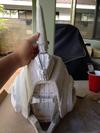
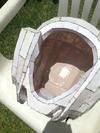
Hey guys, I'm back from college and I decided to try tackle a custom Destiny Warlock Helmet. I've got the thing pepakura'd already. It is quite tight to put on, but I can just cut away and make the neck opening bigger later. For my other helmet builds with Pepakura, I have tried to strengthen it using fiberglass and resin once, and the other time I used Rondo on the inside and just resin on the outside; both times failed to achieve what I wanted. I'm leaning towards just doing fiberglass and resin again for this helmet and hopefully doing it better this time but I'm open to any suggestions as to how to strengthen the thing and keep the details nice. Will keep you guys posted on the build.
- Togo

P.S. Here's the link for the Warlock build thread by fellow member Ghost Bear 027 http://www.405th.com/showthread.php/41579-Destiny-Warlock-Helmet-and-Pepakura-file
IMG_2453.jpg
 

Attachments

  • IMG_2451.jpg
    IMG_2451.jpg
    402.6 KB · Views: 419
Togo how do I know what pieces go together? I'm trying the same build but it's my first pep so looking at te print out sheets I'm completely lost
 
Togo I know my husband has said to do a couple of thin small layers of resin on the outside first. You should also add supports through out the interior of the peice to help give it stablity while the resin hardens. Do 1 or 2 coats of resin on the outside first, then a resin coat inside. At that point you have lots of options to choose from. They include doing a fiberglass layer, a rondo/fiberglass layer, straight rondo layer all on the interior of the piece. After that you can do rondo or bondo layers on the outside.
 
Last edited by a moderator:
Togo how do I know what pieces go together? I'm trying the same build but it's my first pep so looking at te print out sheets I'm completely lost

There should be numbers on the edge of the paper. Such as here

0C1DE7BD-B751-489F-895D-E99866B41808_zpskzrncgbo.jpg

This number is 212. There is another 212 on another piece. You just line up those tabs and glue them together.
 

Attachments

  • 0C1DE7BD-B751-489F-895D-E99866B41808_zpskzrncgbo.jpg
    0C1DE7BD-B751-489F-895D-E99866B41808_zpskzrncgbo.jpg
    51.3 KB · Views: 171
Togo how do I know what pieces go together? I'm trying the same build but it's my first pep so looking at te print out sheets I'm completely lost
HaloMaster sort of got it. under 2d menu there should be a selection to turn on Edge ID. turn that on and reprint, it will have the numbers.
 
Hey Togo,

I'm also in the middle of reinforcing my own pep of Ghost Bear's model.

When I first tried constructing a set of Mk. IV armor two years ago I'd ruined my shoulder and forearm pieces by misusing resin and bondo.
It is very important to properly mix resin and catalyst hardener.

I decided to go with resin again on this helmet but tried a few new things this time. It's working out great this time.

1. Shoot for a specific volume of resin for each attempt at coating. Take the container you'll mix resin and catalyst hardener in and fill it with four or five tablespoons of water to get an idea of how much of the container is taken up. That is how full with resin you'll want it to be before adding hardener.

2. Mix the resin and hardener thoroughly. With a proper ratio of resin to hardener you should have between 10 and 15 minutes from contact to apply resin to your pep. However, if you do not properly mix in the hardener only part of the resin will properly cure. You'll be left with a helmet regionally covered with sticky, fuming, uncured resin. Spending your first two minutes of each batch stirring away with a popsicle stick will save you from dousing the model with baby powder or ditching the whole mess. I've heard some hardeners come in dyed variations. Alternatively, you can be sure that you're done mixing in clear hardener when you no longer see lines in the resin caused by the hardener being bunched up.

3. Cover the creases on the model with resin first. The point of covering the outside of a helmet with resin is to seal it and provide some additional support for when you fill the inside with resin/fiberglass and resin/bondo/resin+bondo combination. This will prevent liquids from leaking through and ruining the outside of the helmet when you solidify the inside. The extra support is a bonus against warping should you decide to just pool a hefty amount of resin on the inside of the helmet.

I hope this helps!
 
Looks Vary clean pep work my friend. And I know your thread specifies only the helmet but would you be ever making a full suit?
 
Ashuraa spooner Thanks for the tips and advice you two, looks like I will be resining and glassing the thing after reinforcing the inside and putting on a couple thin layers of resin first. Will keep you guys posted on my progress. Artifice I want to start with the helmet and make it as perfect and detailed as can be which may take me the rest of my summer break since I'm busy with other stuff half the time, but yes, I plan on making the rest of a custom suit at some point. One of my first ever things I made was a pepakura'd full master chief suit, but I sized every piece wrong and ended up dumping the thing. For Destiny characters, I think it should be easier as well since there seems to be an equal use of clothing and armor, meaning less pep work.
 
Last edited by a moderator:
Thanks guys I'm on a start the rebuild when I get home tonight. I'll let you know how it comes out I'm hoping I can mod the design a bit to match the tengu helm
 
looking good, cant wait to see it done, I'm also working on the same helmet trying to get it done before the release
 
Hey everyone! New to the site! Great work BTW! Has anyone thought about making a pep file for a Titan Helmut or armor?
 
Hey fellow members, Togo here. Just finished rondoing the inside of the helmet for support as well as beginning to bondo the outside of the helmet. I ran out of bondo halfway through that process so I'm going to go store and grab some more later, in the meantime I started to sand it a bit. After I'm done with the bondoing and sanding, I'm going to do a final glaze coat of rondo to patch any imperfections, followed by a final sand, then detailing and paint.
- Togo
P.S. Ghost Bear 027 Here's the build I'm doing
IMG_2464_zps3a4478c8.jpg
IMG_2463_zps1173ea78.jpg
IMG_2460_zpsd160fda6.jpg
IMG_2458_zps3a08e1da.jpg
IMG_2459_zps0c925a2e.jpg
 

Attachments

  • IMG_2463.jpg
    IMG_2463.jpg
    2.5 MB · Views: 340
  • IMG_2464_zps3a4478c8.jpg
    IMG_2464_zps3a4478c8.jpg
    44.3 KB · Views: 240
  • IMG_2463_zps1173ea78.jpg
    IMG_2463_zps1173ea78.jpg
    92.4 KB · Views: 301
  • IMG_2459_zps0c925a2e.jpg
    IMG_2459_zps0c925a2e.jpg
    52.7 KB · Views: 258
  • IMG_2458_zps3a08e1da.jpg
    IMG_2458_zps3a08e1da.jpg
    102.4 KB · Views: 251
  • IMG_2460_zpsd160fda6.jpg
    IMG_2460_zpsd160fda6.jpg
    121.5 KB · Views: 235
Last edited by a moderator:
Hey, a bit of small advice from someone who learned the hard way, you should work one area at a time before starting to bondo the next. That way you don't lose where your edges are and over- or under-sand them. Otherwise it's looking great!
 
Kyre Haha thanks for the heads up. While sanding I realized that, yeah, maybe I should have done it one part at a time. Thank goodness I have a mouse sander and a dremel to save me.
 
Last edited by a moderator:
I imagine you know this, but just in case someone doesn't, make sure not to wear gloves or loose long-sleeved shirts while working with power tools, especially rotary tools like drills and dremels. They can and will catch the fabric/material of your shirtsleeve or glove and cause serious injury if you're not incredibly careful, and sometimes in spite of any caution on your part. Sorry, I'm missing my finger tip because I didn't think about that, so I make sure to let people know just in case haha...
 
Hello again everyone, just spent today sanding and sanding some more. the top parts was very easy to sand and feels very smooth. Still has occasional divots that I will go over with just a little bit of bondo to patch up. The sides of course are giving me a headache, but I just got to crank on through those. I haven't even touched the chin piece and head attachment since rondoing the inside of it haha. I don't think I will be working on it tomorrow though since I moved all my stuff indoors since there's a tropical storm coming in tonight. I'll keep you guys posted as I go.
- Togo
IMG_2470_zpsfd1b2468.jpg
IMG_2469_zps3819a32b.jpg
IMG_2467_zps45796121.jpg
IMG_2466_zps6c4b94ed.jpg
IMG_2470_zpsfd1b2468.jpg
 

Attachments

  • IMG_2469_zps3819a32b.jpg
    IMG_2469_zps3819a32b.jpg
    88.5 KB · Views: 273
  • IMG_2470_zpsfd1b2468.jpg
    IMG_2470_zpsfd1b2468.jpg
    74.6 KB · Views: 247
  • IMG_2470_zpsfd1b2468.jpg
    IMG_2470_zpsfd1b2468.jpg
    74.6 KB · Views: 255
  • IMG_2466_zps6c4b94ed.jpg
    IMG_2466_zps6c4b94ed.jpg
    56.1 KB · Views: 247
  • IMG_2467_zps45796121.jpg
    IMG_2467_zps45796121.jpg
    91.7 KB · Views: 261
  • IMG_2470_zpsfd1b2468.jpg
    IMG_2470_zpsfd1b2468.jpg
    74.6 KB · Views: 252
08/11/2014 Update: Spent about 3.5 hours sanding and spot patching small defects, progress is going great. Whole mask is getting really smooth, but I broke my mouse-sander today :( 
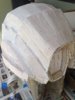
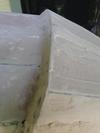
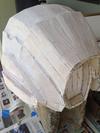
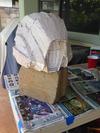
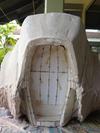
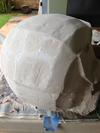
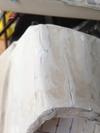
so now I have to do everything purely by hand. Going to definitely be doing some more sanding tomorrow, and if I do like how it's looking, I'll rondo glaze to smooth everything and do some final sanding. The attachments shown here, I just poured rondo inside so it's pretty hard, will be bondo detailed later. Alright, will keep you guys posted. Aloha
- Togo

IMG_2476_zps751f6d1f.jpg
 

Attachments

  • IMG_2476_zps751f6d1f.jpg
    IMG_2476_zps751f6d1f.jpg
    87.3 KB · Views: 260
Looking good mate. Definitely need to buy another mouse though. You'll never finish by hand. Well..Never is a long time, but you really ought to grab a new power sander.

My 2 cents from my build: Watch the inside grooves where that chin cup lines up with the helmet. If they get too narrow you'll have to go in and open them up a touch. Recommend you don't bondo anything inside of that space to leave enough room for the chin piece.

Also, don't be afraid to sand down through the edges of your peppakura. If you've got enough rondo inside, you won't punch through, and you'll do a good job of keeping the original shape. The pepp is a guide, and it's ok to go under and over it to get the shape you want. I most certainly went through mine at a million different points. Keep it up and looking forward to seeing how it turns out.

Final thought, be careful attaching the probe to the base. Try to get it as symmetrical as possible. The pepp isn't flat up on top of the base, so you may have to sand and groove it to get the smooth symmetrical fit you're looking for.
 
Thank you for the tips Ghost, definitely will be sanding through the pep in certain areas in order to get a better shape. And regarding the chin strap, yeah that's what I was thinking, which is why I tried to avoid putting bondo inside of it, plus it would've been hard to sand. Will keep posting pics as my progress continues.
 
Status
Not open for further replies.
Back
Top