Hey 405th,
Originally i wasn't going to post this build. I didn't take many pictures up until now... I'll do my best to explain what I've done so far.
Here's a sketch I did of the colors I'll be using.

Starting with mummifying myself with masking tape and cling wrap

I made patterns using that. also, when cutting the tape form off of you make sure you add registration so that you can tape is back together properly.
Here's my rough masking tape patterns:


Tape to clean paper patterns, all i do to clean them up is make curves more uniform and lines straighter :


From those new paper patterns I made a muslin out of old bed sheets and tweeked the pattern accordingly and the final pattern pieces are all done.
Then I started building the armor:
I don't have many pics of this process but its pretty easy to explain so...
I traced the armor pattern that I just made onto my EVA floor mats and glued the pieces together using contact cement, I've used hot glue before and I don't like how I feel rushed to put it together and then having to hold both sides together as it dries, I find its too fast and too slow at the same time :/ so contact cement works wonderfully as long as you actually let it dry before attaching the sides together. I live in canada and cant get Barge at a decent price so I used Lepage heavy duty, It's been working pretty well so far.
Adding maker lines to match up on both pattern pieces will make the final piece way closer to the original shape you're going for. I made the chest plate twice because my first pattern was super disappointing and didn't give me the shape I wanted. the pattern pic above are my final pieces that worked for me.
also, being the busty girl that I am made getting the shape more difficult than it would be for boys and flatter chested girls. To make the foam easier to shape with my heat gun I sanded off quite a bit of the texture side of the foam so its thinner and more malleable.
the patterns for the arm braces and knee pads were made quickly just my taping paper to my arm and drawing the shape i wanted. Trace those to foam, cut it out and shape it with a heat gun.
I used my Dremel a LOT. sanding the sides down, beveling, and adding some detail.
Detailing the chest piece:


grey is 1/2" foam, blue is 2mm craft foam. the black is a mesh, its the kind they use for padding on backpacks. the mesh covers all the seams. its all contact cemented down. no sewing involved just yet.
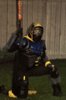
heres what it looks like after painting in its current state: blue was airbrushed on, silver was hand painted.

Pauldrons:
Same with everything else, patterned, cut, glued and shaped with a heat gun to get the nice bell shape. the detailed were also pattern in paper before getting cut out of foam. The electrical looking box thing int he pic on the right was roughly patterned and put together, it took some patience to get the curve right so that it sat on the shoulder nicely. the wires are just stripped housing electrical wires that i shoved into the box. the black is actually the texture side of my EVA foam; i shave it off pieces with my band-saw and re-glue it to add detail.


Kneepads:
All i have is the finished pic of the knee pads.. these were so easy, they took 1 night each to make.
left: The little recessed deta dremel'd in. the paint pattern was cut out of masking tape like a stencil and sponged onto it.
Right:made of 2mm craft foam. the "rivets" are nail heads that I cut off the ends and hot glued in place. not sure the pic is clear enough, but the texture was meant to look like leather, crumple tin foil up and iron in the wrinkles. pretty easy.

Bracers:
Required sewing
first i removed the texture side of the EVA foam because its the biggest pain when heat forming the foam, also i wanted them slightly thinner then they were. next i made the patterns for the detail. the fabric part is sort of quilted. i took 2 layers of that mesh and 1 layer of plain black fabric and sew'd the lines into it. then i sew'd the craft foam frame around the quilted area, trimmed the edges of the fabric and hot glued it down. it seemed more complicated than it was. i love the effect it gives though.

Stapping was all pretty routine, lots of stretchy stuff and velcro. I fit the straps to how tight i wanted them using my sewing pins and I sanded down where the straps would attach and hot glued them in place. originally the chest was going to have the under arms strapped but i couldn't figure out a way to make that invisible so i glued the sides together and cut a seam in the back since there will be a cape covering it up.
Thats it for now folks!
Questions and comments are appreciated.
Happy building")
Originally i wasn't going to post this build. I didn't take many pictures up until now... I'll do my best to explain what I've done so far.
Here's a sketch I did of the colors I'll be using.
Starting with mummifying myself with masking tape and cling wrap
I made patterns using that. also, when cutting the tape form off of you make sure you add registration so that you can tape is back together properly.
Here's my rough masking tape patterns:
Tape to clean paper patterns, all i do to clean them up is make curves more uniform and lines straighter :
From those new paper patterns I made a muslin out of old bed sheets and tweeked the pattern accordingly and the final pattern pieces are all done.
Then I started building the armor:
I don't have many pics of this process but its pretty easy to explain so...
I traced the armor pattern that I just made onto my EVA floor mats and glued the pieces together using contact cement, I've used hot glue before and I don't like how I feel rushed to put it together and then having to hold both sides together as it dries, I find its too fast and too slow at the same time :/ so contact cement works wonderfully as long as you actually let it dry before attaching the sides together. I live in canada and cant get Barge at a decent price so I used Lepage heavy duty, It's been working pretty well so far.
Adding maker lines to match up on both pattern pieces will make the final piece way closer to the original shape you're going for. I made the chest plate twice because my first pattern was super disappointing and didn't give me the shape I wanted. the pattern pic above are my final pieces that worked for me.
also, being the busty girl that I am made getting the shape more difficult than it would be for boys and flatter chested girls. To make the foam easier to shape with my heat gun I sanded off quite a bit of the texture side of the foam so its thinner and more malleable.
the patterns for the arm braces and knee pads were made quickly just my taping paper to my arm and drawing the shape i wanted. Trace those to foam, cut it out and shape it with a heat gun.
I used my Dremel a LOT. sanding the sides down, beveling, and adding some detail.
Detailing the chest piece:
grey is 1/2" foam, blue is 2mm craft foam. the black is a mesh, its the kind they use for padding on backpacks. the mesh covers all the seams. its all contact cemented down. no sewing involved just yet.
heres what it looks like after painting in its current state: blue was airbrushed on, silver was hand painted.
Pauldrons:
Same with everything else, patterned, cut, glued and shaped with a heat gun to get the nice bell shape. the detailed were also pattern in paper before getting cut out of foam. The electrical looking box thing int he pic on the right was roughly patterned and put together, it took some patience to get the curve right so that it sat on the shoulder nicely. the wires are just stripped housing electrical wires that i shoved into the box. the black is actually the texture side of my EVA foam; i shave it off pieces with my band-saw and re-glue it to add detail.
Kneepads:
All i have is the finished pic of the knee pads.. these were so easy, they took 1 night each to make.
left: The little recessed deta dremel'd in. the paint pattern was cut out of masking tape like a stencil and sponged onto it.
Right:made of 2mm craft foam. the "rivets" are nail heads that I cut off the ends and hot glued in place. not sure the pic is clear enough, but the texture was meant to look like leather, crumple tin foil up and iron in the wrinkles. pretty easy.
Bracers:
Required sewing
first i removed the texture side of the EVA foam because its the biggest pain when heat forming the foam, also i wanted them slightly thinner then they were. next i made the patterns for the detail. the fabric part is sort of quilted. i took 2 layers of that mesh and 1 layer of plain black fabric and sew'd the lines into it. then i sew'd the craft foam frame around the quilted area, trimmed the edges of the fabric and hot glued it down. it seemed more complicated than it was. i love the effect it gives though.
Stapping was all pretty routine, lots of stretchy stuff and velcro. I fit the straps to how tight i wanted them using my sewing pins and I sanded down where the straps would attach and hot glued them in place. originally the chest was going to have the under arms strapped but i couldn't figure out a way to make that invisible so i glued the sides together and cut a seam in the back since there will be a cape covering it up.
Thats it for now folks!
Questions and comments are appreciated.
Happy building