garrenfolts9
New Member
Whats up guys, I originally posted this on tumblr (same username, go check it out) so there may be some references to the site and that I apologize for. I am currently building this as of 11/23 and could use some pointers. WAYYY at the bottom I painted and it didn't come out just right, though i fel once i add the details and straps and such it should look a little better. Anyway, read on and i hope you enjoy.
SKIP AHEAD FOR TUTORIAL…or read, whatever floats your boat
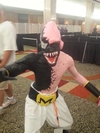
Alright…I know this sounds a little weird but hear me out. I fell in love with Attack on Titan and am a huge Destiny player. Anyway, i got the idea when i saw a blended cosplay at AWA a month ago.

I was blown away. Anyway I started thinking of blended ideas between universes and the first thing to pop to mind was Attack on Titan and Destiny. 1. They both involve a heavily populated city being on the brink of humanity. 2. The hunter cloak and the scout regimen cloak easy match and 3. For me its the best of both worlds. Destiny…Attack on Titan WHY NOT BOTH.

Anyway so I got the idea and I ordered the Scout jacket-cloak-harness. I am buying boots that are the best of both worlds as opposed to the “above the knee” boots from Attack on Titan. My plan is to wear the Jacket over the chest piece, the chest piece over and apart of the straps, and the scout cloak as a hunter cloak “I just push the front behind my shoulders and flip up the hood.” So you get the point. I currently have all the Attack on Titan pieces “minus the white pants” so last night I started making the chest piece. Below is the record of my progress.
CHEST PIECE TUTORIAL!!
So the materials I used were simple materials.
Hot glue gun ( I used high temp)
Scissors
Sharp Knife (Didn’t have a razor blade on hand (-_-) )
Used a thick sharpie
and well foam of course.
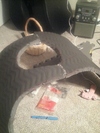
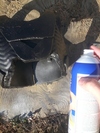
So in the build (which is still currently in progress) I used, am using two types of foam. A very thick foam used to put gym equipment on (shown below) and the generic EVA foam (shown above).

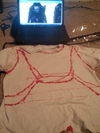
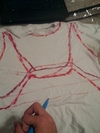
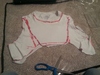
The reason i used the thicker foam was because…well…..it was on sell. I just happened to be at Academy Sports and saw the packs of 3 for 9.99$ and dammit i just had to use it. Well it turned out to be a b****. Though in the end I liked the thickness because it made it feel as if i was wearing real armor and made it look more legit. Instead of it looking like cardboard it actually looks like well..armor. Anyway i started with a white T-shirt and drew the outline of the armor itself.

I screwed a few times, but just outlined the right lines in blue….ish

The I put on the shirt and made sure the measurements, once they were, to cutting it is.

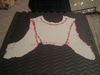
Yayy, cut shirt. Then i put it on the board to outline the foam cut out.

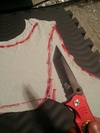
I used pins to hold down the shirt, and proceeded to use this very sketchy knife to cut out the foam.

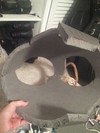
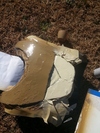
Ba bam, the front piece of the foam chest piece.

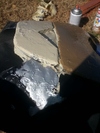
After that i used the front piece as a template for the back piece, but i just filled in the cut outs to fit the back properly. Once that was cut, i hot glued the ends together to make the shoulder straps.

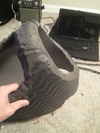
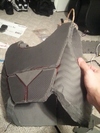
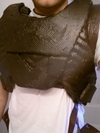
Yes, it all looks sloppy, but give it time. Anyway once that was finished drying I went ahead and started hot gluing the bottom pieces together to complete the chest/back piece.

After the base of the piece was finally finished, I cut the back about 3/4 of the way up so that I could actually get inside of it (I will be putting straps back there eventually once they come in the mail) So after that was finished I took a dremel to it to smooth the edges to more of a triangular edge so it looks as though it is resting against the body.

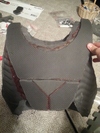
Once again, I know it looks ****ty right now, but once its covered in plasti dip and bed liner, it should look pretty good. So once that was finished i need to add the front design piece. This is where the thinner foam came in handy.

Then just like the same process as before, traced and cut, then glued it down.


I left the center piece separate ( no not iron man style) but because in the Hunters Armor there’s design in the center of the triangle. That I will do later.

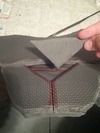
The final pieces I added went along the inside of the arm holes. This is pretty simple, just 2 long pieces of foam bent and glued inside.

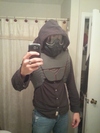
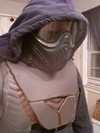
This is what is done so far- The hood is just a regular hoodie, and the paintball mask is one of my old ones. I am using another mask for the hunter helmet but this is just the one I had on hand. I am painting tomorrow and will try to keep everything updated.


After finishing the frame of the chest piece I decided to use Flex-Seal not only to cover up some blemishes but also hold it together better.

What it looks like after it finished drying (also over the 3d maneuvering harness)

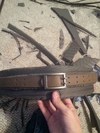
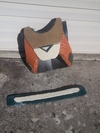
While that Flex seal was drying I went ahead and made the Hunter belt piece. Its very simple so I wasn’t very worried about it. I just used 2 long pieces of foam and cut holes in the end to slide the belt through.


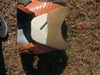
Once that was out of the picture I headed back to working on the Chest Piece. Once the Flex-seal was finished i then took a metallic silver spray paint and covered the front with it. After that dried i applied the Plasti-Dip (double layered with it) This gives a better matte black look and is easier to paint. Also, the silver coat is for if/when it scrapes, it will look as if the material underneath is actually metal, due to the fact that Plasti-Dip does peel fairly easily.

Time to paint. I used tape to seal off the unwanted painted areas and used a piece of cardboard to make the paint spray more precisely .


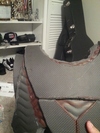
Below is what I ment when I said the plasti-dip peels easily, especially when using tape. Yeah it was a bummer but an easy fix. (I just reapplied the spray.)

Anyway, using the same process I finished painting the rest of the piece and belt.


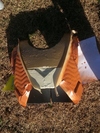
Finished product after drying.

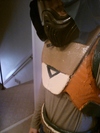
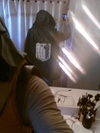
Shut up…i know it looks a tad bit sloppy, though once everything comes together it shouldn’t be so bad. So i finished the painting and was ready to try it on. In the pictures you will see the cloak, which is the same as the one you order from Amazon (The attack on Titan Scout Cloak) All i did was pin the cloaks sleeves or front part or whatever the hell its called back in order to make it look like the hunter cloak.


The things missing are the scarf to hold the cloak right, the details on the armor itself, pants, Attack On Titan jacket, knee pads, wasn’t wearing the straps, helmet, and boots.
So the one thing I forgot to talk about was THE SUIT ITSELF. I still have not decided exactly what I am going to do. Mainly with how i am going to implement the jacket. I have the large that fits regular so i could put it underneath but it doesn’t feel right, so as of right now i am waiting to get an xxl to put over it. (Would fit like the Ranger armor cloak from Fallout. New Vegas) I am also still working on knee pads, mask, possibly shoulder pads, and (as said before) I have to add the straps on the chest and belt, along with decals on the chest piece. I will keep updating as i go though I cant say when part 3 will be out. So..yeah. stay tuned, and if you have any ideas message me or do whatever. Fairly new to Tumblr so I am not sure how to communicate other than posts. Sorry, but thanks for reading.
SKIP AHEAD FOR TUTORIAL…or read, whatever floats your boat
Alright…I know this sounds a little weird but hear me out. I fell in love with Attack on Titan and am a huge Destiny player. Anyway, i got the idea when i saw a blended cosplay at AWA a month ago.
I was blown away. Anyway I started thinking of blended ideas between universes and the first thing to pop to mind was Attack on Titan and Destiny. 1. They both involve a heavily populated city being on the brink of humanity. 2. The hunter cloak and the scout regimen cloak easy match and 3. For me its the best of both worlds. Destiny…Attack on Titan WHY NOT BOTH.
Anyway so I got the idea and I ordered the Scout jacket-cloak-harness. I am buying boots that are the best of both worlds as opposed to the “above the knee” boots from Attack on Titan. My plan is to wear the Jacket over the chest piece, the chest piece over and apart of the straps, and the scout cloak as a hunter cloak “I just push the front behind my shoulders and flip up the hood.” So you get the point. I currently have all the Attack on Titan pieces “minus the white pants” so last night I started making the chest piece. Below is the record of my progress.
CHEST PIECE TUTORIAL!!
So the materials I used were simple materials.
Hot glue gun ( I used high temp)
Scissors
Sharp Knife (Didn’t have a razor blade on hand (-_-) )
Used a thick sharpie
and well foam of course.
So in the build (which is still currently in progress) I used, am using two types of foam. A very thick foam used to put gym equipment on (shown below) and the generic EVA foam (shown above).
The reason i used the thicker foam was because…well…..it was on sell. I just happened to be at Academy Sports and saw the packs of 3 for 9.99$ and dammit i just had to use it. Well it turned out to be a b****. Though in the end I liked the thickness because it made it feel as if i was wearing real armor and made it look more legit. Instead of it looking like cardboard it actually looks like well..armor. Anyway i started with a white T-shirt and drew the outline of the armor itself.
I screwed a few times, but just outlined the right lines in blue….ish
The I put on the shirt and made sure the measurements, once they were, to cutting it is.
Yayy, cut shirt. Then i put it on the board to outline the foam cut out.
I used pins to hold down the shirt, and proceeded to use this very sketchy knife to cut out the foam.
Ba bam, the front piece of the foam chest piece.
After that i used the front piece as a template for the back piece, but i just filled in the cut outs to fit the back properly. Once that was cut, i hot glued the ends together to make the shoulder straps.
Yes, it all looks sloppy, but give it time. Anyway once that was finished drying I went ahead and started hot gluing the bottom pieces together to complete the chest/back piece.
After the base of the piece was finally finished, I cut the back about 3/4 of the way up so that I could actually get inside of it (I will be putting straps back there eventually once they come in the mail) So after that was finished I took a dremel to it to smooth the edges to more of a triangular edge so it looks as though it is resting against the body.
Once again, I know it looks ****ty right now, but once its covered in plasti dip and bed liner, it should look pretty good. So once that was finished i need to add the front design piece. This is where the thinner foam came in handy.
Then just like the same process as before, traced and cut, then glued it down.
I left the center piece separate ( no not iron man style) but because in the Hunters Armor there’s design in the center of the triangle. That I will do later.
The final pieces I added went along the inside of the arm holes. This is pretty simple, just 2 long pieces of foam bent and glued inside.
This is what is done so far- The hood is just a regular hoodie, and the paintball mask is one of my old ones. I am using another mask for the hunter helmet but this is just the one I had on hand. I am painting tomorrow and will try to keep everything updated.
After finishing the frame of the chest piece I decided to use Flex-Seal not only to cover up some blemishes but also hold it together better.
What it looks like after it finished drying (also over the 3d maneuvering harness)
While that Flex seal was drying I went ahead and made the Hunter belt piece. Its very simple so I wasn’t very worried about it. I just used 2 long pieces of foam and cut holes in the end to slide the belt through.
Once that was out of the picture I headed back to working on the Chest Piece. Once the Flex-seal was finished i then took a metallic silver spray paint and covered the front with it. After that dried i applied the Plasti-Dip (double layered with it) This gives a better matte black look and is easier to paint. Also, the silver coat is for if/when it scrapes, it will look as if the material underneath is actually metal, due to the fact that Plasti-Dip does peel fairly easily.
Time to paint. I used tape to seal off the unwanted painted areas and used a piece of cardboard to make the paint spray more precisely .
Below is what I ment when I said the plasti-dip peels easily, especially when using tape. Yeah it was a bummer but an easy fix. (I just reapplied the spray.)
Anyway, using the same process I finished painting the rest of the piece and belt.
Finished product after drying.
Shut up…i know it looks a tad bit sloppy, though once everything comes together it shouldn’t be so bad. So i finished the painting and was ready to try it on. In the pictures you will see the cloak, which is the same as the one you order from Amazon (The attack on Titan Scout Cloak) All i did was pin the cloaks sleeves or front part or whatever the hell its called back in order to make it look like the hunter cloak.
The things missing are the scarf to hold the cloak right, the details on the armor itself, pants, Attack On Titan jacket, knee pads, wasn’t wearing the straps, helmet, and boots.
So the one thing I forgot to talk about was THE SUIT ITSELF. I still have not decided exactly what I am going to do. Mainly with how i am going to implement the jacket. I have the large that fits regular so i could put it underneath but it doesn’t feel right, so as of right now i am waiting to get an xxl to put over it. (Would fit like the Ranger armor cloak from Fallout. New Vegas) I am also still working on knee pads, mask, possibly shoulder pads, and (as said before) I have to add the straps on the chest and belt, along with decals on the chest piece. I will keep updating as i go though I cant say when part 3 will be out. So..yeah. stay tuned, and if you have any ideas message me or do whatever. Fairly new to Tumblr so I am not sure how to communicate other than posts. Sorry, but thanks for reading.
Attachments
-
 tumblr_inline_nf9xo4WUSs1s744vh.jpg206.3 KB · Views: 794
 -
 tumblr_inline_nf9xwaGJ461s744vh.gif302.2 KB · Views: 343
 -
 tumblr_inline_nf9yjaAhAC1s744vh.jpg174.2 KB · Views: 249
 -
 tumblr_inline_nf9yvfANem1s744vh.jpg168.4 KB · Views: 264
 -
 tumblr_inline_nf9yw2c73f1s744vh.jpg156.7 KB · Views: 272
 -
 tumblr_inline_nf9z0zLOXr1s744vh.jpg133 KB · Views: 264
 -
 tumblr_inline_nf9z1aLzOD1s744vh.jpg116 KB · Views: 341
 -
 tumblr_inline_nf9z1fJBKj1s744vh.jpg189.2 KB · Views: 300
 -
 tumblr_inline_nf9z1mhyxk1s744vh.jpg182.6 KB · Views: 273
 -
 tumblr_inline_nf9zadI0D71s744vh.jpg196.5 KB · Views: 265
 -
 tumblr_inline_nf9ze3NGle1s744vh.jpg178.3 KB · Views: 285
 -
 tumblr_inline_nf9zkmvOhC1s744vh.jpg166.6 KB · Views: 277
 -
 tumblr_inline_nf9znwTdVo1s744vh.jpg183.2 KB · Views: 286
 -
 tumblr_inline_nf9zq6MoF31s744vh.jpg198.9 KB · Views: 455
 -
 tumblr_inline_nf9zqhsCJv1s744vh.jpg223 KB · Views: 250
 -
 tumblr_inline_nf9zqrShx01s744vh.jpg198.8 KB · Views: 275
 -
 tumblr_inline_nf9zw50y0w1s744vh.jpg217.5 KB · Views: 284
 -
 tumblr_inline_nfa00xYU0m1s744vh.jpg174.8 KB · Views: 519
 -
 tumblr_inline_nfa018TZVc1s744vh.jpg212.3 KB · Views: 326
 -
 tumblr_inline_nfghmtNMju1s744vh.jpg267.6 KB · Views: 280
 -
 tumblr_inline_nfghteCfSs1s744vh.jpg198.5 KB · Views: 283
 -
 tumblr_inline_nfghx7Tw191s744vh.jpg202.8 KB · Views: 279
 -
 tumblr_inline_nfghxyrr4y1s744vh.jpg228.9 KB · Views: 329
 -
 tumblr_inline_nfgi2qgrH01s744vh.jpg247 KB · Views: 287
 -
 tumblr_inline_nfgi80mLlB1s744vh.jpg248 KB · Views: 266
 -
 tumblr_inline_nfgi8flkKU1s744vh.jpg238.8 KB · Views: 263
 -
 tumblr_inline_nfgiayCrA31s744vh.jpg176.1 KB · Views: 254
 -
 tumblr_inline_nfgidwhmd31s744vh.jpg282.3 KB · Views: 278
 -
 tumblr_inline_nfgieyR0OI1s744vh.jpg178.5 KB · Views: 270
 -
 tumblr_inline_nfgiguLL8v1s744vh.jpg214.7 KB · Views: 261
 -
 tumblr_inline_nfgimtGtzg1s744vh.jpg159 KB · Views: 270
 -
 tumblr_inline_nfgimz8l7A1s744vh.jpg187.8 KB · Views: 244
 -
 tumblr_inline_nfgin7tr111s744vh.jpg164.7 KB · Views: 226