Duke's Half-life 2 Metrocop Helmet Pep w/photos

Status
Not open for further replies.

PerniciousDuke

RCO & BCO
405th Regiment Officer
Member DIN
S128
Hey all,

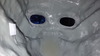
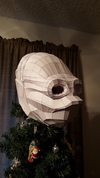
You may remember this photo from my Venator thread...
20160109_161104_zpshyz2r1pb.jpg

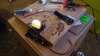
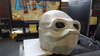
And again here, resined..

20160110_113355_zps6ufvoskc.jpg

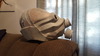
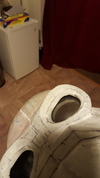
Well I've finally had a chance to get working on it. I've just finished the bondo phase.
20160310_102127_zpsxonkmchf.jpg

20160310_102105_zpsqm9xgkyd.jpg

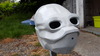
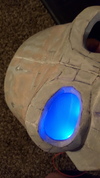
Next step will be figuring out how to get the eyes to light up. I've been given a link from a member and I'll give proper mention to them when I start working through the tutorial.

This file is the one from the archive, created by rundown . Many thanks!
 

Attachments

  • 20160109_161104_zpshyz2r1pb.jpg
    20160109_161104_zpshyz2r1pb.jpg
    642.9 KB · Views: 2,447
  • 20160110_113355_zps6ufvoskc.jpg
    20160110_113355_zps6ufvoskc.jpg
    322 KB · Views: 1,690
  • 20160310_102127_zpsxonkmchf.jpg
    20160310_102127_zpsxonkmchf.jpg
    240 KB · Views: 687
  • 20160310_102105_zpsqm9xgkyd.jpg
    20160310_102105_zpsqm9xgkyd.jpg
    239.4 KB · Views: 605
Thank you for the compliments Kyre and hopkins77 !

Progress!


(for reference: APH4002.jpg )

I'm trying different things here based on this tut http://xrobots.co.uk/IM6/index_lights.html Corweena shared with me a while back.
This video also shows the same process https://www.youtube.com/watch?v=SHcH60giVys


First up is a silver mirror sunglass lens with the mesh on it (and a clear safety glass lens on top). This one didn't light up very well and I'm guessing it's because of the curve of the plastic. Even still, I think it looks really stylish with the "bubble" effect.

20160331_215245_zpsijpesdhf.jpg

So I went out and bought a plastic storage bin and cut out two pieces to get the flat plane for the mesh. The result was a fairly well lit up eye though feels a little lacking being flat. I could see through it alright, but I'm still curious to see what it is like with both eye holes lit up. Stay tuned.

20160331_215357_zps9oetzp8c.jpg

Next I'm going to try using EL Wire instead of the LEDs to see if I can get a more even glow.
 

Attachments

  • 20160331_215357_zps9oetzp8c.jpg
    20160331_215357_zps9oetzp8c.jpg
    574.8 KB · Views: 536
  • 20160331_215245_zpsijpesdhf.jpg
    20160331_215245_zpsijpesdhf.jpg
    463.9 KB · Views: 540
Sanding your LEDs, or modifying their tops, can also give you a more diffused output. Maybe doing that and moving the LEDs to the inner and outer corners of the eyes will give you the effect you're looking for?
 
Sanding your LEDs, or modifying their tops, can also give you a more diffused output. Maybe doing that and moving the LEDs to the inner and outer corners of the eyes will give you the effect you're looking for?

Yeah, good idea. I've been just using hot glue to diffuse the lights, they also came with plastic diffusers I haven't tried. It's tough because I can't have it so diffused that it doesn't light up the eye, but if it's too bright then you can't see out. :/ Someone is going to give me an led strip to play around with. After that I'll try moving to the inner and outer corners.

The EL Wire was not bright enough to light up the fabric. So I will try to perfect the LED method (after trying the LED strip).
 
Frosted leds (or clear leds giving a little sanding) will help somewhat with diffusing, but in my experience not _that_ much. You'll still have clear "light origin spots" which is exactly what you're looking to prevent, am I right ?

Could you make a picture of the inside of the helmet so I've an idea of how you're trying look through the eyes ? It it "just" a viewport (so open holes as big as the eyes themselves ?) or are they more like "holes" behind those lenses ?

I think the method used here
could very well be adapted to your situation.

OR you could try an EL panel instead of an EL Wire. Puncture it to create viewports in the EL panel itself. But EL's have a couple of drawbacks :
1) light performance is not very good, certainly not comparable to even a "normal" mainstream led
2) most EL convertors generate a buzzing noise that drives me up the walls.
3) compared to simple leds, they tend to be more costly.

So actually I'm saying "drop EL solutions unless you've no other choice". :) And even then, they might not turn out enough light anyhow.
 
Last edited by a moderator:
Thanks kaween ! Sorry for the delayed response.

You'll still have clear "light origin spots" which is exactly what you're looking to prevent, am I right ?
Yes. But, putting the lights on the two corners might at least make the origin spots look more natural than how I have them now with both on the bottom.


Could you make a picture of the inside of the helmet so I've an idea of how you're trying look through the eyes ? It it "just" a viewport (so open holes as big as the eyes themselves ?) or are they more like "holes" behind those lenses ?
I will try. The eyeholes are about as big as the lens of a pair of safety glasses. One of the downsides with this helmet is how far away the eyeholes are from the face. It makes vision difficult even without the lights.

I think the method used here
could very well be adapted to your situation.
Crap! I forgot to give credit to the member who showed me the tutorial and the link and now I accidentally deleted the PM. :facepalm I'll figure it out soon... But yes, that is pretty much exactly the method I used although your video link would have been very helpful. :) I choose not to use that many LEDs because of how far away the eyeholes are from the face. I'm curious what looking through that iron man helmet is like.. those eyes are so bright!

So actually I'm saying "drop EL solutions unless you've no other choice". :) And even then, they might not turn out enough light anyhow.
Yeah, I'll stick with the LEDs. I didn't even have good luck with the LED strip either. I was not able to easily direct the light in the appropriate direction, at least not with the room I had.

I will post more pics this weekend!
 
Last edited by a moderator:
Man, it's been awhile since I've had even an hour to build. :( My roommate had to take medical leave which means I had to take a second job and keep up the house. He's getting a lot better already.

I had to detour from the electronics for now. The progress was too slow. So I've moved on to the gas mask attachment pieces.

I've got them pepped and ready to resin and rondo this week. I wanted to show how I decided to attach them. This is also similar to what I was recommending to daviduffy for the attachment pieces on his FO stormtrooper. The idea is for a solid attachment that can be unattached for easy storage. The gas mask pieces are awkward and I didn't want them to get snapped off for some reason.

I cut a keyway into the pep piece, one hole the size of a bolt's head (or washer) and the center hole the size the bolt's thread. Once the pep was glued together, I could then insert the bolt into the slots and epoxy into place. You can see the completed process with the piece on the left. There is even a big enough hole left for me to pour the rondo in. With just the paper form it is very secure. I am confident that this will work perfectly once I resin the outside and rondo the inside. *Be sure to tape up the threads so that you don't get anything in them*

20160509_201410_zpsn749hbvt.jpg

I bought washers and wing nuts to secure the pieces from inside the helmet.

I really want to wrap this thing up so I will be posting progress soon. :)
Thanks for reading!
 

Attachments

  • 20160509_201410_zpsn749hbvt.jpg
    20160509_201410_zpsn749hbvt.jpg
    147.9 KB · Views: 583
Hah, I totally forgot about this build. Aiming to have a ready made helmet in your 2016 X-mas tree perhaps ?
Then again, the chances you wouldn't be ready for the Half Life 3 launch are non-existant so there's no rush (oooooh evil me. :D )

Seriously now : did you have plans for a complete outfit or will it be "just" the metro cop helmet ?
 
Half Life 3 launch
So mean. :p lol.

Seriously now : did you have plans for a complete outfit or will it be "just" the metro cop helmet ?

It's for my younger brothers who are going off to college this year. Yes, whole costume (but I'm only making the helmet), the other one will be Gordan Freeman for 2016 Halloween. I'll try to get a pic of them from it. They have put together some pretty good halloween costumes in the past. My favorite was when they went as Vash and Wolfwood from Trigun.


*Update*

The resin and rondoing are coming along great. Tonight I will sand them down a little and bondo to get a nice round look. I also got up the courage to work on the lights again. I've decided to just go the standard route of string LEDs along the bottom. I only had 10 blue ones, so it will be five per side. Thanks to this youtube video, I was able to solder them up in record time and they even look nicer than any lights I've done. The video is a bit long, but better to have too much information than not enough.
 
20160516_221541_zpsvh4vuru9.jpg
Kyre and kaween .. I took both of your advisements, in part. I went with more LEDs along the bottom and I added the diffusers. I am happy with the result. Now to figure out how to attach the electronic eye piece mess without making more of a mess.

When I add the second strand of 5 leds (and one resistor) to the same 9volt battery will it dim all the lights or just drain the 9volt? Or would I have to add another resistor to dim them? That will be a shorter term goal before I fit them in because they are a tad too bright.
 

Attachments

  • 20160516_221541_zpsvh4vuru9.jpg
    20160516_221541_zpsvh4vuru9.jpg
    435.8 KB · Views: 599
When I add the second strand of 5 leds (and one resistor) to the same 9volt battery will it dim all the lights or just drain the 9volt? Or would I have to add another resistor to dim them? That will be a shorter term goal before I fit them in because they are a tad too bright.


Putting identical strings in parallel causes all strings to run on the same voltage, you're "splitting the current" there to speak in laymens terms so basically if you build identical strings and stay within specs, the only thing that will change is the running time that will become shorter.

Mind you, running a _lot_ of leds from a 9V block isn't the brightest thing to do. A 9V is good for "a couple of leds for a very long time" or "a lot of leds for quite a bit less time". Depending on how long you're shooting for in terms of running time, you might consider redesigning it to work from a 4.5 or 5V source (3xAAA or a USB PSU), or combine 2Xboxes of 3xAA's in series which would give you 9V's without recalculating anything.


as a bonus a USB 5V brick ( power bank ect ) puts out a FLAT 5V till its dead and that makes math a snap... ya dont have to account for batt droop.
 
... Absolutely and 100% correct.

And strange as that may sound, that may be seen as an advantage as well as a disadvantage.

If you have a situation where you'd prefer "all off" instead of slowly dying, the USB pack will do that for you : this could be very important if you're running other extra stuff from such a pack like some action camera's for example which do not take too kindly when it comes to variations on their loading port.

On the other hand, if you don't have the possibility of having a quick visual check on the batterystatus because it is under the helmet liner or whatever, the "dying of the light" can actually work for you as a battery status indicator of course.
I run my helmet fans from the same pack as the lights, on my kids' helmets there was no easy way to hide the battery pack AND have the wearer allow a check on the status while wearing it, so I found the "slowing down of the fans" actually a good thing.

It all depends on what you're aiming to achieve or what the needs and expectations of the user and the implemented hardware is, and how good you've tested your setup prior to using it.
I mean : I've come across people using some kind of circuit/battery combo who've NO IDEA how it will perform in real life before stepping onto the convention floor with their stuff, only to find their fans go down to zero after half a day or something. Even if you wouldn't have visual access to the battery status of a USB power pack, you SHOULD have a notion of how long the stuff works on a full pack. Once you know that, even the missing of an indicator could be lived with.

PS : it looks unsuspectinly creepy with just one eye lid. :D
 
I really appreciate the input guys. I am not very battery savy. I'm getting better. But the skinny is that I have like 30 9V batteries and I need to use them up. Lol. I also can't really do the math because I purchased the lights and resistors together in bulk and neither came with any numbers.. easiest kind of math.

I'm not worried too much about run time. The light up eyes are a novelty and hard to see out of so I don't imagine them on for long periods of time. My main concern is trying to get the brightness down a little atm. Each string of lights has a small resistor on them and I am thinking I will add a larger resitor to the main positive line to help slow it down. Also I will check at the shack because my co-worker mentioned a tiny voltage dial that you can get that can help me easily dial the brightness down a bit.
 
And we have attachments!
20160518_184723_zpsp9f1divz.jpg

I've also finished the hardware part of the light up eyes. Now I've just to figure out how to install them. I've been suggested caulking, but I've also seen some putty type stuff in visor tutorials that I might try to find again. Also, I did install a larger resistor at the beginning of the positive lead and that seems to have done the trick of dimming the lights down.
20160518_172157_zps4jgrnveq.jpg

So far the biggest challenge with setting them in is space. Not a lot of room, especially on the outside bottom corners of the eyes.
20160518_172320_zpss3zrvbln.jpg
Kinda looks like a creature from DOOM! Lol.
 

Attachments

  • 20160518_172320_zpss3zrvbln.jpg
    20160518_172320_zpss3zrvbln.jpg
    111.2 KB · Views: 510
  • 20160518_172157_zps4jgrnveq.jpg
    20160518_172157_zps4jgrnveq.jpg
    187.7 KB · Views: 457
  • 20160518_184723_zpsp9f1divz.jpg
    20160518_184723_zpsp9f1divz.jpg
    184.2 KB · Views: 456
Well this sucks.. I went to go paint the helmet with a brand new bottle of spray paint and I dropped the can while I was shaking it. Hit the gravel and poped open like a can of soda! I hate wasting money so I tried to just use the paint as it sprayed out. Looks like it worked, but I might as well have just dumped a bucket of paint on the helmet. I haven't had much success with sanding paint to make it look nicer, but it seems I will need to refine that skill here in the next few days. :facepalm

20160526_193629_zpsoyyzhhjw.jpg
 

Attachments

  • 20160526_193629_zpsoyyzhhjw.jpg
    20160526_193629_zpsoyyzhhjw.jpg
    148 KB · Views: 460
Wet sanding with a high grit sand paper will make it super smooth. The more water, the better. I've had huge success with this on primer and it ends up super smooth and glassy. The helmet looks amazing though.
 
Status
Not open for further replies.
Back
Top