Props Duke's (Skookum's) Reach Target Locator

Status
Not open for further replies.

PerniciousDuke

RCO & BCO
405th Regiment Officer
Member DIN
S128
I got a little surprise during Turbo's last visit to the States... It's a 3d-Printed Halo Reach Target Locator!!!
HReach_-_Target_Locator.png

We don't have many "finishing-a-3d-print-walkthroughs" so I thought I'd post my progress on this one. The goal is for Vancouver Fan Expo Feb 15th. (One Month)

First step is to clean up the print. (the real first step is determining if your print is PLA or ABS. Mine is PLA. If yours is ABS then my techniques may not work for you.)

Take a craft knife and start knocking off all the support pieces to make as clean of edges as you can.

20200107_203459.jpg

You may need to sand (or file) some of those edges due to imperfections, heavy saturation lines, or just to make them flat. I also sanded down the fake screws so I can add real screws later.

20200108_101252.jpg

Sanding plastic creates pretty crazy burrs. You can grab your craft knife again to cut them away. I recently picked up a Metal Deburring Tool and think it makes pretty quick work of it.

20200108_102212.jpg


UP NEXT

Before gluing I'm going to see if I can plan out any electronics I might want to add to this guy.
 
Last edited:
Annnnd imma just comission a Halo Reach DMR from ya, no rush
:) sadly Zach, I don't know how to make my 3d printer work! I didn't print this. I know Misriah Designs on Facebook has a H5 DMR file.

If I may ask, where did you get the model for the Target Locator?
I got it from the guy in the post just above this one. :D

Progress:

I was able to glue the big pieces together using 5_minute Epoxy. I can't glue more until I'm able to install some electronics and other doodads.

20200108_214709.jpg

As it stands, the target locator works pretty well!
20200109_205704.jpg
20200109_205918.jpg
TARGET AQUIRED


also, I've moved my deadline to Jan 24th
 
Last edited:
Always glad to creep you out Sean Anwalt :p

. Update:

I've been able to start smoothing out the print. There are still things to glue together, but I want to install the electronics. And it's much easier to sand when there are less things to worry about, such as lights and lenses.

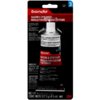
I prefer the 3m spot putty approach for smoothing medium to large 3d prints. It's $4-$6 and one tube can do a helmet. Two tubes can do an AR plus leftovers. I hit it once with 320 grit sandpaper and I think it sands very quick and easy. Only downside is I get covered in pink dust.
ddf46d91-347c-4c45-a0be-3928a6e5f3b2_1.b6eec62f1e2e90b37204a6e6e7cbd092.jpeg


First, I put a dollop on a flat surface and just spread it around with my fingers. After a few minutes the excess will dry on your finger making it hard to spread evenly. I just get new gloves or wash/dry my hand.
20200112_111401.jpg

Once spread evenly it will look like this.
20200112_112501.jpg


Keep doing this until the entire this is done. Took me about 40 minutes for this prop.
20200112_113528.jpg


I like to keep tooth picks handy so I can scrape out any details I might be losing while it is still wet.
20200112_130220.jpg20200112_142840.jpg

Now with plenty of 320 grit sandpaper you can sand every surface smooth. This can take a little longer. For this weapon about an hour or more.

You're going from this rough rusty color to this smooth powdery pink color in just a few quick passes with the sand paper.
20200115_205446.jpg20200115_205458.jpg

I like to leave some pits in it and some unsanded spots in tight areas. These can be painted to look like scratches or dirt and grime.

Up next, installing electronics and the lenses. I also have some weird ideas for spinning knobs.
 
Last edited:
Here's the latest update:

I drilled a 3/4" hole on the bottom to install a round rocker switch. I also drilled a hole through the side so that a light could be inserted into that cylinder eyepiece. One problem I had was that the interior frayed, leaving me with no clean hole to shove the wires through. Solution I bought a 3/4" x 2" pvc connector into the frayed hole. It is now a nice clean channel from one side of the locator to the other.

So I put a green light for the optical lense and a white light for the display panel. Yes, I soldered the connection straight to the battery. I can always fix it later when I get more battery connecters.
20200204_103716.jpg
20200204_103723.jpg

Up next I dusted off the makeshift vacuum former. Popped out a few lenses and they work just fine!
20200204_103646.jpg20200204_103653.jpg
20200204_103742.jpg20200204_103802.jpg
 
I made a spinny knob!!! It's moments like these that make me feel like a very successful dork.
20200205_163428.jpg

So, probably a better way to do this but here is what I did...

First acquired a bearing and a drill bit with the same diameter as the bearing ID. I cut the shank off the drill and lock tited the shank stub inside the bearing.
20200205_103201.jpg

Then I epoxy puttied around the bearing to adhere it to the 3d printed knob. I didn't want to use anything too liquidiy in fear of freezing the bearing. With the rest of my drill bit I drilled a hole and superglued my knob into the hole!
20200205_163416.jpg
 
Status
Not open for further replies.
Back
Top