edwardjlw's Halo 4 Master Chief - Scratch build

Status
Not open for further replies.
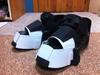
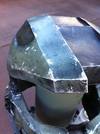
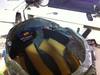
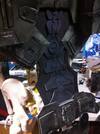
Had a couple spare hours and decided to throw together some boots. I really like how they turned out - they look good, and because I built the boots using an old pair of running shoes as a base, they're very comfy and just slip right onto my foot :) I realised after I finished them that I will have to mask off the actual shoes when I paint the armour plating green, but that shouldn't be an issue anyway.


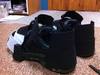
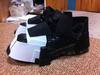
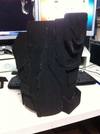
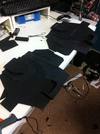
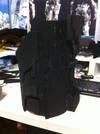
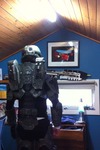
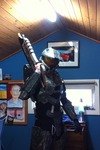
Anyway here they are:

IMG_0344_zps4f78de67.jpg


IMG_0345_zps35e7efc0.jpg


IMG_0346_zps1b65a5aa.jpg


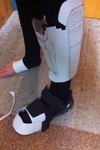
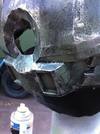
The running shoes they are based on had some slick looking patterns on them already, which I left showing on the un-plated parts of the boots.

IMG_0347_zps958987c9.png


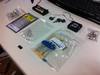
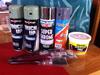
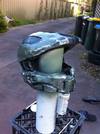
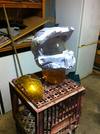
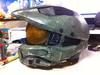
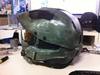
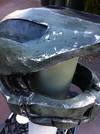
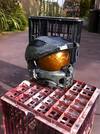
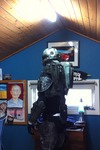
And on an unrelated side note, the electronics for my helmet have all arrived, except for my other battery holder. Not sure why that one's taking so long.

IMG_0348_zps23294762.jpg


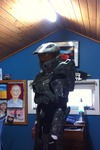
That's all for now, I'm hoping to buckle down and finish the left thigh this weekend. Once that is complete, I will just have to assemble the right leg, then the building phase will be over (save for some minor detailing and modifications of earlier pieces). Thanks for takin a look :)
 

Attachments

  • IMG_0344_zps4f78de67.jpg
    IMG_0344_zps4f78de67.jpg
    117.5 KB · Views: 184
  • IMG_0348_zps23294762.jpg
    IMG_0348_zps23294762.jpg
    87.3 KB · Views: 191
  • IMG_0347_zps958987c9.png
    IMG_0347_zps958987c9.png
    1.4 MB · Views: 189
  • IMG_0346_zps1b65a5aa.jpg
    IMG_0346_zps1b65a5aa.jpg
    111.5 KB · Views: 164
  • IMG_0345_zps35e7efc0.jpg
    IMG_0345_zps35e7efc0.jpg
    110 KB · Views: 184
Time for a minor update.

I'm slowly nearing the end of actually putting the armour together and I'll begin resining soon. Until then, I have to finish the right leg, as well as a few touch ups on the pieces I've already done.
I spent a good 4 or so hours today working on the thighs, I think they're shaping up pretty well. The left one is complete, and the right one is in the process of being assembled as I type this. I'm really satisifed with the detail in this piece, especially the thicker bits of foam which give the armour a bit more depth and complexity. Anyway here it is:

IMG_0360_zpsb021b320.jpg


IMG_0368_zps807b0c9f.jpg


IMG_0352_zpsfeb21bdf.jpg


Here's what they started as.

And finaly I found this pic and thought I might as well post it here, I think this is the old helmet but whatever

IMG_0277_zpse0f729b3.png


I've gotta say I really love working with foam. If I ever do an ODST build down the track (or even something outside the halo universe D: ) I'd love to have a crack at an all foam build.

Anyways that's all for now, hoping to be finished building by next weekend :)
 

Attachments

  • IMG_0360_zpsb021b320.jpg
    IMG_0360_zpsb021b320.jpg
    64.5 KB · Views: 182
  • IMG_0277_zpse0f729b3.png
    IMG_0277_zpse0f729b3.png
    1.1 MB · Views: 183
  • IMG_0352_zpsfeb21bdf.jpg
    IMG_0352_zpsfeb21bdf.jpg
    98 KB · Views: 187
  • IMG_0368_zps807b0c9f.jpg
    IMG_0368_zps807b0c9f.jpg
    82.4 KB · Views: 178
Kamatize, I should have clarified; I intended to have all the armour pieces built this weekend, ready to resin by next week. There's no way the whole build will be finished (much as I'd like it to be ;) )

Woooh! Currently waiting on the first layer of resin on my helmet to cure! First time I've worked with the stuff, but it seemed to go smoothly. I also slapped some resin on a quick test piece of foam and hot glue, to see how it interacts with these. I've heard horror stories of peoples work falling apart because the resin melted the hot glue D: . Quick question, I was using a respirator at all times, though I could still pick up the smell of the resin. Was just wondering if this is normal, or something to be worried about. Sorry this might sound dumb but I'm very paranoid about this stuff.

Anyway, while it's curing I figured I can make some progress on the rest of the suit. I'm planning to get started on either the assault rifle or magnum this weekend (probably the magnum) and I intend to scratch build both of them. I'm actually quite keen for this as I've made quite a few prop weapons before. There's also some bits of armour here and there that I want to modify slightly. The biceps and shoulders, in particular, need a little work building up a bit more depth. Oh. And the knee pads. I'd better get those done as well. Can't have Master Chief dawdling around without anything covering up his knees D: Anyway once these are done they'll be ready to glass next week when the holidays start.

Will hopefully get some pics up tomorrow or Monday when the helmet's glassed and the armour's done, so I guess I'll see you then :cool
 
Time for a big update

IMG_0533_zps2afb0b94.jpg


The helmet's complete!

Here it is, the finished helmet. Hard to believe that this time last week the helmet was a just flimsy paper model. I'm really pleased with the way it's turned out, especially the paintjob. The photos really don't really do it justice IMO, but what can you do? Let me know what you think of my first ever halo bucket ;)

First I had to pick up some supplies

IMG_0440_zps53f75133.jpg


Then I moved on to resin, fibreglass and body filler. This was my first time working with this stuff, and I was amazed how stiff the fibreglass gets.

IMG_0442_zps9535ec18.jpg


IMG_0455_zps73d79d11.jpg


I was really excited when it came time to start painting. I may be a newbie at halo armour, but painting is something I'm real comfortable with. I began with primer, followed by 2 coats of the base green colour. I then did a black wash all over, scuffing and smudging with an old rag. finaly I dry-brushed all the metallic paint around the edges to give it that worn look. I mean, the Master Chief's saved the galaxy on numerous occasions, right? So I wanted his experience to show in the armour

IMG_0495_zpsd7ab0259.jpg


IMG_0497_zps459249bd.jpg


IMG_0498_zpsf15cab63.jpg


IMG_0499_zps1910a837.jpg


IMG_0533_zps2afb0b94.jpg


IMG_0541_zps33b5a90c.jpg


IMG_0536_zpsa9a111ae.jpg


And then there was LIGHT! I went for blue LEDs for style rather than clear, but they're still quite bright.

IMG_0537_zpseaf75e55.jpg


A bit of an insight into the wiring and padding. The LEDs are all wired in a parallel circuit with they're own switch, while the fan in the front of the helmet is wired to the same power with its own switch.

IMG_0540_zps4ef56e63.jpg


Also, the school holidays have arrived! Hopefully I'll have enough time to get this armour finished over the next two weeks, but there's no rush.

So, where do I stand with rest of the build? Well, the helmet's now completed. The torso has been fibreglassed, and the second main coat of paint is drying at the moment. Tomorrow I'll weather and detail the torso, and also split it and install the buckles and padding (if I have enough). As far as I'm aware, the helmet is the only piece of the Halo 4 suit with lights. At some stage in the next few days I'll be able to fibreglass the remaining pieces and will paint them throughout the week. I also have the templates for my assault rifle and magnum ready to print.

On a final note, only 49 days until supanova. :D Thanks for looking
 

Attachments

  • IMG_0440_zps53f75133.jpg
    IMG_0440_zps53f75133.jpg
    123.5 KB · Views: 183
  • IMG_0442_zps9535ec18.jpg
    IMG_0442_zps9535ec18.jpg
    86.3 KB · Views: 189
  • IMG_0533_zps2afb0b94.jpg
    IMG_0533_zps2afb0b94.jpg
    148.6 KB · Views: 179
  • IMG_0497_zps459249bd.jpg
    IMG_0497_zps459249bd.jpg
    100.2 KB · Views: 180
  • IMG_0499_zps1910a837.jpg
    IMG_0499_zps1910a837.jpg
    118.6 KB · Views: 176
  • IMG_0495_zpsd7ab0259.jpg
    IMG_0495_zpsd7ab0259.jpg
    121.3 KB · Views: 177
  • IMG_0455_zps73d79d11.jpg
    IMG_0455_zps73d79d11.jpg
    108.8 KB · Views: 176
  • IMG_0541_zps33b5a90c.jpg
    IMG_0541_zps33b5a90c.jpg
    99.7 KB · Views: 182
  • IMG_0536_zpsa9a111ae.jpg
    IMG_0536_zpsa9a111ae.jpg
    97.1 KB · Views: 186
  • IMG_0498_zpsf15cab63.jpg
    IMG_0498_zpsf15cab63.jpg
    128.3 KB · Views: 180
  • IMG_0533_zps2afb0b94.jpg
    IMG_0533_zps2afb0b94.jpg
    148.6 KB · Views: 186
  • IMG_0540_zps4ef56e63.jpg
    IMG_0540_zps4ef56e63.jpg
    92.8 KB · Views: 190
  • IMG_0537_zpseaf75e55.jpg
    IMG_0537_zpseaf75e55.jpg
    87.2 KB · Views: 187
  • IMG_0533_zps2afb0b94.jpg
    IMG_0533_zps2afb0b94.jpg
    148.6 KB · Views: 163
this build is motoring along mate! Loving the helmet! ...still cant believe you built that chest piece out of card.
 
Update timmme! :D

So, before I start, I'd like to say that I had this entire post typed out, then chrome crashed. And Auto save... ugh... didn't save... sad face

Anyway, time for some good news! I've got all the armour done, including paint! Yay! At the moment, I am fitting the armour to my body, filling it with padding and whatnot. I also put together a simple belt system to hold the thighs in place. Once all this is done I'll begin work on the undersuit. On top of all this, I've been working on my AR as a fun little side project. Wow. I've been busy O_O

Anyway, here's some pictures of me wearing the armour. Sorry for the poor quality, I'll shoot some decent pics in good light when this things done, I promise!

IMG_0652_zps12f394c2.jpg


So uhh... obviously that's not me in the suit... moving on...

IMG_0725_zps3f679c2b.png.html
IMG_0726_zps83b6deed.png


IMG_0728_zpsa2921696.png
IMG_0735_zps4c452244.png


IMG_0738_zps8fee458c.png.html
IMG_0740_zps9e928afd.png.html


IMG_0741_zpsb8f50e9f.png
IMG_0743_zpse9a5ae03.png.html


IMG_0745_zps05a865ef.png
IMG_0750_zps9c5e913c.png


The Assault Rifle seen in these pics can be seen in more detail! Click here!

IMG_0752_zps54699c58.jpg


A close up of the spine, templates were requested so I'll get some up for everyone to use if they wish

IMG_0753_zps90b9b9ae.jpg


The thighs, with the belt attached

So, that's all for now. Tomorrow I'll try and finish up fitting the suit, and maybe even begin on the undersuit. Also would like to finish my AR.

Until next time guys :)
 

Attachments

  • IMG_0652_zps12f394c2.jpg
    IMG_0652_zps12f394c2.jpg
    120 KB · Views: 158
  • IMG_0726_zps83b6deed.png
    IMG_0726_zps83b6deed.png
    1.1 MB · Views: 161
  • IMG_0728_zpsa2921696.png
    IMG_0728_zpsa2921696.png
    1.1 MB · Views: 162
  • IMG_0735_zps4c452244.png
    IMG_0735_zps4c452244.png
    1.1 MB · Views: 175
  • IMG_0741_zpsb8f50e9f.png
    IMG_0741_zpsb8f50e9f.png
    1.1 MB · Views: 157
  • IMG_0753_zps90b9b9ae.jpg
    IMG_0753_zps90b9b9ae.jpg
    113.5 KB · Views: 165
  • IMG_0752_zps54699c58.jpg
    IMG_0752_zps54699c58.jpg
    96.9 KB · Views: 158
  • IMG_0750_zps9c5e913c.png
    IMG_0750_zps9c5e913c.png
    1.1 MB · Views: 165
  • IMG_0745_zps05a865ef.png
    IMG_0745_zps05a865ef.png
    1.1 MB · Views: 174
this build is absolutely amazing man :D the level of detail here is waaayyy up there with the pro's :D btw, reckon you could through up a diagram or something of how you got your helmet wired? i just picked up some stuffs myself from jaycar, but its been forever since i did electronics and im in need of help :)
hope your ready for Supanova :D im hoping to have mine done for next years Supanova, and the Comicon headed to NSW :D

happy building man!
 
Thanks man, it means a lot :)

In regards to diagrams, I'd be happy to draw some up, but I'll have to wait till tomorrow, I'm a little on the tired side right now and I don't wanna screw it up haha :)
 
Wow this looks really Good . I am very impressed with your foamwork. I like your visor but it looks like you used some kind of spray paint on the inside . if visibility is an issue you could try using krylon looking glass paint on the visor which would give it a mirror-like effect and the color would just be the color of the plastic of the visor. I have seen some videos that have proved looking glass' effeciency .
 
Thanks everyone for the feedback, it really helps keep me motivated :)

No big update, just posting some wiring diagrams and spine templates for those that requested them :)

First up, here are the wiring diagrams. Not the neatest things but they give you an outline of what I did. Keep in mind there are a lot of factors that will affect which bits of electronics you will use and how it will be wired up, so take this as a general guide (I used 4 x 3.2V Blue LEDs, each with it's own 68 ohm resistor, a battery pack holding 3 x 1.5V AA batteries, and a 5V fan). Everything is wired up as a parallel circuit.

IMG_0760_zpsc1ac6ee7.jpg
IMG_0761_zps8326457d.jpg


The first pic's a bit of a general guide (note: with only one LED wired up, more can be added in a similar fashion). The second pic is a somewhat "proper" wiring diagram. Here is a link to a website for figuring out the resistance required for your setup.

Next up, the spine templates. I freehanded the pieces then traced the template, as such these won't be 100% accurate. This is more of a combination of accuracy and what I think looks cool, but it looks very similar to the actual spine detail seen of the back of the chief. I had someone request these but I thought I'd just post em here. Keep in mind the templates are just a basic outline, so you will have to add detail yourself, but if you look at the picture of what I came up with it's pretty easy.

P4-Halo4SpineTemplatebyedwardjlw_zps4c79e9b0.jpg
P1-Halo4SpineTemplatebyedwardjlw_zps15e4b344.jpg


So that's all for now. If you have any questions about any of this I'd be happy to help. Hopefully someone can make good use out of these things. :)
 

Attachments

  • IMG_0760_zpsc1ac6ee7.jpg
    IMG_0760_zpsc1ac6ee7.jpg
    90.6 KB · Views: 160
  • P1-Halo4SpineTemplatebyedwardjlw_zps15e4b344.jpg
    P1-Halo4SpineTemplatebyedwardjlw_zps15e4b344.jpg
    70.7 KB · Views: 163
  • P4-Halo4SpineTemplatebyedwardjlw_zps4c79e9b0.jpg
    P4-Halo4SpineTemplatebyedwardjlw_zps4c79e9b0.jpg
    83.6 KB · Views: 147
  • IMG_0761_zps8326457d.jpg
    IMG_0761_zps8326457d.jpg
    66 KB · Views: 151
Good to see another fellow Australian on the site. Great build, looking forward to seeing your progress.
 
PERFECT!! those diagrams simple as they are, are exactly what i needed :D thanks man!! maybe ill PM you and you can get my switches working for me :p

@Levity - Sup Sydney Sider :D
 
Hey guys! Just a quick update on my progress!

First of all, I just wanted to bring something up. I was looking through the threads in the noob forum and saw that my post had gone down from a 5 to 3 star rating. No biggie, everyone has their own opinions. But I looked further, and the thread only had two ratings. One had to be a five star, which means to get an average of three, someone would have had to have rated my thread as one star (terrible). Now, that's fine, everyone's entitled to their own opinion and such, but if you are going to call my piece of work that I have poured hours of my time into "terrible", I would appreciate it if you at least had the decency to tell me what was wrong so that it could be improved. I appreciate feedback, but if you don't tell me what's wrong, how can I make my work better? :)

Now that that's out of the way, progress will be a little slower from now on. I'm now back at school and as such study and assignments take first priority. I'm also going away next weekend and will not be able to do any work on the suit. The rowing season's also starting back up, which takes up a significant chunk of my life. To make matters worse, I just ordered GTA 5 -_- .

Anywho, I still have 3 weekends before Supanova (excluding the one I'm away) and I'm confidant I should be able to finish before then. All that's left is to do my undersuit. I found a piece of mesh with a nice hexagonal pattern, which I will use as a stencil to spray on the pattern to the fabric of my undergarments. From there, I will sew it together with foam and other fabrics to achieve the look of the halo 4 undersuit (Well, that's the plan, here's to hoping it all works out). Apart from this I will have to spray up my Assault rifle. If I have time, I'm also hoping to get my magnum done, but getting the costume done takes first priority :)

Officially less than one month until my deadline, wish me luck guys :D . Let's hope I can pull this thing off!
 
This is very impressive! And to think cardboard is and option too! How did you get it to look accurate when you put it on, I mean up to scale.
 
Wow, haven't been to over to look at this build in a while... And man does it look good! When I first saw your build, I seriously questioned to use of cardboard, as it can get really flimsy or bad looking when it's painted, and if it isn't done right you can still see the texture. Looking at it now, I can't even tell parts of it are cardboard. It's looking great, and I hope you have a good time at supernova. Keep up the good work!
 
Status
Not open for further replies.
Back
Top