Hello all!
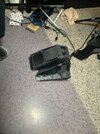
I've been roaming around the forum for the past couple months and decided to take a shot at making a MK V(b) suit out of foam over winter break in December. After about a week and a half of work I managed to create one bicep that turned out like this:


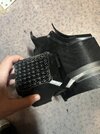
I got frustrated with not being able to cut the right angles in the foam to get everything to line up causing me to go through a lot of foam, so I decided to invest in a 3D printer. I bought a used original CR-10 (I knew what I could be getting myself into by going used and by getting an old printer from 2017) because I didn't mind having to upgrade or fix stuff since that would only provide me with more knowledge on the ins and outs of the printer. Took me about a month to get everything working flawlessly so that I could do multi-day prints without issue. Anyways, enough about that! I decided to use PETG (specifically Overture PETG) for this build because of its higher heat resistance and strength as compared to PLA+. I made sure to install an bi-metal heatbreak so I wouldn't be releasing any toxic fumes from the PTFE bowden tube at the higher temps that PETG requires.
I started off by scaling everything using Armorsmith Designer (which I would highly recommend any person gets that is going to be building a suit of armor, even though it is $40, as it'll save a lot of headache and time) and came up with this the first image below. The forearm might look too small but I used blender to create a more "accurate" representation of my forearm by taking multiple circumference measurements of my forearm at different parts and then scaled a cylinder at the same places in blender, as shown in the second image below. I used this and the forearm 3d model to find a more accurate scale to make sure it was going to be right the first time so I didn't have to reprint. I also took the time to come up with the color design for my spartan using blender and the SpartanPack.


After scaling everything I began by printing the left knee first, since it is one of the smallest prints and was going to print in a short amount of time. I spent quite a while trying to make sure the supports were going to behave properly and come off easily since I was going to be using tree supports in OrcaSlicer. The nozzle impacted the top of the knee (you can see it in the upper right as a little divot in the primer because I forgot to take photos of a lot of parts before sanding and/or priming) after the print finished because I had the end gcode in the slicer set up wrong. I fixed that issue real quick lol. After the knee I started to print the bicep which took a little more than 24 hours. The bicep came out pretty much perfect and was scaled pretty well I think. Next I printed the left forearm, which took a little over 22 hours to print. This one also came out looking basically perfect and was scaled well.


I decided to then start sanding them down and to hit them with filler primer to get rid of the print lines while I was printing the left shin. I hit them with 120 grit by hand and also using a detail sander with 100 grit that I bought at harbor freight. I had bough a 3M organic vapor and particulate filter half-mask respirator to use while applying contact cement for the foam I originally planned to use so I used it while sanding to protect myself from the sanding dust. Once again, I forgot to take pictures of what the parts looked like after sanding and before priming but I'll make sure I do when I print the right side pieces. After the shin finished (which took just under 44 hours) I sanded that but I haven't gotten around to priming it yet because I plan on trying a method I saw on YouTube for mixing Bondo spot putty and acetone and then spray painting it on to smooth out imperfections before the filler primer. The shin came out with quite a few spots where the printer decided to under-extrude and not completely fill the wall near the end of the walls (everywhere you can see the red spot putty).


Next up was the left thigh! This print came out better than the shin that was before it. I managed to get rid of the under-extruded wall issue. I was never really ever to figure out what it was lmao. It magically fixed itself by switching to a different profile with the exact same settings. After the thigh it was time to embark on the physically largest part of the armor, the chest piece! I split the chest into 8 pieces (my naming scheme is whether it is top or bottom half first, front or back half second, and left or right half last) since the CR-10 has a decently large build volume. I am currently printing the left half first and have printed the bottom front left, bottom back left, and top back left. I am currently about 1/3 of the way through printing the top front left piece.
The pieces printed so far have turned out pretty good except for some weird issue where on very shallow inclines there was what appeared to be flaking on top of the print looking matte. If anybody has any recommendations on how to fix that go right ahead, any help would be appreciated! I have already sanded down 2 of the pieces as I was trying to see if the aforementioned artifacts are easily removable and it appears that they are physically raised a slight bit compared to their surrounding areas.


For anybody that read through the entirety of this post, thank you so much! I tried to split it into sections that I thought weren't too long to read to hopefully make it easier. Future posts should be a bit shorter") . To end off this post, I have a few questions for anybody that would like to answer:
. To end off this post, I have a few questions for anybody that would like to answer:
1. What glue would you recommend for gluing together PETG pieces, such as chest pieces and possible the helmet.
2. What type of paint would you use? I have read of people using latex housepaint on this forum and others using rattlecan paints. I have access to an HVLP spray paint gun and was wondering if anyone would have any recommendations on if I could get better results using that and paints that come in cans.
3. How do you sand in very tight spots where your fingers won't reach? There are some spots that need to be sanded down prior to priming because they have little blobs sticking off the surface.
Thanks!
I've been roaming around the forum for the past couple months and decided to take a shot at making a MK V(b) suit out of foam over winter break in December. After about a week and a half of work I managed to create one bicep that turned out like this:
I got frustrated with not being able to cut the right angles in the foam to get everything to line up causing me to go through a lot of foam, so I decided to invest in a 3D printer. I bought a used original CR-10 (I knew what I could be getting myself into by going used and by getting an old printer from 2017) because I didn't mind having to upgrade or fix stuff since that would only provide me with more knowledge on the ins and outs of the printer. Took me about a month to get everything working flawlessly so that I could do multi-day prints without issue. Anyways, enough about that! I decided to use PETG (specifically Overture PETG) for this build because of its higher heat resistance and strength as compared to PLA+. I made sure to install an bi-metal heatbreak so I wouldn't be releasing any toxic fumes from the PTFE bowden tube at the higher temps that PETG requires.
I started off by scaling everything using Armorsmith Designer (which I would highly recommend any person gets that is going to be building a suit of armor, even though it is $40, as it'll save a lot of headache and time) and came up with this the first image below. The forearm might look too small but I used blender to create a more "accurate" representation of my forearm by taking multiple circumference measurements of my forearm at different parts and then scaled a cylinder at the same places in blender, as shown in the second image below. I used this and the forearm 3d model to find a more accurate scale to make sure it was going to be right the first time so I didn't have to reprint. I also took the time to come up with the color design for my spartan using blender and the SpartanPack.
After scaling everything I began by printing the left knee first, since it is one of the smallest prints and was going to print in a short amount of time. I spent quite a while trying to make sure the supports were going to behave properly and come off easily since I was going to be using tree supports in OrcaSlicer. The nozzle impacted the top of the knee (you can see it in the upper right as a little divot in the primer because I forgot to take photos of a lot of parts before sanding and/or priming) after the print finished because I had the end gcode in the slicer set up wrong. I fixed that issue real quick lol. After the knee I started to print the bicep which took a little more than 24 hours. The bicep came out pretty much perfect and was scaled pretty well I think. Next I printed the left forearm, which took a little over 22 hours to print. This one also came out looking basically perfect and was scaled well.
I decided to then start sanding them down and to hit them with filler primer to get rid of the print lines while I was printing the left shin. I hit them with 120 grit by hand and also using a detail sander with 100 grit that I bought at harbor freight. I had bough a 3M organic vapor and particulate filter half-mask respirator to use while applying contact cement for the foam I originally planned to use so I used it while sanding to protect myself from the sanding dust. Once again, I forgot to take pictures of what the parts looked like after sanding and before priming but I'll make sure I do when I print the right side pieces. After the shin finished (which took just under 44 hours) I sanded that but I haven't gotten around to priming it yet because I plan on trying a method I saw on YouTube for mixing Bondo spot putty and acetone and then spray painting it on to smooth out imperfections before the filler primer. The shin came out with quite a few spots where the printer decided to under-extrude and not completely fill the wall near the end of the walls (everywhere you can see the red spot putty).
Next up was the left thigh! This print came out better than the shin that was before it. I managed to get rid of the under-extruded wall issue. I was never really ever to figure out what it was lmao. It magically fixed itself by switching to a different profile with the exact same settings. After the thigh it was time to embark on the physically largest part of the armor, the chest piece! I split the chest into 8 pieces (my naming scheme is whether it is top or bottom half first, front or back half second, and left or right half last) since the CR-10 has a decently large build volume. I am currently printing the left half first and have printed the bottom front left, bottom back left, and top back left. I am currently about 1/3 of the way through printing the top front left piece.
The pieces printed so far have turned out pretty good except for some weird issue where on very shallow inclines there was what appeared to be flaking on top of the print looking matte. If anybody has any recommendations on how to fix that go right ahead, any help would be appreciated! I have already sanded down 2 of the pieces as I was trying to see if the aforementioned artifacts are easily removable and it appears that they are physically raised a slight bit compared to their surrounding areas.
For anybody that read through the entirety of this post, thank you so much! I tried to split it into sections that I thought weren't too long to read to hopefully make it easier. Future posts should be a bit shorter
. To end off this post, I have a few questions for anybody that would like to answer:1. What glue would you recommend for gluing together PETG pieces, such as chest pieces and possible the helmet.
2. What type of paint would you use? I have read of people using latex housepaint on this forum and others using rattlecan paints. I have access to an HVLP spray paint gun and was wondering if anyone would have any recommendations on if I could get better results using that and paints that come in cans.
3. How do you sand in very tight spots where your fingers won't reach? There are some spots that need to be sanded down prior to priming because they have little blobs sticking off the surface.
Thanks!