You are using an out of date browser. It may not display this or other websites correctly.
You should upgrade or use an alternative browser.
You should upgrade or use an alternative browser.
Energy Sword pep build
- Thread starter VectorArt
- Start date
- Status
- Not open for further replies.
Welcome! I'm very interested to see how you do with this. Make sure to ask any questions, guys like Chernobyl troll these parts all the time and they have a heap of knowledge.
First build I'm putting together on here
Keep you updated as I go pep file is from here but cannot remember the name ( will look next time I'm on pc)
Can't wait to see how this turns out for you! are you gonna do lights on it also?
Can't wait to see how this turns out for you! are you gonna do lights on it also?
That's the plan trying a few new things to see how she goes getting some led strips and going to try hide switches in handle with cables hopefully got some carbon fiber vinyl coming in from a friend so be interesting to see how it comes when I'm not working lol
Nice! Building it for fun or making armor to go with it? ")
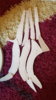
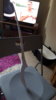
Something to help you in pep'ing: in the Settings drop down menu, there's an "Other Settings" option, there's a check box that says Hide a certain type of fold, basically the ones that assist when gluing. Unchecked that before printing and you will be able to make those slight creases to keep it from bunching up like it is in your photo.
Edit: if that's too confusing to understand, I'll take a picture for you later of what I'm talking about.
Edit: if that's too confusing to understand, I'll take a picture for you later of what I'm talking about.
Something to help you in pep'ing: in the Settings drop down menu, there's an "Other Settings" option, there's a check box that says Hide a certain type of fold, basically the ones that assist when gluing. Unchecked that before printing and you will be able to make those slight creases to keep it from bunching up like it is in your photo.
Edit: if that's too confusing to understand, I'll take a picture for you later of what I'm talking about.
Ah thanks man I've had a look and I see what you mean I didn't know that was there!! Deffo a big help
I have noticed a fair bit of bunching but just assumed that it was me I've been having a play with some ideas and I'm hoping to use this as a bit of a test run to see how it plays out if Ithe works I'll do another one spending a lot more time with putting it tougher instead of busting through to see how it goes lol
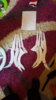
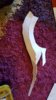
So I managed to build one side but it's looking a lol off centre so gives me an idea were I'm going and has been a great piece to start with I'm thinking I'll follow Lt shiny sides advice and go back to basics again and continue on from there
^_^ starting again just means I can try again to make it perfect
Ps ignore the TV she never gives me the remote lmao
^_^ starting again just means I can try again to make it perfect
Ps ignore the TV she never gives me the remote lmao
Attachments
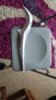
Looking good so far. Is that Scott Bakula on the tv? He's looking rough!
Welcome! I'm very interested to see how you do with this. Make sure to ask any questions, guys like Chernobyl troll these parts all the time and they have a heap of knowledge.
"Troll", you say? I prefer 'lurk' or 'prowl', 'trolling' has such negative connotations.
Regardless - this is an interesting project. Are you building the base form from Pepakura, with an aim to vacuum-form a clear copy later on?
"Troll", you say? I prefer 'lurk' or 'prowl', 'trolling' has such negative connotations.
Regardless - this is an interesting project. Are you building the base form from Pepakura, with an aim to vacuum-form a clear copy later on?
i had a few lil thoughts and vacuum-form was something i looked at but i was looking at maybe using worbla trans-art to make two halves of the blades using the pepakura as the base then removing the pep (hopefully still in one piece) to have the clear halves which then i could place electronics inside and seal it up but at the moment im just having a play with it.
this is the first time i've really looked into going all out and designed myself a plan of action so im hoping come this time next year i'll have everything fully built Alas until our moving day im without anywhere to fibre glass *heart broken* still great opportunity to try new things
(and also trollin nahha son we gruntin hahahaha - its okay i'll show myself out)
(and also trollin nahha son we gruntin hahahaha - its okay i'll show myself out)
Aghh, the cringe is too much to ignore.
Shame on you.
Anyway, out of interest, can someone explain this worbla thing to me? I thought it was just plastic for vacuum forming.
Thanks.
Aghh, the cringe is too much to ignore.
Good, good! Let the tacky comments flow through you!*exits Emperor Palpatine....*
A place where my tackiness is encouraged I'M HOME!
Worla is a thermo plastic I think the best way to explain this is think of just a big ol roll of paper that when you heat up becomes shape-able and moldable then when it cools down becomes a solid plastic.
There is a cos player who makes loads of videos about it kamui cosplay not halo but pretty damn cool.
I didn't realise the flood of comments I'd get on this post
https://www.cheapassgamer.com/uploads/profile/photo-334507.png?_r=0
Please follow the link for the gift of a grunt doing the peanut butter jelly dance
https://www.cheapassgamer.com/uploads/profile/photo-334507.png?_r=0
Please follow the link for the gift of a grunt doing the peanut butter jelly dance
You sir... you sir, have made Monday great again!
You sir... you sir, have made Monday great again!
Haha I'm glad I could help hoping to get some of the other side done tonight while trying to convince misses to start my other secret project *enter some dramatic music*

- Member DIN
- S2424
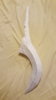
people are following......believe me......its almost the end of the school year and a lot of the members are of that age bracket. The rest are either working or stay home parents.......That last piece looks like 1/2 of the Eye of Ra for some reason.....don't know where that came from but your build is coming along great.
- Status
- Not open for further replies.