Fallout New Vegas, NCR Veteran Ranger Armor

Status
Not open for further replies.
Saw the words Duct and Tarp, my mind instantly translated them to "Duct Tape".

This build is turning out great! I've noticed that there's not a really accurate replica of the game's .357 in airsoft. However, I have seen these that look pretty close.
 
Big update!

First up,
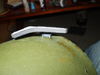
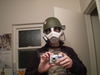
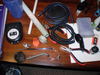
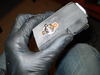
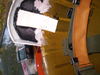
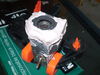
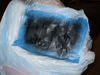
a shot of some of the junk i thought may be useful for the 'details' of the helmet and mask.
(btw, i shared this costume on the bethesda official forums, Joshua Sawyer, the lead designer and project director of the fallout new vegas game gave me a fine compliment about it, so i've been extra motivated)
PA100595.jpg


i decided to try out gluing my pep files directly onto plastic and bandsaw cutting them.. not a bad result in the end, but extra sanding required to removed the paper later.

PA100596.jpg

i also began work on part of the right ear piece.
PA100597.jpg

and used a heat gun to heat a strip of plastic against the ear, and helmet, to create a support for some extra insurance it doesnt break off.
PA110614.jpg


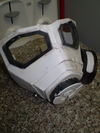
and i've finished the left ear blub, which i don't seem to have a shot of right now.. it was half a clear Christmas bauble. (tis the season?)
i may add some holes into it do i don't get noise bouncing around as much inside the mask.
PA110613.jpg


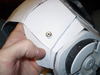
ive made a sort of headset cable that will come out from the right earset, and plus into the mask around the right lower cheek.
it's got a piece of metal tubing around a small part of it to make it look more "natural" and actually a piece of existing tech.
PA110604.jpg


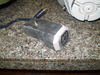
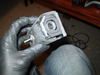
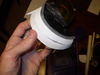
this is the makings of the larger camera on the side of the helmet.
PA110606.jpg

the switch could potentially work, and there is a plastic lens in the front of the camera.. if someone were to give me some advice on how to rig a simple LED setup connected to this switch, then i could easily have a working light for it.
to go with the eyes.

PA110607.jpg


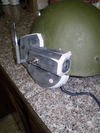
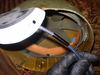
i've taken a wireless network ariel and added a telescopic "thingy" to it, for the helmets ariel.

PA110608.jpg


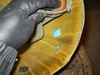
slapped some bondo on the camera to improve the design, will wait for it to cure and then trim it down to a nicer shape.
PA110611.jpg


i'm a fan of striking the iron when it's hot, or rther, trimming the bondo when it's not yet hard.. with what you say? these handy tools.
PA110612.jpg

see bondo gets slowly harder (like i'm waiting for over a half hour right now for it to set enough that i can trim away at it like clay) my choices are, trim now or sand alot more later..

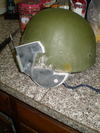
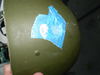
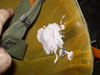
speaking of bondo.. denting a fiberglass helmet liner is not possible.. i tested this by giving it a god few whacks with a ballpeen hammer with no effect.. other than my wife laughing at me..

so i took a knife to the area, and cut a hole, as well as taped it over for my plan..
PA110605.jpg


i slapped a bunch of bondo into the hole, from the inside.

PA110609.jpg


and then pushed the other side of the hole a little with my finger.
no idea if this will work, but hopefully it will make a good looking dent in the helmet.. i feel like a post apoc bobba fett..

PA110610.jpg
 

Attachments

  • PA100595.jpg
    PA100595.jpg
    93.9 KB · Views: 248
  • PA110608.jpg
    PA110608.jpg
    75.4 KB · Views: 240
  • PA110607.jpg
    PA110607.jpg
    96.2 KB · Views: 278
  • PA110606.jpg
    PA110606.jpg
    67.6 KB · Views: 245
  • PA110604.jpg
    PA110604.jpg
    76.7 KB · Views: 251
  • PA110613.jpg
    PA110613.jpg
    40 KB · Views: 250
  • PA110614.jpg
    PA110614.jpg
    107.8 KB · Views: 270
  • PA100597.jpg
    PA100597.jpg
    41.4 KB · Views: 241
  • PA100596.jpg
    PA100596.jpg
    53 KB · Views: 245
  • PA110610.jpg
    PA110610.jpg
    52.3 KB · Views: 250
  • PA110611.jpg
    PA110611.jpg
    63.9 KB · Views: 237
  • PA110612.jpg
    PA110612.jpg
    38.1 KB · Views: 241
  • PA110605.jpg
    PA110605.jpg
    125.7 KB · Views: 250
  • PA110609.jpg
    PA110609.jpg
    114.9 KB · Views: 257
now i've been planning on going for the colt single action route for my armaments.. but you know.. i've always liked the NCR flag..

PA110598.jpg

why buy one though.. when you can buy two, and cut the head off one, to stitch to the other!
PA110599.jpg


now, i need to add the lettering too.. i considered taking a few letters from the cut up flag, but i decided to use a test piece and see how well painters tape works on a flag, when you use that rubber paint plastidip spray.
PA110600.jpg

no bleed whatsoever!
PA110601.jpg


so lets use this knowledge for practical .. practice.
PA110602.jpg


needs some dirt, and bullets holes, tattered edges and such.. but i really like this, and it was very fast and very easy to do.
i could easily make more.

PA110603.jpg
 

Attachments

  • PA110599.jpg
    PA110599.jpg
    77.2 KB · Views: 254
  • PA110600.jpg
    PA110600.jpg
    77.5 KB · Views: 222
  • PA110602.jpg
    PA110602.jpg
    73.6 KB · Views: 239
  • PA110601.jpg
    PA110601.jpg
    59.6 KB · Views: 242
  • PA110598.jpg
    PA110598.jpg
    44.5 KB · Views: 246
  • PA110603.jpg
    PA110603.jpg
    47.4 KB · Views: 439
YEAH! That flag is sick!

Thanks for the input regarding laying the paper onto plastic. I was thinking that would be the way I would go.

This build is looking great Sir.
 
Awesome man! I didn't even know California's flag even looked remotely LIKE the NCR flag. This is going to be SO sweet.
 
i think ohio has the coolest shape, california has the coolest design.. or at least it does in fallout ;)

got abit of a cold, so i've been slowing down.
as well as doing crack filling and making sure the seems between pieces seem seemless :lol
starting work on the main extension on the helmet.

PA120617.jpg


this is a shot much later in the progress, where i had extended the ear set on the right, and been adding alot of edges to places.
i would have posted afew more shots, but i was focusing on fighting my headache and doing the work, rather than photos at the time. so i plumb forgot.
PA120618.jpg


i drilled a hole in the headset for the ariel, but decided i didn't like the location, filled it with bondo, sanded it down, once it's painted, you wont be able to tell.
but the new location for the ariel is much better.
it has two joints of rotation, so it can be positioned in any direction or angle within it's half sphere of movement.
mostly it will be upright or just slightly to the side.

PA130621.jpg


you may notice the video cable running out of the headset, well it plugs into the cheek of the mask.
PA120619.jpg

a few more details have been added to the mask here. including some scratches and the weird dent that is on the right hand side of most of the pictures.

PA130620.jpg


the camera box has been trimmed and spruced up, it's just about ready for an LED.

PA130622.jpg


i've yet to decide if i should have the entire camera box removable, with earth magnets, or just have the battery pack thread through a hole in the helmet, and keep the battery on the inside of the helm.
but for now, it slides into place, and unless i shake it around a bunch, the camera box wont fall out.
PA130623.jpg


the headset fits pretty snug against the rest of the mask, if i add some black foam, after the paint job you wont be able to tell it's two separate pieces.

two shots, one with, one without flash, couldn't decide which to share, since ones alittle fuzzy.. so heres both.
oh, and that idea for the dent? worked out fine.
PA130624.jpg
PA130625.jpg
 

Attachments

  • PA120617.jpg
    PA120617.jpg
    57.8 KB · Views: 220
  • PA120618.jpg
    PA120618.jpg
    90.4 KB · Views: 231
  • PA130621.jpg
    PA130621.jpg
    124.7 KB · Views: 243
  • PA120619.jpg
    PA120619.jpg
    46.4 KB · Views: 246
  • PA130620.jpg
    PA130620.jpg
    85.6 KB · Views: 240
  • PA130622.jpg
    PA130622.jpg
    125.3 KB · Views: 225
  • PA130623.jpg
    PA130623.jpg
    112.8 KB · Views: 235
  • PA130624.jpg
    PA130624.jpg
    50.9 KB · Views: 235
  • PA130625.jpg
    PA130625.jpg
    46.8 KB · Views: 228
well, i've been working on a slightly different goal, i spent a few hours consulting a friend, and he's pointed me in the right direction of some LEDs,

so one trip to Radioshack later, i started work.

PA140629.jpg

PA140630.jpg

PA140635.jpg


the goal is one Red and one Blue.
the lenses will come later.

heres a quick video showing the switch and brightness, i had to rub the LEDs with a fine grain sanding sponge to give them a bit of diffusion, otherwise i had a head cam that could blind people at a moments notice.


fewer pics this time obviously, sorry, fiddling with wires isnt something i tend to stop and take a look at from a distance much, so no time for pics.

PA140629.jpg


PA140630.jpg


PA140635.jpg
 
Last edited by a moderator:
been pretty sick the last few days, but ill post progress soon.
the coat is being sewn,
the helmet is done apart from paint,
the mask is almost done, i need to make the lenses,
and find a good rubber hose for the side.

im going to extend the top of the mask and i think either use earth magnets or hooks to attach the mask, as once its under the helmet, it doesn't move, once i;ve added foam, it's going to be very secure.
 
yo pretty bad ass i did a t45d hlemt, but did you use the pep file by the hugh guy or another one if you found another one could you please put a link up. i've been really wanting to make this armor ever since i saw the front cover of fallout new vegas. thanks
 
Status
Not open for further replies.
Back
Top