FifthFreedom
New Member
Good even everyone. I've been lurking this business for a while, and I decided to just go for it. I've got some build experience from over at The Dented Helmet, but that was a while ago, but let's jump into this. This will be a full suit, ODST style, some of the personality and gear of the kit is inspired by USSCOM DEVGRU, but that will come out later with the armor. So, my bucket is about 90% Pepped, just some bells and whistles to finish up, and the fiberglass resin situation will start tomorrow, enough talk, ladies and gents, enjoy these photos.

Mandatory setup shot.

Some of the incredibly humbling Pep process.

Fixing loose shizz

And a one..

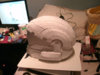
And a two..

And yeah there it is.

That's all for tonight, going to finish up the bottom and the ears. Goodnight folks.
Mandatory setup shot.
Some of the incredibly humbling Pep process.
Fixing loose shizz
And a one..
And a two..
And yeah there it is.
That's all for tonight, going to finish up the bottom and the ears. Goodnight folks.