Finished Skyrim Dargonscale Armor (freestyle colors)

Status
Not open for further replies.

Nephtis

New Member
Hello!
I am pretty new here, haven't interacted much and have discovered Pepakura just this summer. But after my first build I was intrigued by the possibilities this offered.
So I sat down and did my very first full armor set. It took some time since I had to figure out a way to make it durable without fiberglas/resin, but I finally managed to come up with a combinaiton of strengthening the build with paper maché and then covering it with Worbla's finest art that lead to a durable, leightweigh and paintable weather- and shatter proof result.

And now I am proud to present my finished armor set!

dragonscale_armor_skyrim_by_nephtis-d6njsnv.jpg


You can find some more pictures - probably mostly of interest because if you scroll down there are some progress pictures - here:
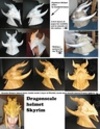
Helmet: http://animexx.onlinewelten.com/basteleien/zeichner/595369/2321458/
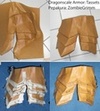
Breastplate: http://animexx.onlinewelten.com/basteleien/zeichner/595369/2321460/
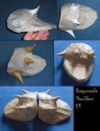
Armor parts http://animexx.onlinewelten.com/basteleien/zeichner/595369/2321462/

Haven't decided yeat if I should make the horns a little darker before I seal it for good. They are not as white as they look in the picture,at first I was even afraid they were too dark but in the images they seem rather bright.

And last but not least: Thanks to ZombieGrimm for providing all those files! I am already working on a weapon to go with this set!
 

Attachments

  • dragonscale_armor_skyrim_by_nephtis-d6njsnv.jpg
    dragonscale_armor_skyrim_by_nephtis-d6njsnv.jpg
    184.3 KB · Views: 1,209
I'm a huge fan of skyrim and this armour is tops I especially love the colour pallet you chose for the scales and spikes. Overall an amazing job.
 
@all: Thanks, I am glad you seem to like the color, I wasn't sure how well doing a freestyle version would be recieved.

@JayOneSeven: Worn shots will have to wait for a little longer. It needs to be sealed and then I need to attach the straps, snaps, buckles and some padding on the inside and whatever else it needs to stay comfortably in place. At least I build in D-rings on the armor parts and did a test fitting with some shoe laces. That worked ok, so I am not expecting any major trouble there.
But the full costume is still a work in progress, just the armor parts are finished. Still need an under-tunic.
 
it is a pleasure to meet you Nephtis...

glad you are showing your work with worbla. I have recently acquired some of that (giddy happy giggles here) and want to know exactly how you did such marvelous work with it.

You need to share the secrets of the build :) I am most interested, and I am sure a couple others are as well because sometimes we are not always able to resin, so alternatives are most welcome sights
 
I saw freestyle colour, and immediately thought of bright neon colours for some reason. But I have to say your colour choice is beautiful. This armour looks amazing. Nice work. :D
 
@morkar78: Thanks!

@Apothacary: Oh, that would be bad. I just like the more red elder/ancient Dragons better than the regular brown/grey ones so I picked that color because it was more fun to paint.

@annabellector: I documented my experiments with Worbla since I had not seen anyone try to combine it with pepakura before.

So: HOW TO "WORBLA" A PEPAKURA BUILD?

Here are a few progress pictures for everybody who is interested in the technique and I'll answer questions if anything is unclear.
This is a step by step of the shoulder, one of ther easier parts and my very first trial.
dragon10.jpg

1) I covered the pepakura model with a layer of paper maché since it needed to be sturdy enough that I'd be able to press the Worbla against it without it warping. For larger parts you could add mor layers, while for the spikes I didn't need any extra layers, they were stable enough due to many flaps.

2) Then I started to cover it with Worbla. For this first trial I started with smaller pieces of Worbla, that way it is a lot easier to handle, but I'll show a picture of working with larger parts later on.

It may be a good idea to add D-rings at this stage already so think ahead

The most complicated part of this was the helmet, that required making a pattern for the Worbla - and I should have paper machéd the large horns, too, keeping them fairly even when pressing the Worbla against them was difficult. But luckily organic armor is forgiving!

Here is a a progess shot of the helmet - in the last shot you can even see the D-rings: dragon12.jpg

So far I had only worked with small pieces of Worbla that were easy to heat evenly and form against the base model. But for really large parts I needed to come up with a different method - or (as I did with the chestplate) hide the seams of different parts under decoration hence the somewhat free-style metal parts on there.

Here is a documentation for the tasset: tasset10.jpg
It works a little bit like deepdrawing - you heat a part, press it against the base and continue on bit by bit. But you need to be careful on the edges where the shapeable warmed Worbla is close to an unheated stiff part or it will tear. It certainly requires some practise.

But you can cover faily big 3D shapes that way - like the front of the Savior's hide that was done with only 2 pieces, left and right with a seam in the middle that gets hidden under the added Decoration: savior10.jpg

NOTE: The above is a foam free build.
I've worked with the sandwhich method before and it has it's uses if you build from scratch - the trouble is, if you re-heat worbla-covered craftsfoam and it gets just a little bit too hot, you get air bubles between the layers which you will need to work out and that can be really annoying. (example: http://fc05.deviantart.net/fs71/i/2013/129/2/f/more_nightingale_wip_by_nephtis-d64mzfp.jpg. Just look at the Nightingale symbol on the chest, I missed some air bubbles there - BUT you can create delicate patterns by cutting some details from craftsfoam and layer those between 2 Worbla sheets, that's how I created the bracers and the symbol).

PAINTING:

If you've never worked with Worbla before you should be aware that Worbla has a texture. I actually like it for organic armor, you can even create a leather-like surface with it. However, for more hightech armor, you'll need to smooth it.

You can use wood glue (takes several layers and patience but you don't need to sand, the more layers the smoother) or gesso (some people use a spray filler, but I've never tried that myself) and sand it down. Worbla itself doesn't sand too well, at least by hand. Remember, it's a thermoplastic and sanding creats heat so the 'dust' kind of sticks to the surface. You can rough it up nicely with sanding but in my personal experience it's not easy to get it smooth.

Then put on a primer as a base.

You can use acrylics to paint but you need to seal them carefully. Also, don't rush and let the layers dry really well! My first armor I wasn't too thorough and I have a lot of scratches in the paint to show for it on parts that tend to connect with things.
 

Attachments

  • dragon10.jpg
    dragon10.jpg
    7.1 KB · Views: 238
  • dragon12.jpg
    dragon12.jpg
    9.2 KB · Views: 248
  • savior10.jpg
    savior10.jpg
    43 bytes · Views: 225
  • tasset10.jpg
    tasset10.jpg
    8.6 KB · Views: 241
Status
Not open for further replies.
Back
Top