First attempt armour build

Status
Not open for further replies.

chris uk 83

New Member
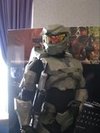
Hi guys, I'm new here and have been looking round the forums trying to figure out how to put together a suit of halo armour. I figured out how to do stuff from reading your posts and watching you vids, so thanks to all who have contributed without even knowing it!

I thought I'd post some progress pics so you can judge me ;) !


Personally I think I needed to spend more time with the bodyfiller and sandpaper before I painted it, but I learned a lesson and will fix that for next time. I'm currently working on the rest of the armour, but it will be a long time in the making as I have very little free time.

I'm going for a Noble 6 helmet, but with the mk VI armour, mainly becuase I think it looks better. Eventually I might rebuild the helmet MkVI style, but the noble 6 one took 2 solid days to pep so I'm in no hurry to do that!
 
I've got an idea about using the left over visor piece (that I managed to cut out whole) as a template for a clear vac-form, after I've smoothed it off a bit of course. I then want to cover it with mirrored film. Any thoughts from anyone?
 
I've now had a go at drybrushing the edges and shading the recessed bits. I've also got some better photos as the lighting is better during the day (imagine that!)

Still got to paint the back of it black, which is meant to look like rubber. I plan to spray and need a bit of time to get the masking right first especially as the black spray paint will completely strip the green if I miss!


Views?
 
Looks sexy! I am pepping this right now making it my second helm. I also plan to vac form the face shield. I will be following along to see what you do with the mirrored film.
 
I've got an idea about using the left over visor piece (that I managed to cut out whole) as a template for a clear vac-form, after I've smoothed it off a bit of course. I then want to cover it with mirrored film. Any thoughts from anyone?

I did leave a link to the film thing but I hasnt tried it I m no where near that step yet. the link should be in Painting place.
 
#1 many people may have started halo with reach, I know several that where really surprised when I told them that there where 4 halo games before reach ;)
#2 noble six helmet just looks good
#3 we need as many noble sixes as we already have master chiefs ;)
 
#1 many people may have started halo with reach, I know several that where really surprised when I told them that there where 4 halo games before reach
#2 noble six helmet just looks good
#3 we need as many noble sixes as we already have master chiefs

I agree, I played Halo 1 and 3 before, but I've recently done Reach and I really really enjoyed it, hence Noble 6. I also wanted a helmet that people didn't already have (thought there were too many MCs!), but now I don't like the rest of the armour, there are too many gaps in it for me and without a decent undersuit (which I don't plan on dropping £100+ on) they'll be noticable. So I plan to make MK VI armour to fill gaps, but use a noble 6 helmet, paint it like MC and hope nobody notices ;)
 
but now I don't like the rest of the armour, there are too many gaps in it
thats one true thing, I'm looking for a way to re-build the undersuite parts of noble six too with some silk, maybe you also want to have a look on that?

So I plan to make MK VI armour to fill gaps, but use a noble 6 helmet
thats a really good idea, if my silk wont work I will look for "enhancing" the noble 6 with mark VI armor parts ;)

paint it like MC and hope nobody notices ;)
nah... nobody will notice out there I guess ;)
 
Quick update on the visor. I'm using the bit of rondo I cut out of the front of the helmet for the visor template. I've sanded and fillered it smooth and I took it to the vac former today (the Design Technology department of the school I work at). I was told that there is a good chance the heat and force of vac-forming would crack my template so we'll have to do something to reinforce it. A wooden model has been suggested but I think that will take forever to make and I doubt I'll end up getting it the right shape.

Anyway, we're thrashing out the issue on Thursday evening, so hopefully I'll have a vac-formed visor then. Until then I'll get on with pepping the chest piece, which I just know I'm going to scale incorrectly.
 
I just pepped the head hole section of the MK VI flying squirrel HD armour, the author wasn't listed, but it's the one with supports.

Anyway, the head hole is way to small. I measured myself for the rest of it though and the height looks ok, so does the width. Has anyone has experience with this model? Does it have a ridiculously small head hole that I'll have to cut larger when it's finished or do I need to scale the piece up to about 128% (which would just fit my massive head in it but make it 59cm tall)?
 
You don't fit your head through the hole, it's a "neck hole", not a "head hole". During construction you will seperate the chest into a 'front' and 'back'. Then you need merely clip them together to wear it. The hole need only be big enough to fit your neck, not your head.

Here's where I seperated my Mk VI chest at the top, also cut the pieces joining under the armpit. Click image to see the blue lines representing where the cut would be:

th_IMG_20101009_152445.jpg
 

Attachments

  • th_IMG_20101009_152445.jpg
    th_IMG_20101009_152445.jpg
    14 KB · Views: 76
Aaaaaaaaaaaah, that makes it much clearer. Much as I really don't want to cut the armour in half coz I don't reckon it'll go back together as neatly as it once did, I'm going to have to go for that approach. Wish me luck with the weeks of pepping I have ahead!

Thanks Roadkiller.
 
I didn't seperate mine until after it had been stiffened with fibreglass and covered with auto-body filler. This ensures the pieces line up perfectly. If you want to test fit it before you get that far (i.e. while it's still paper) just cut it apart, try it out, then glue the pieces back together.

You can see in this pic where mine is seperated. My first method of connecting the pieces, while fairly strong, leaves a gap. There are ideas and suggestions abounding on this forum on how to make that gap smaller.

th_73639_10150307653280468_637440467_15448356_5559901_n.jpg
 

Attachments

  • th_73639_10150307653280468_637440467_15448356_5559901_n.jpg
    th_73639_10150307653280468_637440467_15448356_5559901_n.jpg
    5.6 KB · Views: 80
Tried vacforming the visor today. I put the body filler shape in the vacformer, heated it up, pushed it through the bendy hot plastic, turned the vacuum on and......CRACK! It broke into 5 pieces. I cried. Now I need the 3d model of noble 6's helmet to plug into the router to make a wooden template in order to do it properly.

Any ideas how I extract the 3d model from the pep file, or even if that's possible? I'd need to scale it properly too.
 
Damn, too bad about the visor, the rest of the helmet looks sick though. I suppose you could try looking in the 3D modeling sub-forum?
 
Status
Not open for further replies.
Back
Top