First build in the works

Thee BurNs

New Member
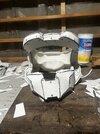
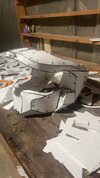
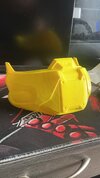
Hi everyone, I’ve started doing a helmet, I’ve watched tons of videos to get a bunch of tips before starting anything. So far I’m enjoying building but would like some tips moving forward to either be able to fix some mistakes I’ve made or to prevent any mistakes in the next steps. I did notice that the front mouth portion is slightly tilted to the left if it’s possible for me to fix this or maybe just cut it slightly (there’s also a slight issue on the top portion but it doesn’t bother me that much … as of now). I don’t want to mess it up completely trying to fix it overall this is a learning experience for me and if it turns out good then I’ll take it as a bonus but anything helps on this build and future builds thank you!
 

Attachments

  • IMG_7212.jpeg
    IMG_7212.jpeg
    1.9 MB · Views: 36
  • IMG_7211.jpeg
    IMG_7211.jpeg
    416.2 KB · Views: 35
Foam helmets are especially tricky because they have to be symmetrical. I've never made a helmet from foam, but I have made symmetrical armour pieces. The trick is to make sure that you apply the same amount of pressure to each side when you glue them, and that you glue things in the same way. Foam stretches and squished when you glue it, so try not to manipulate it too much for gluing. If you glue a piece on the left from the bottom to the top, make sure the piece on the right is glued from bottom to top in the same way. It can be a very tricky balancing act to get each side perfectly symmetrical, but you can also get the visor to help you out. Having something rigid in the helmet can help it to keeps its structure. I know Pixelcube hade his mk7 helmet out of foam, so hopefully he can give you a tip or too as well
 
Ok awesome! I do have an ender 3 max, so I was thinking of doing the helmet with the printer, I did get rather discouraged awhile back because I tried printing the helmet and it failed after 17 hours. I tried printing it whole cause I didn’t know to much about slicing and it also ended up being too small anyway lol I wanted something challenging to learn as much as possible, your video for your armor is actually one of the videos I watched and I’ve seen it’s a common thing for people to do the helmet with a printer. My printer I’ve only made a few smaller things here and there but it’s not set up currently, but very possible for my actual armor setup that I print the helmet.
 
Ooooh if you have a 3D printer then i'd definitely recommend giving printing another shot! Even with my CR-10 that is big enough to fit a whole helmet, I still elected to cut it into pieces and glue together after. This way I didn't get as much support material. You can cut the files in a program called 3D builder which is free on windows computers. It's also worth looking in to a few tutorials on YouTube on how to scale cosplay helmets so that you make sure it's the right size.
 
So with that then what do you recommend for bonding the pieces together, I’ve only done smaller pieces so I would do a mixture of plastic welding with a soldering iron and super glue, but some of the seams on the helmet depending where I slice it I could see that being an issue doing . Also with foam building I know you said you haven’t done a helmet before but when you have pieces on the template that have fold lines is it better to cut those pieces out separately, I would do the whole piece so the top portion for example has fold lines on the template and I just curved it when I glued vs cutting them out (which I could see that being a possible reason on the angle being slightly different). There’s some really small pieces to this helmet that have multiple folds on it too.
 
For 3D printing I use CA glue with activator. I may also reinforce the inside with 2 part epoxy. For the most part, CA glue is very strong. I find that if it's applied properly, the plastic will break before the glue will let go.

For foam, I use contact cement. I prefer the Barge brand specifically. LePage does not work. Both my suits (excluding their helmets) are entirely foam and made with contact cement.

I try to follow the template as closely as possible. If it calls for a fold, then I try to fold. If it calls for a cut then I try to cut. If I'm folding the foam, I do a valley cut, also known as a V-cut, which is where you cut out a V-shaped groove on the side of the foam that is going to fold in on itself so that the outer edge has a sharp fold rather than a gradual curve. Sometimes it gets too complicated if a single piece has multiple folds in different directions and it's easier to just cut all the pieces out separately and glue them together. Foam is quite tricky for this reason; there's no one-size-fits-all advice or rule to follow. Every piece and every armour set is different and may require different approaches. But generally, I try to fold where the template says to fold.
Ok thank you and thank you Spartan as well. I have a whole back story with the spartan I wanna create and everything. I want it too look like an abandoned spartan who went to a planet and his team was killed by local creatures. Comms went down and UNSC abandoned the last spartan assuming they were killed as well. The spartan endured the harsh weather of the planet until finding an ingenious tribe that took him in. So I want to really beat up the armor and add things to it to correlate to the story. Hopefully I can bring my ideas to life
 
Ooooh if you have a 3D printer then i'd definitely recommend giving printing another shot! Even with my CR-10 that is big enough to fit a whole helmet, I still elected to cut it into pieces and glue together after. This way I didn't get as much support material. You can cut the files in a program called 3D builder which is free on windows computers. It's also worth looking in to a few tutorials on YouTube on how to scale cosplay helmets so that you make sure it's the right size.
Hey so I was finally able to get a good first layer down after getting the bed leveled etc, first layer looked great and even up to 30 mins after it started printing. I wasn’t home and it looked like it slightly lifted (I have a camera looking at the printer) but I figured I’d let it continue, it eventually did remove from the bed completely, do you think this is too high of temp or bed adhesion (I have a glass bed) I did drop down from 210 to 205 because of issues of delamination. That seems to of fixed that issue as these parts seem very sturdy.
 

Attachments

  • image.jpg
    image.jpg
    1.4 MB · Views: 17
  • image.jpg
    image.jpg
    1.5 MB · Views: 18
Hey so I was finally able to get a good first layer down after getting the bed leveled etc, first layer looked great and even up to 30 mins after it started printing. I wasn’t home and it looked like it slightly lifted (I have a camera looking at the printer) but I figured I’d let it continue, it eventually did remove from the bed completely, do you think this is too high of temp or bed adhesion (I have a glass bed) I did drop down from 210 to 205 because of issues of delamination. That seems to of fixed that issue as these parts seem very sturdy.
also bed temp was set to 60 i watched a video and i brought it down to 40 when i printed this due to the over heated first try ( trying to figure out my previous settings as cura got deleted and im also using a different filament, im going to try and bring it back up and run it with a brim on
 
Sometimes a low ambient air temperature can cause the first layer to peel up well after it's been printed. I use two halogen lamps with my printer to light it for my web cam, but they also help keep the air around the print nice and toasty. It the room is quite chilly I tend to have more failures.
 
Sometimes a low ambient air temperature can cause the first layer to peel up well after it's been printed. I use two halogen lamps with my printer to light it for my web cam, but they also help keep the air around the print nice and toasty. It the room is quite chilly I tend to have more failures.
So the room is slightly colder (it’s in the basement) but I’ve always had bed adhesion issues with this bed I may get a pei bed. But I used some brims and it was good this time, I may re print it though because I believe my infil density needs to be increased. I’m going to print the back portion to make sure this is going to be a good fit prior to reprinting the front ( I ran it at 5% I’m going to bump it to 6 as the first failed pieces feel more sturdy and that’s what they were running at) what infill do you run by chance? I don’t know exactly how sturdy it should be I’d assume you just wouldn’t want it brittle
 

Attachments

  • IMG_7250.jpeg
    IMG_7250.jpeg
    418.4 KB · Views: 14
Last edited:
I run about 20% infill for my helmets. 5-10% for props and things. 3 walls

I don't have experience using a PEI bed, but a while ago a bought a new glass bed that had some sort of coating on it, not a plain glass sheet. It's certainly helped with adhesion issues.
 

Your message may be considered spam for the following reasons:

If you wish to reply despite these issues, check the box below before replying.
Be aware that malicious compliance may result in more severe penalties.
Back
Top