First build - Jorge, Halo Reach

I can't wait to see your complete set! I also appreciate the list of materials and your attention to detail in your build log so far!
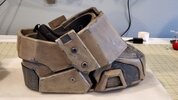
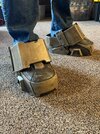
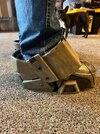
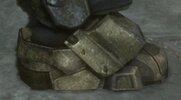
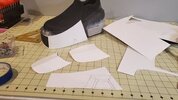
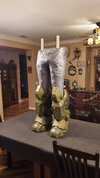
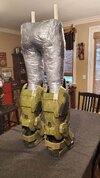
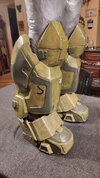
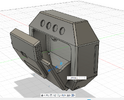
So I am keeping all of my patterns I create. Anyone who has size 11 shoes that wants this pattern, just reach out. I will try to get them scanned in a digital format
 
Jorge boots done!
Painting process:
  1. Base layer of black hexflex: https://tntcosplaysupply.com/product/hexflex-paint/
  2. Layer of gunmetal grey metallic paint by folkart @walmart
  3. Liquid mask for paint chipping in corners. [Note use heavy coats for easier removal] https://www.amazon.com/dp/B005P1ROEY?psc=1&ref=ppx_yo2ov_dt_b_product_details
  4. Airbrushed AppleBarrel acrylic paint Khaki: @walmart
  5. brushed on custom color of territorial beige, white, and hexflex black to come up with a brownish-grey color on the toe accents
  6. Removed the liquid mask
  7. Highlighted chipped areas with DecoArt gloss enamels - Shimmering Silver: @walmart
  8. Did a wash of ~1/3rd black hexflex, ~1/3rd brunt umber, and ~1/3 water over everything
  9. Drybrushed everything with khaki
  10. Sealed paint with DecoArt DuraClear matte varnish: https://www.amazon.com/gp/product/B003ULNCYC/ref=ppx_yo_dt_b_asin_title_o00_s00?ie=UTF8&psc=1
Lessons learned:
  1. NEVER USE RED/PURPLE SHARPIE to mark your parts. The Red in it will bleed through 10 layers of paint!!!!:mad::mad::mad:
  2. I might recommend adding some OD green to the Khaki to give it a little more green tint. I found AppleBarrel acrylic paint in English Ivy Green at Walmart that I am going to use on the OD green parts of the armor. It's a good enough match for me.
 

Attachments

  • 314836165_676234047329275_8577691642313532147_n.jpg
    314836165_676234047329275_8577691642313532147_n.jpg
    161.8 KB · Views: 148
  • 315212308_534179418526375_3453558296542192075_n.jpg
    315212308_534179418526375_3453558296542192075_n.jpg
    743.3 KB · Views: 143
  • 315267517_1763314937382743_4106422028204349848_n.jpg
    315267517_1763314937382743_4106422028204349848_n.jpg
    677.9 KB · Views: 125
  • Jorge boot closeup.jpg
    Jorge boot closeup.jpg
    73.5 KB · Views: 126
Last edited:
Looking great! I would have never been able to tell there's a riser hidden away in there.
 
Jorge boots done!
Painting process:
  1. Base layer of black hexflex: https://tntcosplaysupply.com/product/hexflex-paint/
  2. Layer of gunmetal grey metallic paint by folkart @walmart
  3. Liquid mask for paint chipping in corners. [Note use heavy coats for easier removal] https://www.amazon.com/dp/B005P1ROEY?psc=1&ref=ppx_yo2ov_dt_b_product_details
  4. Airbrushed AppleBarrel acrylic paint Khaki: @walmart
  5. brushed on custom color of territorial beige, white, and hexflex black to come up with a brownish-grey color on the toe accents
  6. Removed the liquid mask
  7. Highlighted chipped areas with DecoArt gloss enamels - Shimmering Silver: @walmart
  8. Did a wash of ~1/3rd black hexflex, ~1/3rd brunt umber, and ~1/3 water over everything
  9. Drybrushed everything with khaki
  10. Sealed paint with DecoArt DuraClear matte varnish: https://www.amazon.com/gp/product/B003ULNCYC/ref=ppx_yo_dt_b_asin_title_o00_s00?ie=UTF8&psc=1
Lessons learned:
  1. NEVER USE RED/PURPLE SHARPIE to mark your parts. The Red in it will bleed through 10 layers of paint!!!!:mad::mad::mad:
  2. I might recommend adding some OD green to the Khaki to give it a little more green tint. I found AppleBarrel acrylic paint in English Ivy Green at Walmart that I am going to use on the OD green parts of the armor. It's a good enough match for me.
Outstanding foamsmithing! Those are probably the best boots I've ever seen!
 
The armor piece in front of the laces will hinge at the ankle to allow flexibility while walking. Going to use Chicago screws for the pivot. The great part is the chicago screw is right where one of the two rivets is located on the actual game model!
Here are the chicago screws I order:
I love how you're going to do that hinge! Thinking up creative solutions to movement problems is my favorite part of cosplay.
 
Bravo for going for a named character, let alone the heart of Noble Team. I’m very jealous since I don’t have the height to do Jorge justice. I am looking forward watching this build continue!
 
Update Shins/Knees completed 1/2/23. Shins were scratch built pattern and the knees were from our armory.
 

Attachments

  • 320760635_954880945489340_3513072855290043514_n.jpg
    320760635_954880945489340_3513072855290043514_n.jpg
    178.1 KB · Views: 132
  • 321418178_2018384701680720_8758620945510598146_n.jpg
    321418178_2018384701680720_8758620945510598146_n.jpg
    244.4 KB · Views: 123
  • 320983377_526777312747910_6880809910816707121_n.jpg
    320983377_526777312747910_6880809910816707121_n.jpg
    237.7 KB · Views: 117
  • 321750938_550815456928739_998637043232686837_n.jpg
    321750938_550815456928739_998637043232686837_n.jpg
    259.4 KB · Views: 137
  • 321304448_468803682106650_7538768371058694109_n.jpg
    321304448_468803682106650_7538768371058694109_n.jpg
    293.7 KB · Views: 125
  • 320720049_5666329616818875_4455651232171532755_n.jpg
    320720049_5666329616818875_4455651232171532755_n.jpg
    262.1 KB · Views: 120
Jorge boots done!
Painting process:
  1. Base layer of black hexflex: https://tntcosplaysupply.com/product/hexflex-paint/
  2. Layer of gunmetal grey metallic paint by folkart @walmart
  3. Liquid mask for paint chipping in corners. [Note use heavy coats for easier removal] https://www.amazon.com/dp/B005P1ROEY?psc=1&ref=ppx_yo2ov_dt_b_product_details
  4. Airbrushed AppleBarrel acrylic paint Khaki: @walmart
  5. brushed on custom color of territorial beige, white, and hexflex black to come up with a brownish-grey color on the toe accents
  6. Removed the liquid mask
  7. Highlighted chipped areas with DecoArt gloss enamels - Shimmering Silver: @walmart
  8. Did a wash of ~1/3rd black hexflex, ~1/3rd brunt umber, and ~1/3 water over everything
  9. Drybrushed everything with khaki
  10. Sealed paint with DecoArt DuraClear matte varnish: https://www.amazon.com/gp/product/B003ULNCYC/ref=ppx_yo_dt_b_asin_title_o00_s00?ie=UTF8&psc=1
Lessons learned:
  1. NEVER USE RED/PURPLE SHARPIE to mark your parts. The Red in it will bleed through 10 layers of paint!!!!:mad::mad::mad:
  2. I might recommend adding some OD green to the Khaki to give it a little more green tint. I found AppleBarrel acrylic paint in English Ivy Green at Walmart that I am going to use on the OD green parts of the armor. It's a good enough match for me.
Update to the painting process:
1. Base coat with black hexflex inside and out
2. Art Deco Metallic Zinc on outside layer (great dark metallic color with a hint of blue to it)
3. Liquid mask on corners and high spots for chipping effect
4. Add base color. Although I was going for an OD green, I used 3 coats of khaki as the base color for the green areas) See step below for green wash
5. remove liquid mask
6. highlighted chipped areas with shiny silver metallic paint
7. Dirt wash with Burnt umber and Black
8. Clear Coat
9. green wash with English Ivy Green. I stippled areas to get a consistent coverage and wiped off high areas to brighten them up to add depth to the paint job.
10. final clear coat.
 
This is looking outstanding!! I'm going to have to follow this thread. Never thought to make risers for the feet. something I'm going to have to do now.
 
So I haven't posted in a while here in the forums. I've been busy building my armor and posting in Facebook. I modeled a functional hip pouch for a reach belt. I want to know how I can post the files somewhere here in the forums where fellow members can find it, download for free and print it.
 

Attachments

  • hip pouch open.png
    hip pouch open.png
    368.6 KB · Views: 98
  • Progress 23-2-7.jpg
    Progress 23-2-7.jpg
    82.5 KB · Views: 100
So I haven't posted in a while here in the forums. I've been busy building my armor and posting in Facebook. I modeled a functional hip pouch for a reach belt. I want to know how I can post the files somewhere here in the forums where fellow members can find it, download for free and print it.
you can post it right here in your thread or dm one of the officers to have them add it in the 3d model thread. but you are doing an awesome job on this i love the progress you have made.
 

Your message may be considered spam for the following reasons:

If you wish to reply despite these issues, check the box below before replying.
Be aware that malicious compliance may result in more severe penalties.
Back
Top