First ever build (helmet only for now) - Cavallino NYAH

RedFalconsMDX

New Member
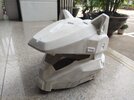
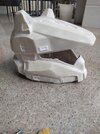
Been around 405th for a while but only recently did my helmet arrived after contracting it with a shop. Print lines are okay I guess?

Helmet is made in three pieces with the top piece, jaw, visor. Gonna attach it with magnets for a latch hopefully.

a74deb1d-4a7c-4dff-a1f5-8171496a4839.jpg
 
IMG_20230614_141821.jpg
IMG_20230614_151627.jpg


Some rookie putty sanding and paint test lol. I think I need to spread the putty more evenly and maybe somewhat thin to sand it fast and quick? Print lines on say this support piece is definitely gone.

As for paint well... I think I just sucked at it as a starter lol. Was just spray canning a single spot or two with that deep red piece. Might do one more practice run this week
 
I find it helps to sand the helmet before putting and bondo or putty on. Also, using a sandable filler primer along with the bondo will fill in those smaller lines so that you don't have to smother the entire helmet in bondo. Also, before you paint, it's a good idea to use a primer to give a nice base.

Very nice helmet! Good luck!
Thanks! Think I might try sanding another test piece tmr (like the way you suggested) and put putty on. Tho don't think I can find a primer in this third world lol. Might have to make do with polishing helmet as smooth as I can with putty.

The paint test piece were done without primer and they adhere well so far. But long run I guess we'll see
 
Last edited:
The primer is only partially to help the paint stick. Some paints are not completely opaque, and so require a surface that is all the same colour. If you cannot get primer, try putting down a black base coat and then doing the colour you want.

Out of curiosity... where are you from that you can't get primer?
Myanmar/Burma in Southeast Asia. Honestly a pretty backwards third world here. Don't want to get political but we are still in a coup here and everything is just going to hell so lol. (My area is chill so I am all good, my heart goes out to others less fortunate tho)

I did find primer but I think it's for automobile and for metal surfaces. And you need a paint gun with it which I don't have so yeah

But yeah funny thing with this country is always like that. Like say I ordered some magnets for the latch for this project too. Saw it in YouTube video tutorials that has the same button shape with a small hole in the middle thingy. It came in yesterday too and welp, it was like 1/4 the size of the YouTube tutorial. Still useable but yeah, this country just sucks to do/get anything you want. And we don't have Amazon or a similar type either so yeah. It manage to dissapoint you one way or another lol
 
Last edited:
If it's any help I ended up using more automotive geared spray paint for my armor. Bonded to the plastic way better, just gotta make sure you're wearing proper protection and have plenty of ventilation when you use it. Hope you're able to have better luck finding materials!

The cat ear legion continues to expand, and I am here for it.
Yeah I should have an update pic on finishing sanding on the helmet in a bit, tho as for spray paint and stuffs don't worry lol, I tested them already on a small test piece and they stick pretty well and are exactly the colours I want

Tho one step at a time, gonna finish putty, and then imma have to make sure my spray paint skills are up to snuff too, but overall it should be good, fingers crossed.
 
img_20230622_145734-jpg.332761
IMG_20230622_145810.jpg
IMG_20230622_145805.jpg

Update #1
First pass sanding done! He's looking absolutely mint, minus the hundreds of small holes lol.

Got enough putty for one more. Gonna use that for the second pass to fill in holes and patch up some imbalance but overall progresses good lol
 

Attachments

  • IMG_20230622_145823.jpg
    IMG_20230622_145823.jpg
    8.4 MB · Views: 48
  • IMG_20230622_145734.jpg
    IMG_20230622_145734.jpg
    9.8 MB · Views: 231
Thanks! It's just the same model made by Moe Sizzlac, I just upscaled the ears with a reference model from the game, needed it 1-1 lol, but that does means I also want it to merged onto the helmet and here we are.

And those CAT EARS AINT COMING OFF NO MATTER HOW PEOPLE TRY TO UN-CAT EARS ME
youve convinced me im putting cat ears on my build.
 
Update #3
Magnet is completo lads! Yeah it's not the easiest thing to attach but it works so. And the splice is just not ideal for a latch coupled with materials limitations. But hey at least it works well!

And yes that is Mark Rober music lol.
 
Last edited:
This thread is more than 9 months old.

Your message may be considered spam for the following reasons:

  1. This thread hasn't been active in some time. A new post in this thread might not contribute constructively to this discussion after so long.
If you wish to reply despite these issues, check the box below before replying.
Be aware that malicious compliance may result in more severe penalties.
Back
Top