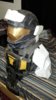
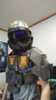
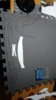
Ok guys, this has been a year since I posted, but I have an update. I have a 95% completed suit! This is a late post, because I tried to have it done by Halloween, but here goes.
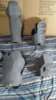
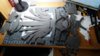
Firstly, I managed to finish both legs, without boots, and one shoulder. That in addition to the helmet and chest I already had, it was enough to go out and not look naked. Lol. Now I say finish, I mean assembled. Didn't have time to seal and paint, and I did a shoddy elastic strap mounting system that ultimately catastrophically failed. But progress!
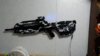
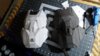
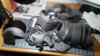
Also a wonderful addition, my one of a kind Battle Rifle painstakingly built by the one and only
RobTC. He only made 6 of these beauties, of which mine was the only Arctic Cam variant.
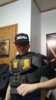
Another fun tidbit, at the last Wizard World Comic Con in St. Louis (April), I took my helmet on a whim even though the suit was nonexistent. Guess who I ran into?

So on to the final build...sort of. I'm going to spend the upcoming 4 months to the next WWCC refining this suit so it is presentable, along with finishing the forearms, shoulders, backpack, and constructing a new helmet since I don't want to risk the signatures xD.
So here is where it stands as of now, I have a couple pictures from Halloween and a couple more recently with snowfall to try out that smexy camo
One last thing before my musings begin, this started as a way to make my face light up and accidentally became a semi holographic shield bar.
Since I more or less have completed an entire suit now, I figured I would like to share my thoughts and experiences from throughout the process in a (hopefully) somewhat humorous manner. So without further ado, I present in no particular order:
TEN THINGS I LEARNED WHILE BUILDING MY KIT, OR, WHAT NOT TO DO WITH FOAM.
1. Scaling is key.
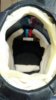
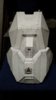
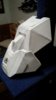
I have wasted a lot of cardstock because the scaling was wrong. Sometimes even foam because I realised only after I built the item it was too tiny or big. I lucked out with the foam ODST patterns I used because the torso and legs were somehow already scaled to my small 5' 5", 128lb frame. The helmet came out a bit big I think, and the shoulders came tiny and huge. Next time I'm going to really crack down on the scaling first.
2. Sharp blades (especially hot knife blades) are a godsend.
Nothing slows progress and results in crappy edges more than a dull blade. If you use a hot knife like me (until I destroyed both my blades and didn't have time to get more), having a sharp blade is still crucial, because if you get in a hurry you aren't letting the temp do the work by melting as you slice, you're only cutting the foam with an xacto knife that can burn you if you slip.
3. You get out what you put in.
If you give yourself stupid crappy deadlines (like finish the whole suit 2 1/2 days before Halloween) you get stupid crappy looking pieces. You rush. "I can skip measuring here," "pretty sure I can cut a straight line without a ruler there." No. Don't take shortcuts. You'll only regret it when you put on that armor.
That being said,
4. Don't ask your neighbor's 6 year old to help you cut out templates (when on a tight schedule).
I figured "more hands = twice the efficiency." Until I got home and had to rearrange all the pieces to conserve foam and also throw away a few cardstock templates that were just a bit too shakily cut. I have nothing against children, especially doing fun crafts such as this, but when you have mild OCD and need everything finished by a stupid deadline you set yourself they just don't have the fine motor skill required yet.
5. Don't forget to factor in paint time.
The deadline I set myself required me to have everything finished and ready to go by 7am on Monday, Oct. 31st. The rate I went, I would have been painting at 2am! That leaves 5 hours to dry, but with the temperatures they way they are in Midwest America in Autumn, that leaves you with a strong paint odor well into Monday afternoon. I ended up wearing the kit mostly unpainted, and considering my Spartan is Steel/Gold, it wasn't too bad since the foam is a dark Grey anyway, but I still was bummed about it.
6. Low temp hot glue is cheap for a reason.
It doesn't work. Never again will I use low temp for a build. There are few things more frustrating than applying glue, going to align parts, then slipping and it dries in the wrong place, or you go to add more glue and that glue melts the first bit of glue and it falls apart, or, in my case, the glue fails to bond completely and halfway through the day wearing it all your mounting straps fail and rip away from the armor, leaving a slightly embarrassed man in tights standing in a puddle of EVA foam.
7. Spend some time on your undersuit. Especially if you are doing a H4 build.
I have seen a lot of armor that looks great, but the undersuit is just black underarmor. It works, but it looks unfinished. If you have a Halo 4 build, especially ODST, you may notice they seem to very much like completely exposed hips and buttocks. Seriously I think H4 ODST is the most skimpy armor set out there. If you don't have some kind of detail to break up the monotony of the underarmor, it looks very incomplete.
8. Accidents can be good.
All I wanted was a cheap way to light my face in the dark for fun. What I ended up doing was create a holographic semi-functional partial HUD. For free in my case, but very cheap if you want to replicate it, I used 2 of the little party finger lights from Oriental Trading, 1 blue and 1 red, and positioned them in the helmet so when the light reflected into the visor it appeared to represent the shield bar of the HUD.
9. Not everyone will know who you are.
At work when I wore my kit, by the end of the day I was "Robocop Prime from the Army." Only my boss knew I was an ODST, but hey, everyone loved the costume anyway! Just because they can't name the exact person from the exact game doesn't mean you failed. You just have to shrug and say "Actually I'm just a guy from a video game."
10. You can improvise.
There are no rules to this hobby. You don't have to follow everything down to a T. If a part comes out with a bit extra material, lob it off. Say the file doesn't include a detail you want. Add it yourself. Don't be limited to the pep files. They're just reference. A starting place. Don't sweat it if you lose one of your templates. Sometimes you realize its the same piece flipped, or is really easy to draw freehand. You don't have to go back and scale and print it all out again. It is YOUR armor. Build it YOUR way. Trust me no one is go up to you and tell you you made it wrong. I've been considering this build as a dry run for the actual thing. I plan to use the pep files as a reference next time, but actually take them over to Illustrator and create new streamlined templates. Maybe add notes for details or draw out stencils for paint. I haven't decided yet. But the point is, you aren't stuck to what other people made and uploaded to the database. Not to knock them, I would be totally lost if it weren't for all their hard work unfolding and modeling those files. But it's perfectly ok to change it up if you want to. We just ask if you make something awesome, maybe share the love and let us in on it too