FIrst Real Build. Captain James Sierra-247 (Pic Intensive)

Status
Not open for further replies.
I always like to see people posting that have collecting themselves and really started moving along. All looks well.

Also, I notice we have the same wood carving kit in the last pic, is the magnet that's suppose to hold them all in place as weak in your as it is in mine :unsure lol
Picture time! So I got kind of excited and forgot to take pictures for large chunks of the helmet, but it still has some progress visible!

Day 1:

Foam arrived!
View attachment 5511

View attachment 5512

Templates cut out and ready to trace.
View attachment 5513

Hard to see, but everything traced onto the foam.
View attachment 5514

Day 2:

Pile of pieces! Starting to get somewhere.
View attachment 5515

I don't have a hot knife, but I have a wood burner with this attachment. It did not work. Switching back to Xacto.
View attachment 5516

Everything cut out!
View attachment 5517

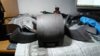
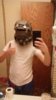
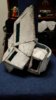
Flattened helmet. It kind of looks cool.
View attachment 5518

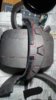
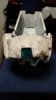
Dome starting to shape up. I know it looks really narrow but it fixed itself later on.
View attachment 5519

View attachment 5520

View attachment 5521

View attachment 5522

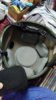
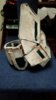
This was really cool I thought. I had this little mesh left over from a bondo kit I used on a Captain America shield. Gives a bit of ventilation in the helmet!
View attachment 5523
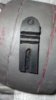
Visor!
View attachment 5524

Chin!
View attachment 5525

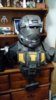
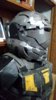
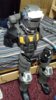
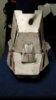
The circle is now complete. When I left you I was but a Visor, now I am a helmet.
View attachment 5526

View attachment 5527

Tada!
View attachment 5528

View attachment 5529

View attachment 5530

View attachment 5531

Day 3: Torso

Templates cut out.
View attachment 5532

Well that's all for now! Thanks for looking and stay tuned for more! I'm gonna go to the Home Depot today and hopefully get some spackle to seal the edges of the helmet. I've got Plastidip waiting already, then I can lay on some primer!
You can contact me anytime for Get Best Essay Writing Service From Best Faculty of UK Or Click On Need Assignment Help|Best Assignment Writing Service in UK & AUS
 
Can you share where you got the EVA foam and it's price?
And awesome work.
I actually favor the ODST armors to the Hearts.
In Reach, I always had a ODST helmet and oxygen flask or EOD. I also got the shoulders as soon as I could.
Reason being, ODST's are similar to what my Father did in the Army but way more safe, yet at the same time extreme.
He was a Chief Warrant Officer 4 parachute rigger, and Jump master.
As a kid I used to watch the video of when he jumped out of planes at shows while jumping off the plane, falling, and landing, I even seen him jump in real life.
I always wished as a child to do that ( not being enlisted) with him, but over time I became scared as I grew up. Eventually I grew out of fear but around that time I learned that it was medically impossible for me to do something like that. I apparently have a Equilibrium problem that If my center of gravity or just my body moves in many different directions in just seconds, I would pass out. Highest I went was around 153 feet high when I lost consciousness, and the embarrassing part of it was that it was a roller coaster, at sea world, and I didn't even reach the max height. It was just the first drop. My younger brother, and eldest half brother made it out with nothing at all, when I came too we were arriving back at the station. Now that I realize it, I really am a flawed human in about every way. But that day, or that New Years Eve was one of the best time seeing my whole family having fun all together, but sadly was the last day it would ever happen. A few days later, to 3 months and 25-27 days from the count down end, 2016 was the worst year of my life and my life would never be the same, and it got worse as we went further.
Sorry lost track. It would be pretty cool if we did have ODST drop pods and capabilities of deploying and transporting them. And I really do value the ODST armors. and for the ODST shoulders, You could possibly edit the files so that they are pointed away instead of toward you because they aren't supposed to be modeled that way.
And If you really don't like to keep them you could donate them or sell them, the 405th does have a market place after all. Go ahead and take use of it.
 
Can you share where you got the EVA foam and it's price?
And awesome work.
...
And If you really don't like to keep them you could donate them or sell them, the 405th does have a market place after all. Go ahead and take use of it.
First batch of EVA foam I got from We Sell Mats on amazon, I think it was 12 sheets for $30. More recently I needed a few more aheeta so I went to Harbor Freight in town and got a pack of 4 for $9. Thanks for the support! And as for right now, the shoulder that I won't be using on the kit I am using as a guinea pig test piece for various things (dremel bits, sanding, painting etc)

Also I thank your father for his service. My dad served as well, but not airborne.
 
I am aware of hobby lobby's thin foam. Very aware unfortunately.
Lol sounds like there is a story to that. This is actually my first time working with it and I have to say I like it so far. I think I am going to make the combat knife out of it.
 
ooooh... I like stories.

Lol sounds like there is a story to that. This is actually my first time working with it and I have to say I like it so far. I think I am going to make the combat knife out of it.
If you are considering making a foam knife, depending on how dense the foam you are using is, you may want to build in some structure to keep it from being too floppy. For example, if you are using 6 mm foam, sandwich some coat hangar wire along the length of the blade.
 
ooooh... I like stories.


If you are considering making a foam knife, depending on how dense the foam you are using is, you may want to build in some structure to keep it from being too floppy. For example, if you are using 6 mm foam, sandwich some coat hangar wire along the length of the blade.
I was thinking about using one of the big flat popsicle sticks, but I suppose it depends on the size of the knife. I don't want it to be too rigid though for safety.
 
Got some details burned out and started gluing the dome, but my brush broke so I am finished for the night. I need to get myself a glue pot.
 

Attachments

  • 20170301_215539.jpg
    20170301_215539.jpg
    979.5 KB · Views: 340
  • 20170301_215552.jpg
    20170301_215552.jpg
    879.3 KB · Views: 349
  • 20170301_215530.jpg
    20170301_215530.jpg
    1.4 MB · Views: 333
I was still concerned about the scaling of the helmet, so I grabbed my trusty roll of max strength duct tape and did a very rough and lopsided assembly of my bucket to get a better understanding of it. Good news, its a match! Can even get my glasses through in there.

So, its been awhile so here is the current status of my entire armor. I have to go back and edit the first post to update, but I'm lazy and on my phone. I'm getting a close!

Hopefully I will have it done in time for a con on April 7th, but I may actually skip that one and go to one in July instead. I am planning to do a partial undersuit for this build, may turn into a full undersuit. Not sure yet. I am still scheming. Mwuahaha.


JUST HAD A BRILLIANT IDEA. I also airsoft, so I have a full protective vest and helmet set up and all that. But I just remembered the padding inside the helmet is velcro based, so my plan is to install the same velcro disks inside the ODST helmet so I can swap the pads back and forth between them as needed.
 

Attachments

  • 20170302_225210.jpg
    20170302_225210.jpg
    904.9 KB · Views: 369
  • 20170302_225217.jpg
    20170302_225217.jpg
    946.1 KB · Views: 369
  • 20170302_224727.jpg
    20170302_224727.jpg
    869.6 KB · Views: 343
  • 20170302_231118.jpg
    20170302_231118.jpg
    1.2 MB · Views: 340
  • 1488522079258-759342715.jpg
    1488522079258-759342715.jpg
    1 MB · Views: 337
Ok so here is the story, around the summer time when I joined, I was pretty much a noob and the only place I could find EVA foam in the area which was inexpensive was hobby lobby. Not knowing that it was just foam for details I started assembling an armor, I nearly completed the right Ricochet armor when I realized I was running out of supplies, as well as noticed that the armor wasn't thick and strong as I thought. It was very soft and flexible. I then reached out to the 405th and realized that this type of foam I had was only used for details. Seeing how that was pretty much a loss I turned to the helmet pepakura assembling. I was quite far when I ran out of super glue. My mother bought me more but instead got Elmer's glue with a precision tip. I told my mom that it was the wrong type of glue and that it wouldn't work, but she said she built crafts using the same way with Elmer's glue as a child. I held off that project, and my mother finally encouraged me to just try it. She watched me apply it, and when I applied it, the card stock got so wet that the helmet started to softly tear on itself with the weight. The the helmet was ruined and I trashed it. My biggest mistake was trusting my mom, again. That is probably my most common mistake in my life.
 
Hey, not true. I use Elmer's glue for Pep, and it turns out fine. You just have to use a tiny bit, rather than a lot.
If there's anyone you can trust, it's your mother. I hope you realize that.
 
Hey guys, rather than waste space with a new thread (also because this pertains to this build) I need some electrical help. If someone with some LED savvy could pm me that would be great

Edit: Resolved.
 
Last edited:
Sort of an update: mainly me playing around with color schemes and weathering on my old/testing shoulder. I tried sealing it with Rustoleum Peel Coat Wheel Paint. I don't recommend it. Most of this past weekend went into finishing up a Captain America shield for a friend.
 

Attachments

  • 20170305_181227.jpg
    20170305_181227.jpg
    694.3 KB · Views: 352
  • 20170305_181244.jpg
    20170305_181244.jpg
    965.3 KB · Views: 370
  • 20170305_181253.jpg
    20170305_181253.jpg
    794.8 KB · Views: 374
  • 20170305_181314.jpg
    20170305_181314.jpg
    824.1 KB · Views: 361
  • 20170305_181227.jpg
    20170305_181227.jpg
    694.3 KB · Views: 360
  • 20170305_181244.jpg
    20170305_181244.jpg
    965.3 KB · Views: 364
  • 20170305_181253.jpg
    20170305_181253.jpg
    794.8 KB · Views: 365
  • 20170305_181314.jpg
    20170305_181314.jpg
    824.1 KB · Views: 336
  • 20170305_181432.jpg
    20170305_181432.jpg
    327.1 KB · Views: 272
The nice thing about having a decent sized TV in combination with theater mode, you can get some decent ortho views of an armor piece with fairly accurate scaling. Now to come up with the patterns for it....

P. S. Yes, I know I have tiny arms/wrists. My bicep only has an 11" circumference xD
 

Attachments

  • 20170308_231925.jpg
    20170308_231925.jpg
    1.4 MB · Views: 381
  • 20170308_232101.jpg
    20170308_232101.jpg
    478.6 KB · Views: 340
  • 20170308_232129.jpg
    20170308_232129.jpg
    485.7 KB · Views: 355
Nice! that is an awesome technique! I'm looking forward to seeing this come to life!

Yes, you have tiny wrists. :p
 
Last edited:
Status
Not open for further replies.
Back
Top