First Spartan III build (3D print)

Status
Not open for further replies.

Emp Frosty

Active Member
Member DIN
S144
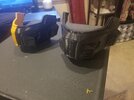
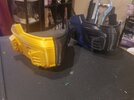
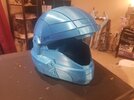
It's been a long time since I've been in the forums but I wanted everyone to see my first Spartan III build. No pictures to post yet but I have started printing out a bucket or two. I'm expecting the build to take several months to complete but to ultimately be ready before Halloween.

The build will consist of the normal suit parts but here are the extra and more specific build parts:

Mk. V helmet with HUL upgrade
ODST helmet for alternative
Mk. V or CQB shoulders
FJ Para knee pads (if I can find them)
SRS99 (Reach sniper)
Breacher collar
Tactical hard case (if I can find it)

Additionally considering nav/tac mount on the forearm that can fit my phone or rig up a raspberry pi.
 
Current print progress of the MK. V helmet.
 

Attachments

  • 20210424_194304.jpg
    20210424_194304.jpg
    3.4 MB · Views: 304
  • 20210424_194309.jpg
    20210424_194309.jpg
    3.4 MB · Views: 277
Soooooo I ran in to a but of a hiccup with the size of the MK. V helmet, hight and width wise are great as well as the hole for my head to fit through (barely fits through). However ITS REALLY LONG. Added some pictures of the ODST helmet for size comparison. Fortunately with the way I cut the model I think I can keep the hight and width the same but shorten the length of the back half so I dont have to scrap the whole thing. For now though I'll keep it as is and work with the intention of having the ODST be my main bucket.


20210428_184103.jpg
20210428_184041.jpg

20210428_184125.jpg


Side question to anyone lurking, what are the more beginner friendly ways of filling 3d prints or just ways that everyone prefers?
 
Soooooo I ran in to a but of a hiccup with the size of the MK. V helmet, hight and width wise are great as well as the hole for my head to fit through (barely fits through). However ITS REALLY LONG. Added some pictures of the ODST helmet for size comparison. Fortunately with the way I cut the model I think I can keep the hight and width the same but shorten the length of the back half so I dont have to scrap the whole thing. For now though I'll keep it as is and work with the intention of having the ODST be my main bucket.


View attachment 305746View attachment 305747
View attachment 305748

Side question to anyone lurking, what are the more beginner friendly ways of filling 3d prints or just ways that everyone prefers?
I think it’s long compared to the ODST but would be fine compared to any other halo helmet .... it looks similar in scale to me.

As for the filling. When I printed in PLA I would melt the seams together with a soldering iron then sand it out. Then filler primer. But most people I see use spot/glaze puty because it sands easy.

Prints are coming out great too
I measured out the scale in my slicer software and it definitely looked the same size but the MK. V has a lot more room in it when I tried it on. It might work out fine with some padding in it but I'm not gonna focus on that till I'm further along and have more of the body printed to compare it to (try not to do more work than I need to if I don't have to).
 
Started working on the SRS-99 over the weekend while I wait for my larger printer to arrive so I can print in as few sections as possible for the rest of the armor. Though ufortunately I found out late that there was something wrong with one of the parts in the file that made it so it wouldn't print properly. Gonna try and measure out a piece of foam to stuff in there instead of trying to rework then reprint the section.

20210504_100730.jpg


About half way through the total print volume of it so far and am excited to see how it turns out.
 
Not so mush of a build update as it is a tool/machine update. I finally got my Ender 5 Plus in today so I can start printing larger sections in bigger and fewer pieces. Also just waiting on the last part for the SRS-99 to come off my other printer so there will be an update for that later.

IMG_20210508_134105_923.jpg


IMG_20210508_134105_925.jpg


Prepare for production to hit warp speed.
 
A progress update to the SRS-99. Got everything printed out and glued that I wanted glued. I realized I had more purple and black left over on the spools than I thought so now it's in 3 colors :p

20210509_115926.jpg


20210509_115939.jpg


I'll be adding magnets to the magazine so I can do reloads but all that's left for the base work is to fill, sand, and fill that pesky hole that didnt print.
 
I've been spending the last couple days getting acquainted with Armorsmith designer what I can do with it. While I've learned that it's great to make your prints fit just right you still need to double check with some sample prints when you can, like so.

20210512_185354.jpg


20210512_185241.jpg


The white is the current size and the gold was what I originally sized to. Even though the size looked good in Armorsmith it it came out bigger than needed so just a little reminder to double check your sizes with samples when printing armor.

(Also dont mind my tiny wrists)
 
You sample printing method is absolutely genius. I had done too many trial and error prints that have wasted a lot of filament. Why I have not thought of this method before, i don't know.
 
You sample printing method is absolutely genius. I had done too many trial and error prints that have wasted a lot of filament. Why I have not thought of this method before, i don't know.
Actually got the idea to do it this way by adapting someone else's idea to print as normal then stop after a few mm to test. The way I did it was sliced off some sample sections in meshmixer then just let those print while I was doing other things.
 
I'll put up an update to the build later tonight but wanted to share a remix of a file I did by RockLobbster on Thingiverse.

Screenshot (6).png


I Liked the file but it was just a solid model so i used what little Meshmixer skills I have to hollow it out and make it functional. Hope anyone else finds it useful for their builds.
 
Status
Not open for further replies.
Back
Top