First timer help

Status
Not open for further replies.

Commander shep

New Member
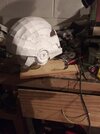
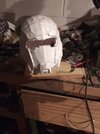
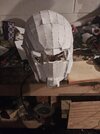
Forgive me if this has been covered. Im doing my first paper pep and this site has taught me a lot just from the forums, but im at a standstill trying to figure out how to brace my pep for the outer resin and keep it all straight. I work at a body shop, so i have access to the best bondo and resin as well as rondo, but i dont want to have to redo all the pep work. Ill post pics
 

Attachments

  • 20210414_211507.jpg
    20210414_211507.jpg
    1.1 MB · Views: 142
  • 20210414_211457.jpg
    20210414_211457.jpg
    1 MB · Views: 144
  • 20210413_222154_HDR.jpg
    20210413_222154_HDR.jpg
    1.1 MB · Views: 140
Hey Commandershep!
I personally have little experience with pepakura work, (tried making a chestpiece and ended up swapping to foam)

But from what I have seen, some people will mix a thin combination of wood glue and water and paint on thin layers to the pep files to make it a little more rigid, or use a clear coat to add some rigidity (I haven't seen that as much though)


Here's a video of someone using woodglue to add a little strength to their piece before using bondo or fiberglass to add that final layer of rigidity.

Hope that helps you out some though and gets you in a good direction! Maybe one day another member will get a good tutorial video made about it, I know TurboCharizard is working on making some tutorials for foamsmithing!

Looking forward to seeing your build come along!!
Thanks for the response. I thought about spraying the paper with a clear matte paint before i add resin to the outside to keep the resin from saturating the paper so it wont have the tendency to sag, but the real issue is keeping the whole thing symmetrical. Ive seen sticks used, but its pretty tight in there.
 
Thanks for the response. I thought about spraying the paper with a clear matte paint before i add resin to the outside to keep the resin from saturating the paper so it wont have the tendency to sag, but the real issue is keeping the whole thing symmetrical. Ive seen sticks used, but its pretty tight in there.
I think it's best to work in small sections at a time, work on parts you can control easily without introducing much sag or warping, and once those have been done, then move onto making sure they stay symmetrical. At least with larger flatter areas you can use popsicle sticks cut to size.

Over all, take your time with it, move slowly and methodically. Rushing will certainly leave you in a pinch at the end and having to build up with bondo to correct mistakes.
 
Hey Commandershep!
I personally have little experience with pepakura work, (tried making a chestpiece and ended up swapping to foam)

But from what I have seen, some people will mix a thin combination of wood glue and water and paint on thin layers to the pep files to make it a little more rigid, or use a clear coat to add some rigidity (I haven't seen that as much though)


Here's a video of someone using woodglue to add a little strength to their piece before using bondo or fiberglass to add that final layer of rigidity.

Hope that helps you out some though and gets you in a good direction! Maybe one day another member will get a good tutorial video made about it, I know TurboCharizard is working on making some tutorials for foamsmithing!

Looking forward to seeing your build come along!!
I also should add that
Hey Commandershep!
I personally have little experience with pepakura work, (tried making a chestpiece and ended up swapping to foam)

But from what I have seen, some people will mix a thin combination of wood glue and water and paint on thin layers to the pep files to make it a little more rigid, or use a clear coat to add some rigidity (I haven't seen that as much though)


Here's a video of someone using woodglue to add a little strength to their piece before using bondo or fiberglass to add that final layer of rigidity.

Hope that helps you out some though and gets you in a good direction! Maybe one day another member will get a good tutorial video made about it, I know TurboCharizard is working on making some tutorials for foamsmithing!

Looking forward to seeing your build come along!!
I should also add that i plan on resining one section at a time and may have to hold parts while they dry, so something like wood glue that takes a long time to dry prob wont be the best route
 
I’m a big fan of the hot glue and popsicle sticks method. Basically you create a cage of structural supports (similar to 3D print supports) inside the item using popsicle sticks and hot glue. Then do very thin layers in small sections based on where the supports are so you ensure there is always some support. This might not be the best advice, as I primarily work with foam under my paper/ fiberglass for support too.
 
I’m a big fan of the hot glue and popsicle sticks method. Basically you create a cage of structural supports (similar to 3D print supports) inside the item using popsicle sticks and hot glue. Then do very thin layers in small sections based on where the supports are so you ensure there is always some support. This might not be the best advice, as I primarily work with foam under my paper/ fiberglass for support too.
Thanks. I think thats the route im gonna go. Ill do whichever side looks better first and then use sticks to push the other side where its gotta go. The back is fairly rigid, but the front has a little twist to it. I wouldnt feel terrible using a lot of bondo once its solid bc this ones prob just gonna be a shelf piece that im gonna make a mould of.
 
All the aforementioned advise is excellent. I second all that has been said.

Personally, however, I don't do any of that with my pep.

I start with a thin layer of resin on the inside. Then, while it's drying, you let it sit somewhere where it won't fall over or flex in any weird ways. With my helmet, I supported it so that it stood upside down basically while the inner layer of resin is drying. I have found that the cardstock is strong enough to resist compressing along the z axis while drying (I hope that makes sense). And by being upside down, you don't get drips out of the neck hole or globs at the edges. It is important that the first inside layer is very thin so that it is not so heavy as to crush the paper model.

Then, I do a thin layer outside similar to the thin layer inside. After that I feel comfortable with thicker layers.

I guess I always start with the inside so that the weight of the resin is pushing outwards from the helmet rather than crushing it inwards... Again, I hope that makes sense...
It does make sense, my problem is the flex. This was my first try and its def not uniform enough to be really straight. So im gonna have to push, pull and brace it to make it so. I know its not gonna be perfect, but id like it to be in the ball park when i bondo it.

Kinda feel like i jumped in the shark tank to see if i could swim.
 
Status
Not open for further replies.
Back
Top