FoxODST Helmet and Armor Build

Status
Not open for further replies.

FoxODST

Member
I'll have this serve as my build thread for both my helmet and armor to keep everything in one place.

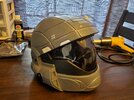
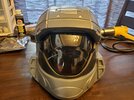
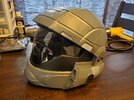
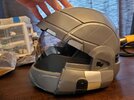
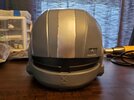
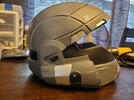
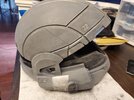
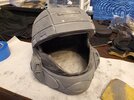
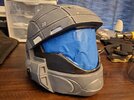
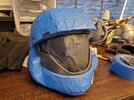
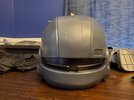
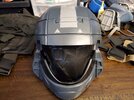
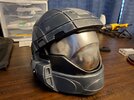
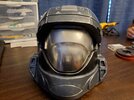
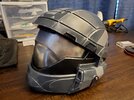
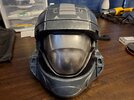
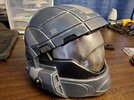
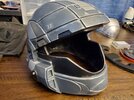
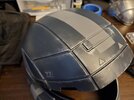
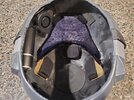
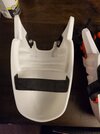
So I'll jump right in. The first part of my ODST build will be my Xcoser helmet. I was able to get ahold of this helmet for $80 with only a week long wait. Out of the box it's not great- paint job is rough. For a mass produced item I'm not too mad of course. It was always going to get modded and repainted anyway and the lineage of the helmet is more than acceptable once it's properly customized and made more accurate. The material is...different. It's an almost flexible rubbery plastic and the inside looks loosely reinforced with some type of fiber before a final epoxy coat is brushed over it. I immediately removed the cheap stuck in foam and removed the visor. The stock visor that comes with the helmet is hot glued in and lightly smoked but doesn't obscure your face at all once the helmet is being worn. I purchased a black tinted visor with more proper screen lineage from a maker on Etsy will should be here at the end of this week or early next week.

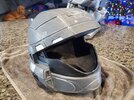
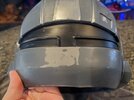
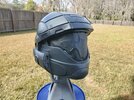
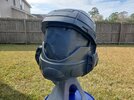
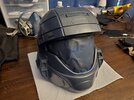
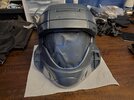
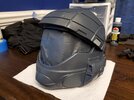
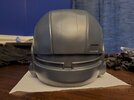
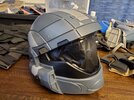
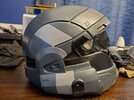
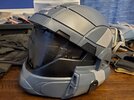
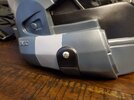
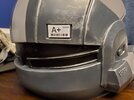
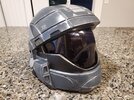
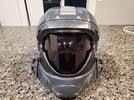
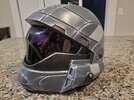
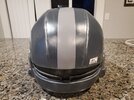
These first pictures are of the helmet right out of the box.
 

Attachments

  • 20201204_100528.jpg
    20201204_100528.jpg
    3.3 MB · Views: 220
  • 20201204_100533.jpg
    20201204_100533.jpg
    3.1 MB · Views: 156
  • 20201204_100538.jpg
    20201204_100538.jpg
    3.2 MB · Views: 203
  • 20201204_100544.jpg
    20201204_100544.jpg
    3 MB · Views: 144
  • 20201204_100549.jpg
    20201204_100549.jpg
    3.2 MB · Views: 149
  • 20201204_100555.jpg
    20201204_100555.jpg
    3.1 MB · Views: 155
Next I gave the entire helmet a light sanding with 400 grit sandpaper. Enough to even the surfaces and rougen up the glossy areas so they will accept paint and it will adhere more easily and strongly. I also took this opportunity to removed the "Xcoser" logo from the back of the helmet. I removed it with an xacto knife and then sanded until the surface was level.
 

Attachments

  • 20201204_110557.jpg
    20201204_110557.jpg
    4.5 MB · Views: 131
  • 20201204_105858.jpg
    20201204_105858.jpg
    2.8 MB · Views: 132
  • 20201204_105907.jpg
    20201204_105907.jpg
    3 MB · Views: 164
  • 20201204_110557.jpg
    20201204_110557.jpg
    4.5 MB · Views: 117
  • 20201204_110615.jpg
    20201204_110615.jpg
    3.1 MB · Views: 137
As a final step before painting I washed the helmet with Dawn in order to remove any residues and oils and then did a wipe down with isopropyl alcohol. I also placed masking tape inside the helmet to avoid overspray going through the visor area. I then laid down the base coat of paint. As I've mentioned before, I prefer Rustoleum brand paints. I looked for a long time before deciding on a color for this. I definitely wanted the armor to be a matte color. I didn't want to do black and the grey the Xcoser helmet came in felt too light. I ultimately found and decided on Slate ultra matte which ended up being perfect for what I was wanting as the base armor color. It is not accurate to the in-game color for Halo 3 which is actually a shade of green similar to an olive drab. I chose not to go the Halo 3 route for the coloration.

Once the helmet was fully prepped it went onto my handy dandy helmet painting stand, which is actually a jackstand I have been painting helmets on for about 8 years. :lol:
 

Attachments

  • 20201204_113542.jpg
    20201204_113542.jpg
    3.5 MB · Views: 138
  • 20201204_122617.jpg
    20201204_122617.jpg
    3.1 MB · Views: 171
  • 20201204_122623.jpg
    20201204_122623.jpg
    3.7 MB · Views: 117
  • 20201204_132221.jpg
    20201204_132221.jpg
    2.9 MB · Views: 135
  • 20201204_132225.jpg
    20201204_132225.jpg
    2.8 MB · Views: 129
  • 20201204_132233.jpg
    20201204_132233.jpg
    2.9 MB · Views: 149
  • 20201204_132242.jpg
    20201204_132242.jpg
    3.1 MB · Views: 122
After allowing the base coat to dry overnight, I masked the helmet to paint the black details. I'm a perfectionist about the masking and this took me about 2 hours. I spent a long time trying to decide if I should have sprayed the black first and mask those areas to do the grey but in the end I think it would have been equally time consuming either way.
 

Attachments

  • 20201205_102543.jpg
    20201205_102543.jpg
    3.5 MB · Views: 122
  • 20201205_102555.jpg
    20201205_102555.jpg
    3.3 MB · Views: 117
  • 20201205_113847.jpg
    20201205_113847.jpg
    2.8 MB · Views: 124
  • 20201205_113857.jpg
    20201205_113857.jpg
    2.5 MB · Views: 119
  • 20201205_113905.jpg
    20201205_113905.jpg
    2.6 MB · Views: 137
After another day of drying I moved to the stripe details. I chose the same color I used for the stripe on my MA40 which is Coastal Grey by Rustoleum. This masking was a little easier. Then back to the helmet stand for the final paint.
 

Attachments

  • 20201206_103031.jpg
    20201206_103031.jpg
    3.5 MB · Views: 113
  • 20201206_103043.jpg
    20201206_103043.jpg
    3.5 MB · Views: 110
  • 20201206_103052.jpg
    20201206_103052.jpg
    3.4 MB · Views: 107
  • 20201206_104155.jpg
    20201206_104155.jpg
    4.1 MB · Views: 121
  • 20201206_121325.jpg
    20201206_121325.jpg
    3.2 MB · Views: 117
  • 20201206_121332.jpg
    20201206_121332.jpg
    2.9 MB · Views: 114
  • 20201206_121347.jpg
    20201206_121347.jpg
    3.9 MB · Views: 118
  • 20201206_121356.jpg
    20201206_121356.jpg
    2.9 MB · Views: 132
I decided to drill out the small hole areas on the sides of the helmet and add button head machine screws to add to the realism. I have seen both flat head and phillips head screws on screen armor so I elected to use that rather than go with something more "futuristic" like torx hardware even though that was my first thought as to what to use.
 

Attachments

  • 20201206_122555.jpg
    20201206_122555.jpg
    4.5 MB · Views: 121
For weathering and detailing I did a flat aluminum dry brush on all the edges and recessed areas of the helmet. There are lots of ways to go about the weathering but this is the look I like the most. I want to armor to appear used and realistic but I just out of pure personal preference I don't want to go really into the weathering and battle damage. I prefer a cleaner look while maintaining realism.

NOTE: I mocked in the visor that came with the helmet for photos just to see it completed. I attempted to use "looking glass" spray paint to create a silver reflective effect. I read a few cosplay places that using this spray lightly will maintain enough transparency to see through the visor- soooooo that was a lie...:confused::p ZERO visibility after 3 light coats.

I won't be able to fully finish the helmet until I get my new visor in and install it.
 

Attachments

  • 20201206_132823.jpg
    20201206_132823.jpg
    3.4 MB · Views: 142
  • 20201206_132831.jpg
    20201206_132831.jpg
    3 MB · Views: 136
  • 20201206_132855.jpg
    20201206_132855.jpg
    3.4 MB · Views: 130
  • 20201206_132905.jpg
    20201206_132905.jpg
    3.1 MB · Views: 135
  • 20201206_132916.jpg
    20201206_132916.jpg
    2.9 MB · Views: 119
  • 20201206_133330.jpg
    20201206_133330.jpg
    3 MB · Views: 115
  • 20201206_133344.jpg
    20201206_133344.jpg
    3.1 MB · Views: 146
To finish up work on this for the weekend, I made a simple med ref decal in Microsoft paint and affixed via double sided tape. I don't have access to a machine the can create and print decals so this is the solution!
 

Attachments

  • 20201206_172120.jpg
    20201206_172120.jpg
    3 MB · Views: 121
That's it for now!

Armor is being printed at a pretty good clip and I hope to have the pieces in hand within the next couple weeks. With the holiday fast approaching it may be a bit before I make meaningful progress. This weekend I hope to be able to finish the helmet by adding the visor, fan, and LED lighting for the interior. I already installed the padding.

Just for gee wiz I'll attach a photo of the three paints I used for this helmet. More to follow!
 

Attachments

  • 20201206_130926.jpg
    20201206_130926.jpg
    2.8 MB · Views: 116
Update today- finally finished with the helmet! The RGBs didn't end up working as well as I would have liked with the darker visor so I canceled those.

Padding completed, New visor installed, and fan installed. Just waiting on the armor to arrive now and I can begin work on the rest of the kit!

The helmet now joins the others in the game/display room as the newest addition in between uses. Its interesting to see the scale is so much smaller in comparison to my other costumes' buckets.
 

Attachments

  • 20201213_174938.jpg
    20201213_174938.jpg
    4 MB · Views: 150
  • 20201213_174947.jpg
    20201213_174947.jpg
    3.8 MB · Views: 130
  • 20201213_174958.jpg
    20201213_174958.jpg
    2.7 MB · Views: 138
  • 20201213_175008.jpg
    20201213_175008.jpg
    4 MB · Views: 141
  • 20201213_175022.jpg
    20201213_175022.jpg
    4.2 MB · Views: 133
  • 20201213_175046.jpg
    20201213_175046.jpg
    2.8 MB · Views: 150
  • 20201213_175309.jpg
    20201213_175309.jpg
    3.5 MB · Views: 137
Small update but want to maintain my progress so I don't lose steam on the thread. Armor pieces are done printing! Hopefully they should arrive some time this week and may be able to begin assembly next weekend. The printing process took about a month longer than we originally planned but that's just the way it is.
 

Attachments

  • received_407875867110326.jpeg
    received_407875867110326.jpeg
    738.5 KB · Views: 94
  • received_693946771233016.jpeg
    received_693946771233016.jpeg
    676.3 KB · Views: 98
  • received_702229863987240.jpeg
    received_702229863987240.jpeg
    739.6 KB · Views: 105
  • received_842594869630502.jpeg
    received_842594869630502.jpeg
    731.4 KB · Views: 90
When i saw your post i suddenly got a vision of the the not so far future. I think i see sandpaper, some kind of filler and a lot of dust.

Jokes aside. that looks like a nice pile of bits for your armor man :)

Edit: may i ask where you got those printed?
I had these printed by a guy I know named Ace Brunnette. He printed some Gears of War armor for me last year so I gave him a try on this project as well!
 
Another notmuchofanupdate update...

Completed install of the screen accurate glove covers onto my pvc leather gloves by Jimmy Da Moose ! They look great! The silicone material bonded really well using Barge all purpose cement so no need to sew to the gloves. Also snagged a couple buckles from Adam Penny. I'll be using the 3D printed versions for the back of the armor.

Armoe WILL BE here on Wednesday (FINALLY). I have to work next weekend, of course right? Although I may take some leave to work on this project. If you're following the build, stay tuned and thanks for caring. I promise there will be meaningful progress soon.
 

Attachments

  • 20210130_151034.jpg
    20210130_151034.jpg
    7.7 MB · Views: 104
Another notmuchofanupdate update...

Completed install of the screen accurate glove covers onto my pvc leather gloves by Jimmy Da Moose ! They look great! The silicone material bonded really well using Barge all purpose cement so no need to sew to the gloves. Also snagged a couple buckles from Adam Penny. I'll be using the 3D printed versions for the back of the armor.

Armoe WILL BE here on Wednesday (FINALLY). I have to work next weekend, of course right? Although I may take some leave to work on this project. If you're following the build, stay tuned and thanks for caring. I promise there will be meaningful progress soon.
YO, those gloves are awesome. can't wait to see the finished product now.
 
Armor did finally arrive and work has started! Some initial strapping to make sure no modification will be needed before paint as well as some spot putty and sanding!
 

Attachments

  • 20210211_095140.jpg
    20210211_095140.jpg
    5.8 MB · Views: 106
  • 20210211_095125.jpg
    20210211_095125.jpg
    1.6 MB · Views: 108
  • 20210211_104838.jpg
    20210211_104838.jpg
    1.3 MB · Views: 103
Due to unprecedented rainfall in the Southeast I haven't been able to paint my pieces so I'm at a bit of a stop until next weekend. I was able to complete the chest piece on my porch as some motivation in between heavy rain falls. Weathered and applied decals. Very happy with the result!
 

Attachments

  • 20210213_124647.jpg
    20210213_124647.jpg
    3.4 MB · Views: 99
Spur of the moment due to the strange warm up we had I decided to lay the base color for the armor. FINALLY I can begin the process of weathering and final assembly!!!! I couldn't be happier with the grey I chose to go with. It's not necessarily a the canon color but it really works for what in my mind is the idealized grey for this armor. I couldn't be happier. (Ignore the ABS Mandalorian pieces those are a project for a friend )
 

Attachments

  • 20210227_112824.jpg
    20210227_112824.jpg
    3.3 MB · Views: 93
Status
Not open for further replies.
Back
Top