Good method for attaching the 2 halves of chest armor together?

Nimitz

Member
I'm using the GA Infinite MC files and am stuck on a workable method for attaching the front and back halves of the chest armor so that you can attach and unattach them easily when putting on and taking off the armor?
 
I was afraid someone was going to tell me that ...I have a poor relationship with magnets and my cosplay outfits for some reason so I'm going to have to get my act together ...
 
I was afraid someone was going to tell me that ...I have a poor relationship with magnets and my cosplay outfits for some reason so I'm going to have to get my act together ...
You can also use varying clips and latches if you build sturdy enough. 3D printing can make something that merges with the suit design.

I have used variations of all of the below: (3d printed or with designs that already worked for their location)
3.29_-304-Stainless-Steel-Spring-Loaded-Self-Locking-Toggle-Draw-Latch-&-Strike.jpglarge.jpgclip.pngimages.jpg
 
This is going to sound goofy, but you can always attach the sides with elastic. Your chest piece will remain one part, but because you're using elastic you'll be able to easily slip it off and on. With that though, I do recommend what Sweed said and using some strong magnets as extra pull strength to keep the two halves together.
 
Hey Nimitz ,
I've been following your Silverteam build and have been meaning to put an update on my Silverteam build about this since you first posted you've been having issues working this out. Sorry about the delay but Christmas/New Years has been crazy with grand kids. Then today I was going to start adding updates and found the thread is locked even from me. So I guess I should post it here for ya. Our armors (yours and mine) are based on the same file set so this should be pretty close for you.

Like you, I'm not a fan of magnets. I've tried them and am just too rough in my wearing for them. I like to get rambunctious at the events and there's just no way I could throw myself around, drop to the floor, and so on with magnets.

I hope this reply isn't too much... too long... or too much like I'm trying to monopolize your thread. I'm just trying to be complete in response. Also, sorry if the photos are a little rough. I didn't set up for a real "photo shoot", so these are just quick snaps in the house to get a reply out to you faster rather than prettier.

Context: I'm generally by myself at a convention. Maybe one other mate who is also getting armored up. So I always build such that I can get fully dressed alone (though we all know it helps if there's someone else to lend a hand).

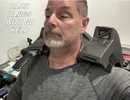
The back is really the base for me. It goes on first and hangs on the shoulders without help through a fairly wide range of body movements.
  • From the back at the collarbones (under the faux clasps) are two long velcros with mating pieces on the inside of the chest below the faux clasps. I just press the chest in place at the top on those two velcro strips.
    IMG_3335.JPEG
  • At the ribs are a long-tailed clasp system used on roller blades and ski boots. With the chest suspended from the velcros its pretty easy to align the tails and put them through the rib clips.
    IMG_3336.JPEG
    2026-01-02_07-08-37.PNG

    This is (to me) where you're having issues: Just the wrong type of clasp.
These clasps are nearly identical to how they were done in the show - and thus why I did it. But I admit to getting lazy and not carving out a recess in the rib armor for them: Mostly because I can't count on having a second person there to work them back through a groove so the tail is inside and not outside. So they are just bolted to the top of the armor. But hey, if someone has their face down in my ribs to see the different there's a bigger issue than a recessed groove for the clasp.
2026-01-02_07-00-18.PNG

IMG_3821.jpg

If you want to get a little more fancy than I did you could cut a groove for the tail, bolt it from the inside passing through the groove to the outside. That would have it a step closer to show accuracy.


I hope this helps ya.
 

Attachments

  • 2026-01-02_06-46-41.PNG
    2026-01-02_06-46-41.PNG
    949.3 KB · Views: 6
Last edited:
Hey SgtSaint
No worries! I appreciate the detailed responses from you! It's always frustrating to get a reply where the poster it trying to help but either assumes you know a bunch of stuff or just leaves out important details by accident. Assuming I don't have a clue is always good since usually when I ask for help it's because I've already tried a bunch of stuff or can't find an already clever solution and a really do need someone to hold my hand ... lol.
Your system is what Ive been looking for for ... I had found on YT a video showing how the actors donned their armor for the show and saw that similar strap and buckle system for the thigh armor and was wondering what it was. I haven't been skiing or rolling blading for 25 years so I had forgotten about these systems. While I like to be able to put on my cosplay outfits by myself if possible my wife typically attends Cons with me so it's not mandatory that it is completely self sufficient ...
I'm still in Egypt right now hanging with the Pharaohs so once I get home on the 13th I can start attacking this again. In the mean time I can start looking for those buckle systems and stare at your photos some more to come up with a good approach.
 
Part of why I was scratching my head for the rib armor connection was how to not have a connector showing on the outside that clearly was 'out of place' but your setup makes perfect sense now that I see it!
 
Ok, first detail question ... I see where you bolted the 'strap' piece of the buckle system to the one side of the armor. For the actual buckle were you able to bolt that on as well or is that just glued on with E6000 ?
 

Your message may be considered spam for the following reasons:

If you wish to reply despite these issues, check the box below before replying.
Be aware that malicious compliance may result in more severe penalties.
Back
Top