Soft Parts H3: ODST Undersuit Analysis/WIP

Status
Not open for further replies.

Jason225

Active Member
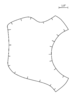
Hey everyone, just thought I'd share some observations and kind of show what I've gotten done so far. So I wanted to start with the top of the undersuit for my "Rookie" ODST armor build, and wanting to go the extra mile, I went to the 3D models for reference pics.

269760
269761


As you can see, there is indeed a lot of texture on the stomach underneath the armor plates, so I'm gonna try to work that in somehow with foam. But looking at the shoulder, we've got what appears to be some kind of rubber or vinyl padding on the shoulders, and I wanted as accurate of a pattern as I could get for that - I just ordered a sheet of gray 1/16" thick 65A SBR rubber, so we'll see how that goes. But anyway, for my pattern, I decided to trace over the model's texture and pepakura out an entire shoulder just so I could cut it up. Here's some pics of that process.

269762
269763

269764
269765


So I've got my pattern, just waiting on the rubber. I also want to talk about the base layers - which, to me, appear to be a tan shirt in the armpit area (which I figured would be a nice breathable base layer since it'll be covered by the rest of the armor anyway, only the armpits will show when I'm done) and black thermal underwear material on the rest of the sleeve (you can see the small square pattern in the cloth in my reference picture up top). Luckily I had a black thermal already and a blank tan shirt was only $6 on Amazon, so we've got those covered. I'll be sewing the sleeves of the thermal onto the shirt, so I won't have to wear the thermal underneath it and overheat.

Next I wanna talk about the legs. Here's a couple reference pics:

269766
269767


For the waist area, I'm just gonna go with grey cargo shorts. Could I put a big rubber piece on the jock area? Sure. Would it look like an adult diaper? Probably. So I'm gonna stick with just the shorts. Then we have a familiar face on the back of the knees, that old square-pattern black thermal again. LUCKILY I also happen to have black thermal pants laying around somewhere too, so I'll be sewing the legs onto the bottom of the cargo shorts similar to the shirt plan for the top half, so I don't end up with a bad case of swamp butt.

If anyone's interested, I can scan the pattern I got for the rubber/vinyl/whatever on the shoulders and upload them here. Let me know what you guys think of my plans so far, and if you have any ideas on things that can be improved upon, definitely let me know.
 
Here's the patterns I ended up with, I scanned them and cleaned them up in Paint.net. I've... Never made a sewing pattern before, so let me know if I did something stupid. They're scaled for my arm by default, which is roughly 14" in circumference where the bottom "strap" area wraps around.
 

Attachments

  • shoulder.png
    shoulder.png
    75.4 KB · Views: 393
  • shoulder2.png
    shoulder2.png
    138.6 KB · Views: 362
Sorry it’s been a minute since my last update, but I’ve been trying to request a sample of the rubber sheet I wanted to no avail. Sent an email to the company a while ago, then filled out their sample request form, no response for either of them, so I decided to just eat the $20 if it turns out to not be exactly what I want and ordered it from the Home Depot website instead. In the mean time, here’s a test piece I made out of foam. Foam was my original plan until I realized how much this shoulder pad will need to stretch to fit properly, but I figured I’d go ahead and whip one up anyway to check the fit. Looks pretty solid in my opinion.
 

Attachments

  • 06C655F4-5AB8-4BD7-BE4D-E9A9C96AD955.jpeg
    06C655F4-5AB8-4BD7-BE4D-E9A9C96AD955.jpeg
    135 KB · Views: 318
You can probably heat form the rubber sheets over your foam template. (If it works like most rubber I've worked with...) Instead of sewing them together. Kinda like wet forming leather over a mold.
 
You can probably heat form the rubber sheets over your foam template. (If it works like most rubber I've worked with...) Instead of sewing them together. Kinda like wet forming leather over a mold.
I’ll have to give that a shot, I’m not super certain what will or won’t work until I actually get the rubber though, haha.
 
Good reference pics and good idea for the shoulder template. That extra level of dimension :) And thanks for extracting so many pics on my own thread earlier this year.

I'd love to make that abdominal undersuit but not sure I've the skills just yet. But we'll see how the rest of the build goes ;)

LostVikingProps (IG and FB) has some great ODST creation videos and pictures including the under suit for the upper body (has zippers) and that he also turned the butt plate into a bum bag to store stuff (ingenious idea).

270568
 
Good reference pics and good idea for the shoulder template. That extra level of dimension :) And thanks for extracting so many pics on my own thread earlier this year.

I'd love to make that abdominal undersuit but not sure I've the skills just yet. But we'll see how the rest of the build goes ;)

LostVikingProps (IG and FB) has some great ODST creation videos and pictures including the under suit for the upper body (has zippers) and that he also turned the butt plate into a bum bag to store stuff (ingenious idea).

View attachment 270568
I saw that when I was digging around on Google! I'm hoping my undersuit turns out that good, though I'll probably use foam for my "abs" as I don't have a sewing machine. And yeah, I was also thinking of doing the buttplate as a fanny pack of sorts, though I think that may actually be the intended purpose. You can actually see what looks like a zipper on the 3D model. I've been kind of looking for a makeup bag or clutch of some sort that matches the shape and texture to save me the trouble of sewing one by hand, that way I'll just have to sew the nylon straps and clips onto it.
 
I saw that when I was digging around on Google! I'm hoping my undersuit turns out that good, though I'll probably use foam for my "abs" as I don't have a sewing machine. And yeah, I was also thinking of doing the buttplate as a fanny pack of sorts, though I think that may actually be the intended purpose. You can actually see what looks like a zipper on the 3D model. I've been kind of looking for a makeup bag or clutch of some sort that matches the shape and texture to save me the trouble of sewing one by hand, that way I'll just have to sew the nylon straps and clips onto it.

I can only sew straight lines (eg velcro onto webbing) :) So I'd be inclined to use foam too, or foam with fabric glued onto it.

The "bum bag" idea is so awesome I'd like to do it myself. Ah you mean you want to find a pre-made bag, add straps to the back and the armour plate to the front? Interesting idea. Myself, I'll go with making the butt plate out of foam then adding a zipper to it.

I'm also planning on making the flashbang grenades into storage containers (eg snacks, small water bottle, money).
Yeah, I know I've seen some makeup cases with that half-moon kind of shape, but unless I can find one exactly the right shape and texture, I'll probably just pull the in-game model and turn it into a sewing template in Pepakura Designer, then use some faux leather or marine vinyl to make the bag then stick the black armor-looking part on afterward. Also, I got my rubber in today, yay! It's less stretchy than I would have liked, but the color and texture are fantastic and I think I can make it work anyway. I maybe should have gone with silicone instead of SBR gasket material, but sheets of silicone are pretty expensive and this stuff was $20 for a roughly 1m x 0.6m sheet, so I've got plenty to work with. My needles and thread are arriving tomorrow, so I'll be getting to work on everything then.
 
Yes!! I am currently looking into a under suit as well. This just made my day even better!!! I kind of made and idea from seeing others under suits but the route you are talking about seems better. So much ideas and not enough time to figure!
 
Yes!! I am currently looking into a under suit as well. This just made my day even better!!! I kind of made and idea from seeing others under suits but the route you are talking about seems better. So much ideas and not enough time to figure!
Glad I could help you out!
 
I gotta say, really clever idea to use the texture maps as a template for construction. Really smart idea, and things are looking great so far. I look forward to seeing more progress.
Thanks! Hoping to be making some more progress soon, I bit the bullet and ordered a sheet of grey silicone. Just waiting for that to show up now. Lol
 
273201


I know it's been a while, but I promise I've been making some sort of progress. I decided to try using the rubber I have for now, at least as practice. I'll probably do a "V2" down the line with silicone, but I figured if I keep waiting I'll never get anything done. It's slow going with no sewing machine, but it's going at least.

273202


Still have one more panel to glue down and sew on, then the left arm will be done.
 
Last edited:
Another quick update: got the last piece glued down, just have to stitch it and then the left arm is finished. This is the first time I've had a good idea of how it'll look.

It'll be covered by the shoulder armor, so a lot of the crappy cut edges and stuff won't matter a ton, but I still want to do this again eventually with silicone. This SBR rubber doesn't stretch nearly well enough to have the correct appearance, but it'll work for now.

273232
 
Another quick update: got the last piece glued down, just have to stitch it and then the left arm is finished. This is the first time I've had a good idea of how it'll look.

It'll be covered by the shoulder armor, so a lot of the crappy cut edges and stuff won't matter a ton, but I still want to do this again eventually with silicone. This SBR rubber doesn't stretch nearly well enough to have the correct appearance, but it'll work for now.

View attachment 273232


DAAAAAAMN, that looks sharp!
 
Decided to take a break from the shoulder to work on the neck seal (my fingers hurt from hand stitching that rubber! Haha). Here's where I'm at so far.

20190720_184808.jpg


Basically the same process as usual for me, use the in-game model as a pepakura template. This time I just took the faces that I needed and traced them onto half inch EVA foam. The edges need to be sanded (used a box cutter :p) and the whole thing needs to be glued and plasti-dipped but overall I like it. The seam is in the back, I plan to epoxy some small magnets into the edges of the foam to keep it closed but easily put on/removed. Also, for anyone wondering if I'm doing the armor right now as well - yes, I am, but I want to hold off making a new thread until I have more to show. I have most of it pepped, but I have a bad habit of not following through after pep, so I wanna push myself to get through some glassing first.
 
Another very small update, but I started work on the stomach pieces. This one will be a ton of work, but if I pull it off it'll look pretty good IMO.

20190724_201024.jpg

20190724_205007.jpg

stomach.png


Also, if anyone wants these "template" pep files and textures, I can throw them up for download at some point.
 
Status
Not open for further replies.
Back
Top