- Member DIN
- S018
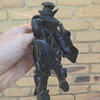
Yea, I had a stupid idea. “Let’s make a Halo 3 Hunter hand puppet”. So I did.
This puppet is inspired by the works of puppeteer/puppet maker/song writer/comedian/singer/musician/story teller (oh boy I could go on), Barnaby Dixon. While I wait to begin work on my main project, the Halo CE Grunt Puppet, I thought I’d give some of the puppetry basics a try in the meantime. This project uses a bunch of different techniques, so I’ll be breaking up the thread into each of them and updating as I go along. This keeps things clean, which may help some of you learn some stuff, helps me reflect and makes it readable for possible future employers (if that’s you, welcome!)
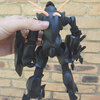
One goal I had about mid production was to keeps parts modular, meaning I can take it all apart easily and work on or replace sections without having to deal with glued pieces. There are three different types of parts to the puppet; hard parts, which are 3D printed, wooden or resin cast, medium, which are foam, and soft, which are sewn and stuffed. The plan was to try and make sure none of these three different types were permanently attached to a different type.
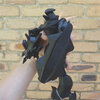
As of the date of posting, here is my progress!


This puppet is inspired by the works of puppeteer/puppet maker/song writer/comedian/singer/musician/story teller (oh boy I could go on), Barnaby Dixon. While I wait to begin work on my main project, the Halo CE Grunt Puppet, I thought I’d give some of the puppetry basics a try in the meantime. This project uses a bunch of different techniques, so I’ll be breaking up the thread into each of them and updating as I go along. This keeps things clean, which may help some of you learn some stuff, helps me reflect and makes it readable for possible future employers (if that’s you, welcome!)
One goal I had about mid production was to keeps parts modular, meaning I can take it all apart easily and work on or replace sections without having to deal with glued pieces. There are three different types of parts to the puppet; hard parts, which are 3D printed, wooden or resin cast, medium, which are foam, and soft, which are sewn and stuffed. The plan was to try and make sure none of these three different types were permanently attached to a different type.
As of the date of posting, here is my progress!
Last edited:
 will there be more puppets??