Halo 4 BR85HB SR (Pic heavy!) - First Major Project

Status
Not open for further replies.
So, since I've now demonstrated that I can both mould and cast, I'm going to open up the kit pre-orders! Obviously I wasn't comfortable taking money until I knew I could do that stuff.

As previously stated, the first batch of five will be $230 + shipping . I don't know what the weight or box size is yet, so shipping'll have to be a separate payment when it's ready to go out. Paypal fees are mostly percentages anyway, so it makes little difference.

Depending on how much time and materials it takes to do all this casting, and my general perception of the casting quality, the second batch of five will probably be $295. It's not much of a difference, so don't worry if you don't get in on the first five, but I want to do something for the people who are helping me out the most in these early stages, 'cause they're awesome. :D

The list currently looks like this:

1) SuprWeenieHutJr (SHIPPED)
2) granvillan
3) Harri51
4) (not on the 405th)
5) EMPTY

The other person on the "definite" list who gets 21 days from RIGHT NOW (ie. Until 8:30PM EST, May 30th 2015) to get an order in (we may even be into order-on-demand by that point, no longer pre-orders!) is RiBeck. If you want slot 3, holler and PM me for PayPal instructions! If not, just lemme know so it opens up.

The "maybes" were FoxtrotX146 and Noble 10 - If you want one of those empty slots, holler and PM me for PayPal instructions. But don't worry, you're not taking up a space in line if you don't.

If you guys want to wait until I've completed my own kit before jumping in to make sure it all goes smoothly, I understand! :p I can't guarantee a spot in the early bird batch in that case, but that's always the price of waiting.

---

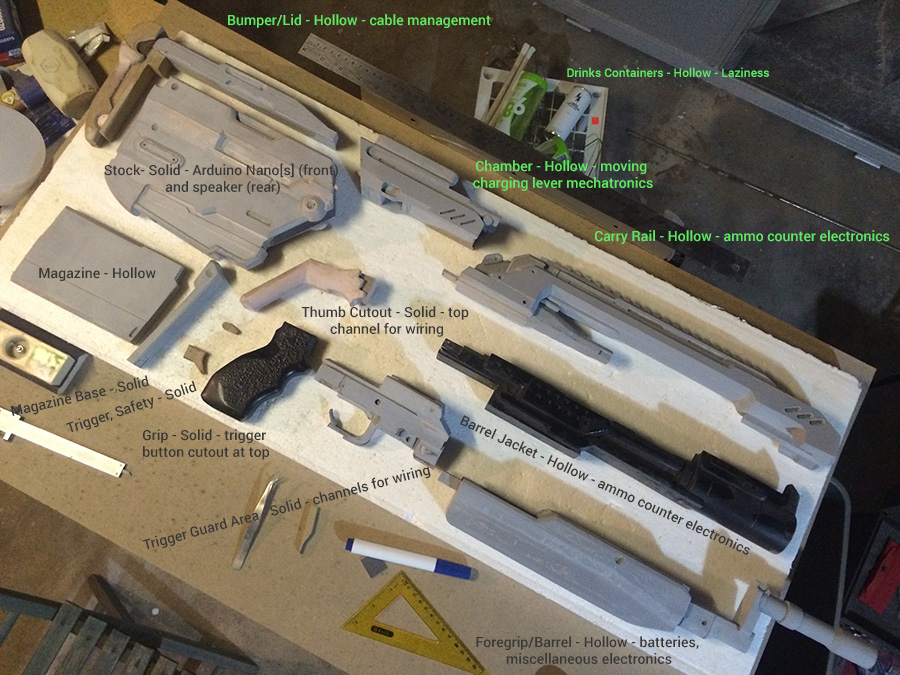
I'm also gonna float this idea, in case anyone's interested, something that Mjolnir made me think of and could be interesting to people like cyberdemon35 who are building a BR right now: Selling parts and spares. If you get a kit and destroy a piece with your Dremel, no worries, just order a replacement part! If you're building a BR85 and don't want or can't afford a full kit, but also want to circumvent some of the more hard-to-build parts or want a base piece to build customisations on top of, you can get a couple of hard pieces and just do the rest yourself in the material of your choice. You could just buy a barrel jacket and use it as a rigid foundation for the rest of the build, say. Anything, really.

If that sounds like something someone's interested in, I have a price list that's good until the early bird kit batch is sold out (all the parts add up to $230). It's based on a combination of size and complexity, and doesn't include shipping:

Carry Rail: $30
Barrel Jacket: $30
Stock: $30

Foregrip: $20
Chamber: $20
Grip: $20

Trigger Assembly: $15
Magazine: $15
Stock Cover: $15

Scope: $10
Barrel: $10

Trigger: $6
Charging Lever: $6
Safety Selector: $3

These in particular help offset the cost of that second batch of silicone I had to buy!

The parts described can be mostly seen in this old image, though some parts have changed a little since this image was made, but you'll know that if you've been keeping up:

attachment.php


If you have a question about a specific part, ask away!

Once I shift from pre-order to cast-on-demand, I'll add a thread to the Marketplace.
 
I hope these members are taking that offer. Because that is a generous price for how professional it is and the amount of work you put into it
 
^True story! :p
Cptins8n087 Uscstaylor ErMaC Starrmont Thanks guys!

Moldmaking has come to a close, now it's a case of cranking out castings as quickly as possible! I wanna get painting and assembling!

While I was waiting on the second delivery of silicone, I started putting together a rotocaster out of scraps in the basement:

20150513_185343106_iOS_1.jpg

20150513_192808839_iOS_1.jpg

20150513_202854428_iOS_1.jpg

20150514_190325353_iOS.jpg

Had to turn a couple of pulleys, with no lathe and my bandsaw blade just snapped, so there was only one thing left to do:

20150514_201207474_iOS.jpg

20150514_204712568_iOS.jpg

20150514_205324930_iOS.jpg

20150514_212111000_iOS.jpg

20150514_234508289_iOS.jpg

It's now assembled into a more-or-less functional first stage. I just need to put together the second frame, finish the second pulley and belt guides, figure out a belt from some kind of rope, and work out a way of mounting moulds into the inner frame. Shouldn't take too long!

The day before the silicone arrived, I started prepping mold boxes. I have the process down a bit faster than it was a few weeks ago!

20150515_164522108_iOS.jpg

20150516_161728119_iOS.jpg

20150516_221441451_iOS.jpg

20150517_183724436_iOS.jpg

20150518_145333658_iOS.jpg

Smooth-On finalised the sticker graphics, apparently:

20150518_160130923_iOS.jpg

20150520_011301965_iOS.jpg

20150520_104906922_iOS.jpg

Bondo mixing sheet and possibly rotocasting pour spout lids, I haven't quite decided yet:

20150521_011219934_iOS.jpg

Nicked a little escape hole in here to prevent a bubble forming in the end:

20150521_203003131_iOS.jpg

20150521_213317539_iOS.jpg

Had some moisture issues with these casts though the second one's a little more usable. I'm going to keep the moulds and resin upstairs out of the basement, since it feels more humid down there than the last time I was casting.

20150522_020419862_iOS.jpg

All for now, should be done in just a few days! :O

I was originally planning on doing a different build next, maybe Skyrim or Fallout, but I kinda wanna do a combat knife set or some kind of M6C/S-M6G-M6H super-set. Feels like the BR isn't complete without some smaller accessory to go with it. Anyone have any opinions there?
 
What are you using as a casting agent? I've never seen bubbling like that from a cured resin, however heat and humidity are huge factors in molding and casting processes, so it could be attributed to that as you said. If you're not currently, consider using 65D from Smooth on, it's the most durable urethane they make and is designed for rotocasting. Also for future reference, consider using OOMOO 25 (also from smooth on) as your molding compound, it's a good bit cheaper then the silicone you're using and preforms slightly better over extended periods (having used both myself).

Nice build, but is there a reason you made the gun in so many parts?
 
What are you using as a casting agent? I've never seen bubbling like that from a cured resin, however heat and humidity are huge factors in molding and casting processes, so it could be attributed to that as you said. If you're not currently, consider using 65D from Smooth on, it's the most durable urethane they make and is designed for rotocasting.

Nice build, but is there a reason you made the gun in so many parts?

That's 305 for the solid casts, which is all I've done so far except the magazine test. I do have 65D for the rotocasts, naturally. At times I wish I'd just gotten 2 boxes of 65D instead, for convenience. But as the title says, this is my first major project so it's a learning process!

My #1 personal cast is simply going to be a static (or almost... I'm keeping the removable mag and also may spring the trigger) example for demo purposes, but once I have the funds to do the electronics R&D, I'm going to roll another one that's going to be pretty close to fully-functional- projected ammo counter, digital scope, safety, magazine reset, moving charging lever, the works. Possibly also muzzle flare if I decide I don't care about it being con safe. Point being, all the individual moving parts have to be separate, and the rest of it has to split apart at convenient locations for installation of the guts. Simply finishing the casting was never intended to be the end of this project.

I do kinda wish I'd moulded it in fewer parts, though- there's no real reason that each part has to be one mould, and on a couple of bits I'd meant to combine (like the stock lid) I ended up forgetting my intent.
 
I do kinda wish I'd moulded it in fewer parts, though- there's no real reason that each part has to be one mould, and on a couple of bits I'd meant to combine (like the stock lid) I ended up forgetting my intent.

We've all been there, no worries ;)
65D also works great for solid casts so you know. I use that almost exclusively for all my mold making, unless I need something clear or translucent.
It is pretty great for a first big time project, quite ambitious. On the plus side, you get lots of practice at molding, it's just going to be more work to actually make castings. And best of luck on the electronics, it will certainly be easier to rig it up as seperate parts, but a pain regardless haha. Look here as a starting point: http://www.plecterlabs.com/catalog/index.php?cPath=23&osCsid=r02cg4bcsfqtrha2jatt7fob11

Hehe, yeah. :p The sheer number of conflicting undercuts in this model may have made more combinations impossible, anyway, and the varying thicknesses may have prevented me from actually combining the parts that would naturally go together unless I wanted to waste more silicone. It'd be much easier to do that with a sliced model, but I was aiming for 95-98% accuracy on this build.

Yeah, I know, that's one of the reasons I wanted to just stick with that across the board. It's generally more useful, too, so I'm not sure I'll be picking up another 300-series any time soon. Speaking of clear, I need to find the trick to getting Smooth-On to ship out Crystal Clear to a non-industrial address, but that's a project for another time.

Yeah, it's pretty ridiculous for a first time project, but I was fairly sure I could finish it. Of course, I was also convinced I could finish it in 3 months, but that didn't pan out so well. :p Live and learn!

The electronics should largely be relatively straightforward, it's mostly straight-up microcontroller programming, other than some of the optoelectronics. If I can't source the right sequence of lenses from random Chinese places, I'll have to figure out a way to fab them myself. And CMOS mirror arrays are crazy expensive, so there'll be some sort of hardware hacking required there. That's really the only tricky part.
 
Well, it's been a mixed bag this week. Hit my first real snag on the casting aspect, it's definitely trickier than using Mold Star silicone, which was my real major concern.

The rotocaster seems to have come out pretty well, though, it works nicely.

20150524_172346287_iOS.jpg

20150524_174613981_iOS.jpg

20150524_174827342_iOS.jpg

...It is going to need a little reinforcement here and there, since apparently going a bit faster is better for consistency. But that shouldn't be too much of a problem.

I'm thinking of giving up on the rotocasting of the magazine though; the edges where the round meets the magazine walls, and the walls themselves, tend to be quite flimsy even when spun faster. I think it'd require such thick walls that it's pretty much pointless to rotocast, and from my latest, thickest, cast, it doesn't feel like the weight gain would be all that significant.

I tried casting the walls and edges of the round separately, but either it just doesn't work, or I shouldn't have let it cure so long before adding the second batch of resin and spinning it. It still didn't have the full consistency of what I was looking for, anyway, though it was much closer than previously. You also have to get all the thin edges off, apparently, because they peel off the final cast and leave a bunch of "dents" all over it.

20150525_012544415_iOS.jpg

Wrote some notes on the magazine casts, though if I decide to paint them up for show, I'll have to photograph the notes first. :p I'm also building a "test" model out of what I feel are "seconds"- a little bubbly, or inconsistent walls, or whatever. Should be good painting practice and a reasonable demo. The top-grade stuff I'm setting aside to send out. There's not a lot yet, but I'm working on overcoming the kinks. I have to get #2 and #3 sets completed!

20150526_144052306_iOS.jpg

Eliminated bubbles by powdering the moulds! Dollar Tree baby powder, works fine...

20150527_164416008_iOS.jpg

...Once you bake the moisture out of it, of course.

20150527_211338210_iOS.jpg

My pile of seconds, coming together. This is seven pieces, I'm working on the other six today. Gotta have it assembled and painted for a demo model by Sunday morning!

20150527_171354992_iOS.jpg

Apparently 305 part A melts your cups to your bench... Just FYI.

20150528_204113490_iOS.jpg

As far as I'm aware, I've been sticking to 6 drops of So-Strong black per 80-100ml mixed, but the casts have been getting darker over time, and the last 3-4 casts have been distinctly cure inhibited and oozed, so I'mma back way off there, probably down to 3 drops. Not sure where the inconsistency is coming from, but functional casts that might look very slightly worse under chipped paint are definitely better than messed up casts that look cooler!

20150529_113511502_iOS.jpg

So, my first "proper" "learning experience" on this project, which I'm kinda perversely happy about, and quickly wanted to share, since the whole point of this thread is to educate others on possible difficulties. It would have been weird just to breeze through a whole major project without any real sticking points. Turns out... Urethane's tricksy, kids!

Now, I have a mould to clean out and six more to rotocast!

Oooh, ooh, another straw poll: Does anyone who buys kits actually care if the plastic parts they receive are bright white or grey? 'Cause that white barrel you see up there is almost perfect, and was definitely easier to cast. Does tinting really matter, or is it best to err on the side of caution when it comes to the appearance of accidental damage prior to repair?
 
Brief update: Things are happening!

Cast the scope; having the deep side of the mould on the side facing the "viewer" (ie. the right hand side for a right handed wielder) definitely helped matters. While there are some (maybe 10?) bubbles, probably because I should have started rotating slower before building speed, or the resin set up before I got a few good rotations in (the talc is still intact inside the mold where the bubbles were!), they're all on the left side where they can't be seen. A couple are about 3/16", most are around 1/32" or less. Very easy to spot-fill and filler-prime for my second-grade test build and shouldn't exist in future casts at all. Anyway, depth of mould parts on rotocast pieces you don't want a pour hole on may be something to bear in mind.

I can see the uses of Smooth-Cast 305 though. The 7-minute pot life is a dream compared to the 2.5 minutes I get with 65D, and no clipping into the rotocaster necessary! A lot of pressure when using 65D, for sure.

As I suspected, the rotocaster needs substantially better part-clamping, so I hand-roto'd the big three- foregrip, barrel jacket and carry rail- which all came out really rather excellently... Dropping the amount of tint in there and waiting an extra 15 minutes to de-mould makes all the difference. I also used fill-holes on those because there were convenient thin mold walls to do so, and I cut the silicone with a smoother motion and not a choppy "sawing" motion, which made all the difference in the fit and convenience of the plugs... could just use the bit I cut out. The fill holes allowed me to use 2-3 smaller doses of resin, and the results are significantly more consistent.

I spent 17 hours working flat-out on Saturday trying to get everything cast and painted and glued, since I was working out-of-town with the number two guy on the list on Sunday, but sadly I didn't quite make it. Still got the chamber (turns out the one in the pics above was trash), stock and stock lid to cast, and a bit more painting to do. Still, I think(?) I did pretty well for one day's work... I didn't even start casting until 3pm, since the day started at 100% humidity!

7:30am:

CGQM_NZUgAAfO-v.jpg

11pm:

CGVUa8oVIAARfmb.jpg

Obviously it was a junk paint job, but it's not really intended to be anything other than a general demo. My "proper" paint job on model #0 will be airbrushed properly with lacquers- and sanded properly first!

I'll update again once #β is done, with all the progress pics from yesterday too.
 
I am definitely interested in purchasing one, but I noticed in the pictures of the master weapon it seemed like it wasn't perfectly straight along the length of the rifle. The front portion looked like it pointed upwards a little bit. I was wondering if that was an assembling error or if that is the case on all of them.
 
ErMaC Hahahah, you know it, man! Works pretty well too, just gotta get some G-clamps or small bar clamps so the big moulds don't fall out and splatter resin all over the floor... Again.
@Random Person Thanks! :D

I am definitely interested in purchasing one, but I noticed in the pictures of the master weapon it seemed like it wasn't perfectly straight along the length of the rifle. The front portion looked like it pointed upwards a little bit. I was wondering if that was an assembling error or if that is the case on all of them.

I assume you're referring specifically to this pic: http://www.405th.com/attachment.php?attachmentid=10987&d=1428594566

...In which case, you're right, it does appear to be curving up, but that isn't how it naturally sits. Note the large gaps between the pieces and some of the angles therein- this is because, due to the two heavy coats of clear coat to get that final gloss finish, the parts became very slightly too thick to mate together without damaging the finish. So they're sort of "laid out", and it looks like I haven't done the best job at making sure the lines stay straight and parallel! :p

Here's a pic I took a couple of hours ago as I work on taking notes for assembly instructions, showing the current (straight!) appearance:

^66D2A84E9D82E13395E628407D8F3F5E93A91C9A9A9FC2AABB^pimgpsh_fullsize_distr.jpg

There are two slight curves in the current batch of casts. One in the carry rail, due to my impatience- I should have kept it strapped up and rotating for a further 3 minutes than I did, and laid it down to harden on its side, not standing up. The other is a slight curve in the top of the stock lid, which I'm unsure how it came about (as you'll see from upcoming update pics) but I definitely intend to investigate and correct ASAP.

Hope that was reassuring! I've been open to the point of forthright about imperfections for this whole thread, since I don't want anyone to buy anything where they're not well aware of exactly what they're getting. I'll add you to the #3 spot on the list and reply to your PM with payment info when I have a kit ready to send out. :)
 
Last edited by a moderator:
Er... Ok. :p

Anyway, onwards! I'm up to 24 images in this update so far, so I may as well update before I head back down to paint and probably take more.

Put the master stock lid in its mould and used that to glue some wooden guide strips to its support. This is the most wobbly mold, so it definitely needed this, though I may double check the big three this way just to be sure.

20150602_002917033_iOS.jpg

20150602_003026489_iOS.jpg

20150602_005757223_iOS.jpg

Letting the stock harden and cool upside down, to ensure that the mag well is vertical:

20150602_011006916_iOS.jpg

20150602_015237970_iOS.jpg

Some of the seams on these casts aren't as hot as I'd like, but live and learn. Nothing a bit of sandpaper and filler can't fix.

20150602_232602136_iOS.jpg

The stock requires four parts cutting out of it; the only part that actually requires cutting for assembly. As you'll see, all I needed for all these steps was a Dremel, a strong knife, a drill and a medium file.

20150602_233411449_iOS.jpg

The drill is primarily to cut out the mag well...

20150603_143850923_iOS.jpg

20150603_144157412_iOS.jpg

20150603_144556839_iOS.jpg

...Though it's the laziest way of putting a slit in the top so the magazine can seat, too:

20150603_144941877_iOS.jpg

20150603_145102949_iOS.jpg

20150603_145256421_iOS.jpg

20150603_145630188_iOS.jpg

20150603_150116504_iOS.jpg

20150603_150124014_iOS.jpg

Took this shot for scale when I did the one in the earlier post from today. Let's not forget how deliciously monstrous this thing is. :D

20150603_180007000_iOS.jpg

Having dowels the same size as drill bits is super handy:

20150603_180623990_iOS.jpg

Time to eschew the super glue, despite Loctite favouriting my tweet on the matter. This stuff needs epoxy.

20150603_194758968_iOS 1.jpg

20150603_195456132_iOS 1.jpg

20150603_205607063_iOS 1.jpg

20150603_204344024_iOS 1.jpg

More seam fixing. Worse on these two parts, for some reason, though it's not like "hiding the crimes with paint" isn't the model maker's mantra for a reason. It's not really as bad as these look, but I think we've established how unnecessarily perfectionist I am at this point.

20150603_200619702_iOS 1.jpg

20150603_211111520_iOS 1.jpg

Now, the primer'll be dry on the mag and lid by now, and the first batch of epoxy should be dry, so time to get back to work.
 
Random Person, please don't hijack another user's thread. If you want to display your work and get critique for it, please create a thread of your own and show your work off their - thread hijacking is not accepted here on the 405th.

EDIT: looking good, Rob! Impressive work as always - my wallet aches to throw funds at you!
 
Status
Not open for further replies.
Back
Top