TetriLys
New Member
Been awhile! Let's get into it!
Day 16, continued: Worked on polishing the cut edges a bit more. This produced a lot of powder and residue, and as previously mentioned, that's not good for your skin and eyes! Practice safe crafting and wear gloves, eye protection, and a respirator. I spent the rest of the day vacuuming and dusting the shop room because experiencing that wasn't fun!
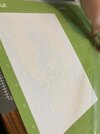
Also: Panic. Are you kidding? Less than 10 days to go and my ADHD was thriving in this environment. I had been stuck on precision, but I demoted it to accuracy. If I had stuck with the perfect image in my head, I would still be working on this prop. I added crafting foam to the lower left portion of the DataPad. Before gluing anything, I trimmed away the masking paper from the areas to be glued and sanded it down a bit so the adhesive would grip better - I will say, it still felt smooth as heck, but there was a nice matte appearance. Loctite superglue needs to sponsor me at some point, because yet again that's the only glue that managed to get the job done. It's also worth noting that you should leave the protective paper masking on the acrylic for as long as possible, as it saved my sanity when I realized it prevented superglue from sticking in places I didn't want it to be on (see image 5).
.jpeg")


Days 17 & 18: Monday hit me like a truck with its brakes cut, and Tuesday hit me with an uppercut. No progress to report.
Day 19: Worked on the grip portion. Remember when I said the LEDs were twice the width of the acrylic? Yeah, that was the conundrum I was facing. In the end, I chose to add an extra layer of foam on both sides to compensate. I had planned on the grip being much thicker than the body of the DataPad anyway. Also, remember that piece of gray plastic that I was going to use as a cover? Nah - sacrificed it to use as the base of the grip instead. I needed something rigid enough not to flex when holding the prop. Since it also had a glossy finish, I scored it on both sides so the adhesive would work better, then glued a layer of ultrathin foam that I had gotten from the wallet I tore apart. It had just the right amount of cushion that I was looking for.
I glued the base layer of plastic + ultrathin foam to the front side of the prop - and this was my first mistake. I should have went ahead and glued the yellow "leather" overtop of that to make it appear nicer.... anyway, that was a problem for Day 20. Image 5 is the backside of the grip after this was done.


Day 20: I realized my goof in adding the base layer without the yellow covering. I ended up gluing it along the edges, using a ruler hold it in place as it dried to make sure it was nice and flat. Ideally, I would have folded the excess over and glued it on the backside before attaching to the acrylic... Oh well. It turned out decent. That's it for Day 20.


Day 21: The work week had really drained me. My sister came over to demonstrate how to work the Cricut and that's when I decided I would be using a vinyl cutout after all, but no progress to report.
Day 22: This was my final weekend before the con. I knew I needed to get cracking. But I was stuck - probably due to 0 caffeine - but stuck. I needed to make the frame for the grip. Finally, I settled on using white foam and I would paint it the correct color later. Still... my brain couldn't fit the puzzle pieces together - not in a way that would look good anyway. I shouldn't have added the layers of foam that you see here - it just made it more awkward in the end. You'll see. This whole thing would have been a lot easier and straightforward if I had actually stuck with the measurements I had set in the beginning.

Because I'm a visual person and not a math person, I ended up making a stencil. I used this to cut the foam to the correct size. I made it wider than necessary so I could fold it down over the edges. Remember how I said I shouldn't have added that first layer of foam? Yeah, it took a lot of swearing and patience I didn't have to get the foam to stay after I glued it. Loctite was pushing its luck and my hands were cramping from holding everything in place as it dried - but it worked out in the end.
I also ended up changing gears and focusing on the backside for awhile. There was a slight bulge that I couldn't get rid of, but I was past the point of caring too much. I ended up using peel'n stick velcro to hold the backside of the grip shut. I was really disappointed with how the front side of the grip was looking, so I slapped on some paint and it made it look a little better, but that's all.


Yeah - still day 22! I decided to go ahead and work on the vinyl cutout. I actually opted for white removable vinyl. I got the PNG with a transparent background from the Halo Fandom Wiki right here. I kept the sizing ratio, flipped it so it was a mirror image, and made it 4" wide, which made it close to a 4x6 size. Blessedly, it cut perfectly on the first try. I love you, Cricut.
It was tricky to remove the excess vinyl around the tiny details, though. I almost crashed out when I messed up the lettering - but I realized I could still see the outline from where it was originally cut out and I was able to tediously coax all the tiny bits back into place. This took a long time... I secured everything in place by adding the transfer tape on top, but I didn't call it a night yet.


The front side of the grip was still bothering me a lot. So, I mixed black and white paint until I had the shade of gray that I wanted, slapped that on, and then called it a night.


Day 23: Yeah, you saw how bad the edges looked on the front of the grip? I promise, it was getting to me too. I used some air dry foam clay to fill in the gaps, but it wasn't sticking well because I had already painted the dang thing. I made it work. Still didn't look great, but you see what day we're on - I was just focused on getting this finished. Details be damned. This is also when I opted to finally remove the paper masking - and boy was that glorious.


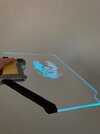
That's when I decided it was time to go ahead and place the vinyl. Mostly because the acrylic was really static prone for some reason and I didn't want a bunch of lint getting stuck behind the vinyl. I used my cutting mat to help everything remain level as I lined everything up. If it wasn't already obvious, I stuck the vinyl image on the backside of the DataPad - I figured the LEDs would bounce light off of it better that way, and I wasn't wrong. There were a few air bubbles I couldn't get out, but whatever. I also couldn't help myself - I had to see what it would look like with the LEDs powered on.


Yeah, that was all the motivation I needed. We were in the home stretch, here! It was also 2am and I had work the next day, so I left it there for the night.
Day 24: Finishing touches! I mixed up some more gray paint to paint over the now-cured air dry foam clay. I also cut out the little trapezoidal shapes that go on the upper right of the grip and painted them a darker shade of gray. I glued them in place, and while that was drying, I worked on something I could carry the DataPad in while also protecting it from scratches and to protect the autographs. It was also still really static-prone, which was weird and inconvenient, but not the end of the world. I just carried a glasses cleaning cloth with me. I opted to use the box that the acrylic had been shipped in - just marked through my address and cut out some spots for the grip so it wouldn't get squished down. I used more of the velcro peel'n sticks to secure the box shut, and it worked out spectacularly.
And the DataPad is done! It's not what I pictured in my head, but it's the result of what I was realistically capable of doing, and I'm more than happy with the results! I may 3D print a new grip down the road, but that's a problem for future me.


And now, drumroll please....
GalaxyCon Day: Jen and Steve were amazing. Jen reminded me so much of Miss Honey from Matilda for some reason - she was just so sweet. And Steve, my guy literally walked onto the exhibit floor right from the airplane - luggage in one hand, Redbull in another. He gave such chill dad/cool uncle energy. They were awesome and kind and everything you would hope them to be. I had brought my polaroid to use for our selfies, and both of them loved it and my DataPad <3


Bonus:


Day 16, continued: Worked on polishing the cut edges a bit more. This produced a lot of powder and residue, and as previously mentioned, that's not good for your skin and eyes! Practice safe crafting and wear gloves, eye protection, and a respirator. I spent the rest of the day vacuuming and dusting the shop room because experiencing that wasn't fun!
Also: Panic. Are you kidding? Less than 10 days to go and my ADHD was thriving in this environment. I had been stuck on precision, but I demoted it to accuracy. If I had stuck with the perfect image in my head, I would still be working on this prop. I added crafting foam to the lower left portion of the DataPad. Before gluing anything, I trimmed away the masking paper from the areas to be glued and sanded it down a bit so the adhesive would grip better - I will say, it still felt smooth as heck, but there was a nice matte appearance. Loctite superglue needs to sponsor me at some point, because yet again that's the only glue that managed to get the job done. It's also worth noting that you should leave the protective paper masking on the acrylic for as long as possible, as it saved my sanity when I realized it prevented superglue from sticking in places I didn't want it to be on (see image 5).
Days 17 & 18: Monday hit me like a truck with its brakes cut, and Tuesday hit me with an uppercut. No progress to report.
Day 19: Worked on the grip portion. Remember when I said the LEDs were twice the width of the acrylic? Yeah, that was the conundrum I was facing. In the end, I chose to add an extra layer of foam on both sides to compensate. I had planned on the grip being much thicker than the body of the DataPad anyway. Also, remember that piece of gray plastic that I was going to use as a cover? Nah - sacrificed it to use as the base of the grip instead. I needed something rigid enough not to flex when holding the prop. Since it also had a glossy finish, I scored it on both sides so the adhesive would work better, then glued a layer of ultrathin foam that I had gotten from the wallet I tore apart. It had just the right amount of cushion that I was looking for.
I glued the base layer of plastic + ultrathin foam to the front side of the prop - and this was my first mistake. I should have went ahead and glued the yellow "leather" overtop of that to make it appear nicer.... anyway, that was a problem for Day 20. Image 5 is the backside of the grip after this was done.
Day 20: I realized my goof in adding the base layer without the yellow covering. I ended up gluing it along the edges, using a ruler hold it in place as it dried to make sure it was nice and flat. Ideally, I would have folded the excess over and glued it on the backside before attaching to the acrylic... Oh well. It turned out decent. That's it for Day 20.
Day 21: The work week had really drained me. My sister came over to demonstrate how to work the Cricut and that's when I decided I would be using a vinyl cutout after all, but no progress to report.
Day 22: This was my final weekend before the con. I knew I needed to get cracking. But I was stuck - probably due to 0 caffeine - but stuck. I needed to make the frame for the grip. Finally, I settled on using white foam and I would paint it the correct color later. Still... my brain couldn't fit the puzzle pieces together - not in a way that would look good anyway. I shouldn't have added the layers of foam that you see here - it just made it more awkward in the end. You'll see. This whole thing would have been a lot easier and straightforward if I had actually stuck with the measurements I had set in the beginning.
Because I'm a visual person and not a math person, I ended up making a stencil. I used this to cut the foam to the correct size. I made it wider than necessary so I could fold it down over the edges. Remember how I said I shouldn't have added that first layer of foam? Yeah, it took a lot of swearing and patience I didn't have to get the foam to stay after I glued it. Loctite was pushing its luck and my hands were cramping from holding everything in place as it dried - but it worked out in the end.
I also ended up changing gears and focusing on the backside for awhile. There was a slight bulge that I couldn't get rid of, but I was past the point of caring too much. I ended up using peel'n stick velcro to hold the backside of the grip shut. I was really disappointed with how the front side of the grip was looking, so I slapped on some paint and it made it look a little better, but that's all.
Yeah - still day 22! I decided to go ahead and work on the vinyl cutout. I actually opted for white removable vinyl. I got the PNG with a transparent background from the Halo Fandom Wiki right here. I kept the sizing ratio, flipped it so it was a mirror image, and made it 4" wide, which made it close to a 4x6 size. Blessedly, it cut perfectly on the first try. I love you, Cricut.
It was tricky to remove the excess vinyl around the tiny details, though. I almost crashed out when I messed up the lettering - but I realized I could still see the outline from where it was originally cut out and I was able to tediously coax all the tiny bits back into place. This took a long time... I secured everything in place by adding the transfer tape on top, but I didn't call it a night yet.
The front side of the grip was still bothering me a lot. So, I mixed black and white paint until I had the shade of gray that I wanted, slapped that on, and then called it a night.
Day 23: Yeah, you saw how bad the edges looked on the front of the grip? I promise, it was getting to me too. I used some air dry foam clay to fill in the gaps, but it wasn't sticking well because I had already painted the dang thing. I made it work. Still didn't look great, but you see what day we're on - I was just focused on getting this finished. Details be damned. This is also when I opted to finally remove the paper masking - and boy was that glorious.
That's when I decided it was time to go ahead and place the vinyl. Mostly because the acrylic was really static prone for some reason and I didn't want a bunch of lint getting stuck behind the vinyl. I used my cutting mat to help everything remain level as I lined everything up. If it wasn't already obvious, I stuck the vinyl image on the backside of the DataPad - I figured the LEDs would bounce light off of it better that way, and I wasn't wrong. There were a few air bubbles I couldn't get out, but whatever. I also couldn't help myself - I had to see what it would look like with the LEDs powered on.
Yeah, that was all the motivation I needed. We were in the home stretch, here! It was also 2am and I had work the next day, so I left it there for the night.
Day 24: Finishing touches! I mixed up some more gray paint to paint over the now-cured air dry foam clay. I also cut out the little trapezoidal shapes that go on the upper right of the grip and painted them a darker shade of gray. I glued them in place, and while that was drying, I worked on something I could carry the DataPad in while also protecting it from scratches and to protect the autographs. It was also still really static-prone, which was weird and inconvenient, but not the end of the world. I just carried a glasses cleaning cloth with me. I opted to use the box that the acrylic had been shipped in - just marked through my address and cut out some spots for the grip so it wouldn't get squished down. I used more of the velcro peel'n sticks to secure the box shut, and it worked out spectacularly.
And the DataPad is done! It's not what I pictured in my head, but it's the result of what I was realistically capable of doing, and I'm more than happy with the results! I may 3D print a new grip down the road, but that's a problem for future me.
And now, drumroll please....
GalaxyCon Day: Jen and Steve were amazing. Jen reminded me so much of Miss Honey from Matilda for some reason - she was just so sweet. And Steve, my guy literally walked onto the exhibit floor right from the airplane - luggage in one hand, Redbull in another. He gave such chill dad/cool uncle energy. They were awesome and kind and everything you would hope them to be. I had brought my polaroid to use for our selfies, and both of them loved it and my DataPad <3
Bonus:
")