Halo Infinite 3D Printed Armor 3rd Build

Status
Not open for further replies.

Bullseye

Active Member
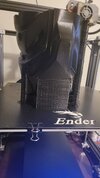
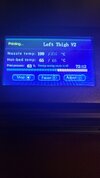
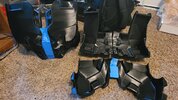
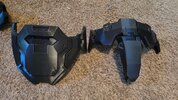
Well It has defiantly been quite a few years since I built my last suit, but I now have me an Ender 5 Plus so its time to build a 3rd set of armor. Practiced my first few prints with the Halo infinite AR and now working on the suit. Hand Plates only took a few hours each and are scaled perfectly. Right forearm is a little over half way done
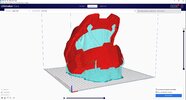
printing should be done after work tomorrow. The files for the armor were made by moesizzlac.
182556758_256200852923026_252791101780450967_n.jpg
183724039_447209256733630_633294039835070317_n.jpg
183558973_173979831290311_6705555840674483603_n.jpg
 
Had a little layer shift about half way up no biggie. Forearm length is perfect but my big hands don't quite fit through the hole but didnt want to scale it up since the length was perfect. Going to try and remove the outlined portion with a jewelers saw since its on the under side so my hand will fit and reattach with some small neo dim magnates. Since is on the under side it shouldn't get pushed out or really noticeable.
183020437_516723479328594_8950696506096557752_n.jpg
184351186_913783229468955_4820590100289907980_n.jpg
 
Had a little layer shift about half way up no biggie. Forearm length is perfect but my big hands don't quite fit through the hole but didnt want to scale it up since the length was perfect. Going to try and remove the outlined portion with a jewelers saw since its on the under side so my hand will fit and reattach with some small neo dim magnates. Since is on the under side it shouldn't get pushed out or really noticeable.
View attachment 306010View attachment 306011
I had that same problem! and same idea! I decided to just print the piece without the little top part in it and attach that with magnets. Also I am using the Anycubic Chiron. Looking good so far!
 
I had that same problem! and same idea! I decided to just print the piece without the little top part in it and attach that with magnets. Also I am using the Anycubic Chiron. Looking good so far!
I thought about doing the one with the piece missing to but the inside wasn't smooth and required more filament with supports. Even after removing and re positioning alot of them the V2 version just took less time.
 
I haven't actually printed it yet but I was just thinking of buying the files for the MK VII and printing those.
 
Well Had the factory plastic extruder break (shocker) so after an all metal replacement and fresh bed level the parts have been coming out SUPER clean and sharp.

189683024_308327714116306_8918975041109114761_n.jpg


Since then the biceps and shoulders have finished up nicely and fit like a glove. Need to get me a soldering iron with a wide tip to try my hand at PLA welding these 2 pieces together.
190854144_1132589270540160_2666069476808071417_n.jpg


Also Boot toe's and heel's just came off the printer today with the mid section and clips finishing up tomorrow.
191748846_235380044606143_8117933786094210653_n.jpg


Up coming next will be the Shins and will have to try some fancy supports or model in some more solid structure as each shin will take 5 days and about 900 grams of filament.
 
While I'm waiting for left shin to finish decided to try my hand at blender. Left shin has a big section of support material that went down to the build plate. Added in quite a few 45degree angles under the overhangs and was able to completely remove support material in the inner section going down to the build plate. That removed 13 hours and 100 grams less off the build. Not much I could do about the external supports, if its there something starts printing mid air

Right Shin model modification.jpg
 
71.5 Hours on the second shin about 8.5 hours to go. Shaved about a day off the first one with some crafty modeling,
191592480_160396369449183_2656593081708682113_n.jpg


Have moved into the Smoothing process and trying to get down my process. Using wood filler diluted with water painted 1 coat on sanded with 400 grit then primed. Still shows some layer lines and poor sanding so will have to sand down some more add spot putty and re primer.
196631199_534899357511430_7594306140667806060_n.jpg


Shoulders went a bit better with 2 coats of diluted wood filler the second being a bit thicker. This time around sanding with 400 grit and then 800 grit. Turned out much smoother and only a few rough spots like the bottom will require spot putty.
197406767_1137994250032807_819022823110795008_n.jpg


2 coats of primer, may need some light 800 or 1200 grit wet sanding in the morning to get super smooth for paint.
196744431_1447348215609360_7351679338740676724_n.jpg
 
Small update had to travel for a few weeks for work and couldn't get the printer going while I was gone. 114ish hours for the left thigh only 42 or so hours left.
 

Attachments

  • 20210624_220447.jpg
    20210624_220447.jpg
    1.3 MB · Views: 134
  • 20210624_220435.jpg
    20210624_220435.jpg
    1,002 KB · Views: 128
Update Time.

Been doing alot of travel and had to re print a few pieces due to them being just slightly to small (luckily they fit my wife... Project V2)

So I have the the COD front and back finished along with the Chest front and back. Currently the Helmet is printing (6.5 days) and man do tree supports make it look like the helmet has been taken over by the flood.
 

Attachments

  • 238772528_601844191198759_5088092649788688996_n.jpg
    238772528_601844191198759_5088092649788688996_n.jpg
    126 KB · Views: 131
  • 240113980_215281033792726_7153403396651603209_n.jpg
    240113980_215281033792726_7153403396651603209_n.jpg
    149 KB · Views: 125
  • Helmet G code.jpg
    Helmet G code.jpg
    371.5 KB · Views: 121
Looking great!!! Cant wait to see a suit-up!
Hope to have all the pieces main and under bits printed by mid September, PLA welded, sanded and primed by the end of September, with padding and strapping done by mid October.
 
Status
Not open for further replies.
Back
Top