Halo Reach 3D Printed Spartan Build

Status
Not open for further replies.

Supre_

Member
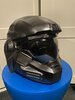
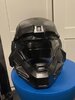
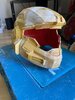
After making three other helmets and just posting the finished piece with a few progress pics I wanted to post an actual build log for my latest helmet. This is the Mark V helmet from Halo Reach. The helmet file I have used is the one available from Moesizzlac on Thingiverse, this is the one with the helmet add on but I have chosen not to add that.

This has been scaled to 110% as recommended by Moesizzlac for a 24inch head and it fits pretty well. A bit of padding will be added later to make it a snug fit.

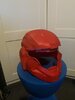
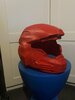
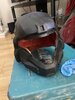
Over the next couple of days I am planning to sand and fill the helmet so its ready for paint. While doing so I will be printing the visor buck I have made using the detailed visor file that came with the helmet. I am unsure how successful it will be when vacuum formed but will add it to the remixes section on Thingiverse for the helmet if it is.
 

Attachments

  • image1.jpg
    image1.jpg
    36.3 KB · Views: 349
  • image2.jpg
    image2.jpg
    35.1 KB · Views: 336
  • image3.jpg
    image3.jpg
    35.7 KB · Views: 285
Helmet has now been filled, sanded, primed, filled some more, sanded more and finally primed again ready for the final paint job. Visor buck has finished printing as well so will test out how will it vacuum forms tomorrow. If all goes well I will add it to thingverse like I mentioned before.
 

Attachments

  • image0.jpg
    image0.jpg
    86.5 KB · Views: 350
  • image1.jpg
    image1.jpg
    75.2 KB · Views: 384
  • image2.jpg
    image2.jpg
    91.3 KB · Views: 311
How many hours did you put in sanding and priming though? More than actual print time?

Thank you! The print took around 60+ hours as I needed to cut it into a few peices. I spent around 9 hours getting to the point I am at now. I might go back and sand more as there are some areas that are still bugging me like above where the visor will go. I am not a perfectionist by any means so I don't spend hundreds on hours on the helmets I make as the battle damage paint job will help me get away with any flaws and from a distance most will not be seen.
 
Looks awesome. What filament did you use?

Cheers! I used ColorFab PLA for the main helmet, I have been using their rolls for a good few months now and they are really good, found no issue with them yet. They are not the cheapest rolls of filament but very worth it, I order directly from their site and it gets to my address in two days. For the visor buck I used SUNLU ABS which I have only started to use recently but like the other performs very well.
 
Just a small update. Was able to apply a coat of silver onto the helmet before the weather turned bad. I will use liquid latex to cover parts of the silver so when I coat the helmet in an other colour I can peel the latex of to show battle damage. Vacuum formed the buck as well which took a few attempts to get an okay looking visor. Planning on making another as there is a bit of webbing on the one pictured. The buck worked okay but since I was not able to add a lip onto the end of the visor portion it starts to curve onto the base in areas that need to be straight. I will need to elevate it when vaccumm forming so it curves lower down
 

Attachments

  • image0.jpg
    image0.jpg
    59 KB · Views: 265
  • image1.jpg
    image1.jpg
    50.8 KB · Views: 357
Wow, looks like you got a lot done in just a few days. What material is the visor?

Cheers, yeah I can only really do stuff during the weekend so when its good weather I try and get a load of work done on it. I am using PETG 1mm sheets for the visor. Was able to make a better visor with no webbing or scratches with the visor placed on a small block.
 
Had some good weather so was able to paint more off the helmet. Went for a blue theme again like past helmets because there was still loads in the spray can. Used liquid latex to keep some of the silver for battle damage and dry brushed to add a bit more. Tried to add a black wash but my mixture was a bit off so will go back some time so improve on the weathering. I tested out dying the old visor black using lens paint for car lights which came out pretty good once I got the technique to apply it right. I know most go with the iDye Poly fabric dye way but I don't have much room for the equipment required.

image0.jpg
image1.jpg
image2.jpg
image3.jpg
image4.jpg
 
(Just going to add this thread for the rest of the suit I am making)

After jumping around the thought of making a full suit and trying to decide on it either being fully foam or a combined with 3D printing I have decided to go fully 3D printed. I decided to buy the Reach Spartan Base Armor Set from fletchasketch3 on CGTrader (also avaible on Etsy) as well as the Power Assault/HP chest and UA Multithreat shoulder pad files to customise it more.

Below is a pic of what a spartan looks like with that armour as well as the color scheme I am going for.

2020-07-31 19_53_18-Halo_ The Master Chief Collection.png


I used Armoursmith Designer to help measure up the files.

1.PNG


2.PNG


I also bought a JFO helmet file from
TurboCharizard on his Etsy (SkookumProps) because he makes some kick ass helmets.

In terms of parts printed I have only got three so far. One shoulder pad, shoulder and hand cover. (I am restricted on when and how long I can print things so this is going to take a while but I am planning on having it done for Glasgow ComicCon next year)

Here are the pics of those peices:

3.jpg


Will try and update this thread when a good amount more peices are printed.
 
One thing I wish I did differently looking back is make my shin pieces larger. You’ll notice on the reach suits the lower half is much bulkier than the top half almost like a gundam. As to where master chief is more top heavy in the torso. After looking at your scaling I think everything looks great but you may want to make the shins just a TAD bit larger, if you go back and look at the armor you’ll see what I mean. No matter what you decide I love your progress And this build!
 
One thing I wish I did differently looking back is make my shin pieces larger. You’ll notice on the reach suits the lower half is much bulkier than the top half almost like a gundam. As to where master chief is more top heavy in the torso. After looking at your scaling I think everything looks great but you may want to make the shins just a TAD bit larger, if you go back and look at the armor you’ll see what I mean. No matter what you decide I love your progress And this build!

Thank you for the tip! I have been checking back and forth on measurements trying to figure out if I can slip my limbs straight into parts without needing to have them in two halves and magneted together but still keep them from looking to big as well as still having movement allowance . Its a very tricky task. The main parts are the shin like you mentioned as well as the forearm where I need to make sure my hand can slip in. I done a test print and realised it couldn't slip my hand in but if I size it to where I can it looks stupidly to big.

THE CURSE OF HAVING THIN ARMS BUT BIG HANDS!!!!!
5.jpg
 
Thank you for the tip! I have been checking back and forth on measurements trying to figure out if I can slip my limbs straight into parts without needing to have them in two halves and magneted together but still keep them from looking to big as well as still having movement allowance . Its a very tricky task. The main parts are the shin like you mentioned as well as the forearm where I need to make sure my hand can slip in. I done a test print and realised it couldn't slip my hand in but if I size it to where I can it looks stupidly to big.

THE CURSE OF HAVING THIN ARMS BUT BIG HANDS!!!!!
View attachment 294103
Honestly I prefer to have my pieces bigger than smaller. I think the one mistake most people make when scaling their armor is making to fit their body instead of scaling it to where you need a little bit of padding. Spartans are bulky and most people don’t have those proportions so just in my opinion I want the armor to slip easily and the void space have padding. Just my 2 cents!
 
Status
Not open for further replies.
Back
Top