You are using an out of date browser. It may not display this or other websites correctly.
You should upgrade or use an alternative browser.
You should upgrade or use an alternative browser.
Huragok (Engineer) Costume
- Thread starter Saber
- Start date
- Status
- Not open for further replies.
- Member DIN
- S028
This is amazing!!!!!
Thank you!
Big stuff today!, guys! BIG STUFF!
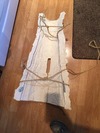
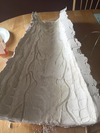
So I was able to pull apart the mold last night. Unfortunately, the underside of the neck mold decided it wanted to crumble in the middle. But the top half came out okay!


Then after some frantic plaster work, I was able to patch the hole, but not without losing the detail that was in that spot. Luckily, I can take a dremel to the plaster and try to carve those details back in. That OR I can just leave it as is because the neck plates are going to be covering that part of the neck anyway.

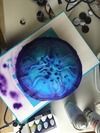
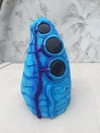
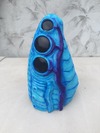
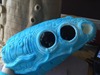
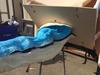
After getting frustrated with the mold and walking away, I decided to try using my airbrush kit for the first time.
I started with the air sac that I had prepainted with acrylics.
Before...

After!!!


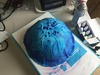
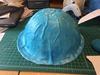
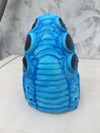
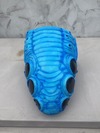
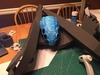
And then there is the head...
Before...

After!!!


I am so uber happy with the paint job and I am so happy that I was able to pick up using this tool so quickly! I am ready to paint more!
Just gotta cast the rest of the body parts!
Happy Alexis is happy!
Attachments
-
 10645209_10209178813411433_3170631236033197363_n.jpg110.7 KB · Views: 359
 -
 10391855_10209191507528778_2175698775959016066_n.jpg100.6 KB · Views: 315
 -
 1173720_10209191078798060_338452223129855335_n.jpg97 KB · Views: 324
 -
 1934794_10209191078638056_1598103122260319311_n.jpg121.6 KB · Views: 314
 -
 6847_10209189595040967_5868052684239487020_n.jpg81.4 KB · Views: 329
 -
 1935599_10209178816771517_1506852857805881176_n.jpg109.5 KB · Views: 326
 -
 12801561_10209191508688807_1916881801305109588_n.jpg77.8 KB · Views: 333
 -
 1517675_10209191507968789_2891537927778213745_n.jpg82 KB · Views: 345
 -
 10330473_10209191508928813_6008547477458100075_n.jpg80.8 KB · Views: 348
 -
 12063526_10209191508368799_8360115090348413022_n.jpg87.2 KB · Views: 315
 -
 10371461_10209130496923551_928404494156992894_n.jpg79.5 KB · Views: 317
 -
 1517656_10209191509168819_450829671339405182_n.jpg84.3 KB · Views: 330
- Member DIN
- S757
Oh my god, that mold for the face is incredible!
- Member DIN
- S713
Oh damn! I've seen some photos on FB first... but DAMN your build is going to kick all Covenant asses! I can't believe how beautiful and real the Huragok looks like so far... Damn!
Also, a little tip - make the eyes as glossy as you can, it'll make the 3D effect and it'll reflect light and everything nicely.
Also, a little tip - make the eyes as glossy as you can, it'll make the 3D effect and it'll reflect light and everything nicely.
- Member DIN
- S028
Oh my god, that mold for the face is incredible!
Thank you!
Oh damn! I've seen some photos on FB first... but DAMN your build is going to kick all Covenant asses! I can't believe how beautiful and real the Huragok looks like so far... Damn!
Also, a little tip - make the eyes as glossy as you can, it'll make the 3D effect and it'll reflect light and everything nicely.
Thank you for the tips! I actually have two coats off gloss on top of two coats of black on those eyes but I was going to repaint some new eyes later.
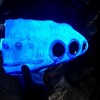
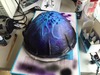
So I decided to put a light behind the Engineer head and it looks AMAZING!!!

I also went to a friend's house and we started casting the top of the neck and one of the larger air sacs.


Tomorrow, my plan is to work on the harness and then go back to my friend's house tomorrow night and cast the bottom half of the neck.
14 days until ECCC! AHHHHH!!!
Attachments
- Member DIN
- S028
OMG his face looks so cute!!!!! I love this so much, dude you are seriously out doing yourself on this!!!
"Unfortuarely you have not been selected to participate in the World Championships of Cosplay Contest..."
I think ever since I got that email, I've been inspired to make this the most kick butt costume I've ever made and make Reed Pop eat their words!

Thank you so much for your support!
Last edited by a moderator:
- Member DIN
- S028
This looks AWESOME
Looks sweet with the light!
Thanks guys!
Another daily update!
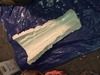
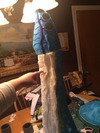
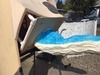
Today, my goal was to get the two halves of the neck cast to stick together. It took me almost all day to do because no adhesive that I used worked. Gorilla glue didn't work, E6000 didn't work, tape didn't do much good either.
So I ended up sewing the whole thing together with some transparent cording.


I started sewing the whole thing inside out to hide the thread as much as possible. Once I had one side completely sewn and the other side about halfway done, I turned it right-side-out and finished the sewing. Since the cording is clear, it's very difficult to see unless you are standing with your nose inches away from the neck and you know what you're looking for. Fortunately, I can also cover up the thread with a good paint job and no one will ever know I had to sew this together (except you guys).
The head and neck line up pretty nicely and I'm thinking I will most likely have to sew the head onto the neck as well so everything stays together and lines up perfectly.

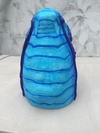
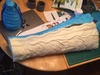
I also did some more experimenting with the air brush and I am getting more confident in my brush strokes.
I took the air sac that I had already started painting and finished it by adding more purples and blacks and then I added a top coat of gloss to make it look shiny and "slimy."
Finished color addition

Gloss top coat added

And tonight, I am still working on the EVA foam harness that goes around the bottom portion of the Engineer. This is more my element in the cosplay world so I'm more confident in doing this, but I've still had my doubts and double-checking myself to make sure I got the size right.
I feel like I've got it pretty spot-on for now and if it turns out it's too big, I'll just fake it till I make it and make it work for the time being.

Tomorrow, the plan is to go to Jeremie's house and finish up the base of the neck with the movement mechanics and cast more air sacs. I still need TWELVE more of the darned things!
Thanks guys for reading!
As always, any and all critique is thoroughly appreciated.
Attachments
-
 12717597_10209222083853167_6869563446703884933_n.jpg57.8 KB · Views: 348
 -
 12494834_10209214197416011_106993002235983318_n.jpg108.3 KB · Views: 315
 -
 11059637_10209221218951545_5667746402969312664_n.jpg102.3 KB · Views: 329
 -
 12472360_10209221218751540_1531988273441769434_n.jpg119.9 KB · Views: 326
 -
 12072789_10209225936429479_4315946339799044292_n.jpg89.6 KB · Views: 317
 -
 12799401_10209225624701686_4449153795187219412_n.jpg100.9 KB · Views: 354
- Member DIN
- S028
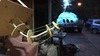
Evening update!
Today was super productive!
I went over to Jeremie's house today and was able to cast 5 more air sacs out of the remaining flex foam I had. I need to cast 7 more but that will have to wait until my next order comes in early this next week.

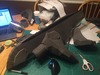
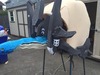
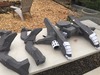
Jeremie and I worked together on getting the neck situated for the mechanics inside.
Discs were trimmed and sanded to fit in the neck better, screws were placed to limit twisting, and cables were crimped into place.

The Engineer can look up, down, left, and right!

And the Engineer can strike fabulous glamour poses.

We continued to test fit the skin over the neck discs and making minor adjustments so the skin looks more natural and you can't see the discs trying to poke through.


The sewn edges worked and on one side, we decided to add a small bit o the flex foam to the seam to add reinforcement and it worked perfectly.
We didn't add it to the opposite side because we decided to add an invisible zipper to that side of the Engineer in case we need to get into the skeleton of the neck to fix wiring or what have you. I still need to sew on the head and find an invisible zipper that will be long enough to work for this piece.
After I left Jeremie's for the night, I got back to work on the harness.
Not a lot was constructed 'cause I'm a little tired, but enough to say that one of the fins on the harness is at least 95% constructed.

Tomorrow, the plan is to add a control wheel to the neck, attach some support legs to the frame (for when I don't want to wear the suit, but I don't want it to sit on the ground), sew the head to the neck, and add the zipper to the neck.
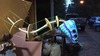
I also need to brainstorm how I'm going to make the tentacles...
I've come up with a few ideas but I'm wondering if you guy have any suggestions?
Thanks for reading!
All critique is greatly appreciated!
Today was super productive!
I went over to Jeremie's house today and was able to cast 5 more air sacs out of the remaining flex foam I had. I need to cast 7 more but that will have to wait until my next order comes in early this next week.

Jeremie and I worked together on getting the neck situated for the mechanics inside.
Discs were trimmed and sanded to fit in the neck better, screws were placed to limit twisting, and cables were crimped into place.

The Engineer can look up, down, left, and right!

And the Engineer can strike fabulous glamour poses.

We continued to test fit the skin over the neck discs and making minor adjustments so the skin looks more natural and you can't see the discs trying to poke through.


The sewn edges worked and on one side, we decided to add a small bit o the flex foam to the seam to add reinforcement and it worked perfectly.
We didn't add it to the opposite side because we decided to add an invisible zipper to that side of the Engineer in case we need to get into the skeleton of the neck to fix wiring or what have you. I still need to sew on the head and find an invisible zipper that will be long enough to work for this piece.
After I left Jeremie's for the night, I got back to work on the harness.
Not a lot was constructed 'cause I'm a little tired, but enough to say that one of the fins on the harness is at least 95% constructed.

Tomorrow, the plan is to add a control wheel to the neck, attach some support legs to the frame (for when I don't want to wear the suit, but I don't want it to sit on the ground), sew the head to the neck, and add the zipper to the neck.
I also need to brainstorm how I'm going to make the tentacles...
I've come up with a few ideas but I'm wondering if you guy have any suggestions?
Thanks for reading!
All critique is greatly appreciated!
Attachments
-
 12924469_10209243282023108_2721739507719709103_n.jpg77.3 KB · Views: 349
 -
 12495102_10209240619276541_7529789123344624866_n.jpg177.2 KB · Views: 349
 -
 1465206_10209243282223113_107017352743295261_n.jpg84.9 KB · Views: 309
 -
 12924609_10209243281823103_3080295036267287275_n.jpg83.9 KB · Views: 337
 -
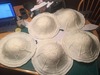 image1%201_1.jpg162.5 KB · Views: 292
 -
 12919726_10209245528239262_3560050996725997136_n.jpg104.3 KB · Views: 336
 -
 12472661_10209240620036560_4440540230924327850_n.jpg150 KB · Views: 337
 -
 12920271_10209243281383092_4501551540061623341_n.jpg204.7 KB · Views: 337
Looking even more amazing!
What about using tights/stockings filled with stuffing or something for the tentacles? You could use dowels to get the general shape you want and length, stick int he stocking with pillow stuffing then air brush them to the color you want. Would give them a little flexibility too. Plus you could glue/sew the feathery type bits on.
What about using tights/stockings filled with stuffing or something for the tentacles? You could use dowels to get the general shape you want and length, stick int he stocking with pillow stuffing then air brush them to the color you want. Would give them a little flexibility too. Plus you could glue/sew the feathery type bits on.
- Member DIN
- S386
Perhaps some thin wall tubing EG heatsrink with clear Dyed slilcone callk
I have a ton here from a project last week so Ill try somethng this afternoon..
It would be trivial to lay in some EL wire OR some fiber optics prior to curing.
My idea is to shove a dowel in the tube so that its rigid . tape or super glue the wanted effects on to the tube and then lay over it various shades of blue ish purple clear caulk.
once cured then you can remove the dowel and its a semi limp limb with lighs in it .
For the tuffs Fiber can be faned out lke those 90s lamps. EL is hard to do that with .
so a single LED can feed a 1/4 inch bundle of fibers and they can be nicked and cut to let light * leak * out.
just like the fiber kids flashlight toys ! . heck you can * pot* the fiber bundle in hot glue or superglue .
Cleave the end so that its flat and not rough. then heat schrin the fiber to a LED .
knda like this but not a bajillon watts and not that many fibers.
http://www.ledlightmake.com/bmz_cache/10WLED_fiber_optic_star.jpg
http://www.ledlightinghut.com/media...d_fiber_engine_with_remote_controller-2_1.jpg
- Member DIN
- S028
Looking even more amazing!
What about using tights/stockings filled with stuffing or something for the tentacles? You could use dowels to get the general shape you want and length, stick int he stocking with pillow stuffing then air brush them to the color you want. Would give them a little flexibility too. Plus you could glue/sew the feathery type bits on.
I think after doing some research and mulling it over a little bit, I think I'm gunna go with a method that's close to yours! Thanks for the input!
Nice! The riging for the neck turned out amazigly!
Thank you!
Okay! So it's been a few days and I still have a crap-ton left to do before I leave for Seattle!
First, here is a video I made of the movement test for the neck!
So for the progress!
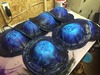
I was able to paint the air sacs that I had cast.
Start
Purple Applied!
Black and Gloss applied!
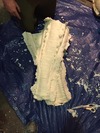
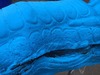
Then I started to sew the head onto the Engineer!
Afterwards, I decided that for sake of ease in getting into the mechanics of the neck, I was going to add a zipper on one side of the neck. It is an "invisible" zipper so you don't actually see the zipper, but a thin fabric line between the two halves of the neck.
I'm not the best at hand sewing, but I will be resewing this into the neck and then I will reinforce it with some flex foam and I will be careful not to get the expanding foam on the zipper itself.
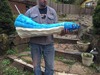
The past three days I've been getting serious work done on the armored harness that goes around the neck of the Engineer.
Working with EVA foam is more my domain so I was able to get through this but not nearly as fast as I wanted to.
Here is what it looks like in comparison to the neck. I'm thinking I have it in the correct size and I don't have the time right now to try and fix it if it were otherwise too big to too small.
I did run into one hiccup while building the harness. I was working on the harness 12+ hours a day for three days and my wrist decided it couldn't keep up with my willpower and a tendon gone done sprained itself.
I had to wrap it up and keep going with gritted teeth!
Today, I basically finished the harness parts and I need to glue the larger parts together.
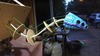
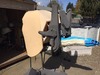
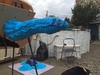
I had this idea to make these poles that came out of the bottom of the Engineer so I can duck in and out of the costume without having other people trying and hoist the costume above my head. This will make it so I can suit up solo without much help. I can also set up the costume so I can walk around it and make sure that everything is looking correct and then I can step under, strap in, and go!
For this, I used a tent canopy (the sports kind) and unscrewed the legs off the canopy. Then, (with my dad's help) we trimmed the legs down to a more manageable size and drilled holes into the metal and the PVC and used bolts and nuts to hold the legs to the skeleton.
And voila!
The legs are pretty easy to miss if you're not looking directly at them!
The best part is, they're collapsible! That's right! So when I get myself all strapped in, I can pull the legs up and go without the poles sticking out the bottom!
So here is my plan for tomorrow:
I finally got my second kit of flex foam so I will be casting the remaining 7 air sacs that I need to cast.
I also will be finalizing the neck zipper and adding the flex foam to the seam for the strongest reinforcement.
I have other plans that I'd like to follow through but my car is getting fixed tomorrow in preparation for ECCC so I don't want to get too ahead of myself.
7 DAYS UNTIL ECCC!
AHHHHHHHHHHHHHHHHHHHHHHHHHHHHHHHHHHHHHHH!!!!
Last edited by a moderator:
This is very nice! will you have it done in time for ECCC?
- Member DIN
- S028
Dude this is just so much win here!!!! I love the tent poles idea and just look at the shmoopy face on your pup!! Make sure to play with him too
Don't worry! Sarge gets plenty of attention! Although, it's getting pretty annoying when I'm trying to get this work done!
This is very nice! will you have it done in time for ECCC?
I'm hoping so!
I've gotten a bit of work done today and I'm hoping to get this done on time! I'm really hoping! But it started raining tonight D:
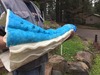
I secured down the zipper inside the neck with more flex foam.and got the neck on the skeleton. I need to add another disc to the skeleton so that dent in the curve of the neck will go away.
I also did some trimming on the top portion of the neck so the top of the neck isn't jamming into the board so much.


I also was able to finish detailing and figured out strapping on the harness. The middle section is buckled down with some parachute clips and the sides have velcro.


And now they are ready for paint!

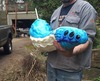
I also got the last of the air sacs cast and painted!

The neck has also been prepainted and it's ready for detail paint!

One thing that is really bothering me about the neck is the bubbles that ended up being in it. I'm probably going to try and resculpt this part of the costume in the future when I make improvements to it.

For now, I'm doing what I can to fill in those holes with the acrylic paint and then try and hide them with the detail paint. They aren't noticeable at a distance, which is good. But I'm also my worst critic (aren't we all).
I'm getting so close to finishing it! I can also taste it! (No, wait-- That's the residual spray paint...)
FOUR DAYS UNTIL I LEAVE FOR ECCC!
AAAAGGGHHHHHHHHHHHHHHHHHHHHHHHHHHHHHHHHHHH!!!!!
Attachments
-
 12920372_10209345349094721_500816237347756484_n.jpg95.6 KB · Views: 305
 -
 12963544_10209345349254725_262010916241866702_n.jpg104.5 KB · Views: 298
 -
 12963851_10209345349654735_6622042102924573425_n.jpg103.3 KB · Views: 310
 -
 12938299_10209345349454730_6076580905109051451_n.jpg111.3 KB · Views: 328
 -
 12936643_10209345331094271_2748840176061002447_n%201.jpg132.8 KB · Views: 308
 -
 12936779_10209343872337803_7915363639778274194_n.jpg113.4 KB · Views: 338
 -
 12523933_10209345349854740_802842870102879954_n.jpg153.2 KB · Views: 328
 -
 12928124_10209343872737813_9140985385939582941_n.jpg117.1 KB · Views: 343
- Status
- Not open for further replies.
Similar threads
- Replies
- 1
- Views
- 176
- Replies
- 4
- Views
- 370
- Replies
- 19
- Views
- 4,672
Similar threads
- Replies
- 4
- Views
- 370