Sir Tsaboc
Member
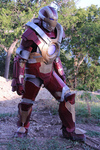
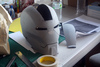
My, it's been a while since I've posted. Thought I'd post about my more recent projects that I've worked on. I started working on this helmet when Brad (thebradinatorr) needed one for a commissioned suit for SDCC last summer. I decided to just modify my Iron Patriot one-off helmet.

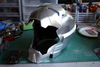
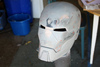
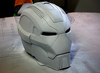
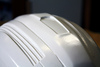
I started by trimming off the chin area, since the heartbreaker has a more angular shape and less organic curves. I backed this with a 2 mm sheet of sintra (the yellow stuff) and began stripping off the details from the top and sides. I also flattened out the bottom of the helmet and cut out a frame from 2 mm sintra to act as the new rim.

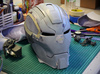
Then bondo! The chin and grooves throughout the helmet were filled with bondo and then sanded down. I might've done 3-4 layers of filling, sanding, then priming, on and on.

The grooves on the faceplate were etched in with a cutting disc on my dremel tool, and I used a dremel sanding drum to get the nice edges by the chin. The raised details on the chin were made separately from 2 mm sintra and sanded to nice curved edges. This piece was then attached with super glue.
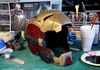
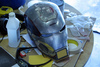
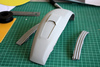
The next thing I did was cut out panels from the top, since these are recessed areas and/or raised in the helmet from the movie. It was easier to cut them out and modify them, then place them back in.

I used the dremel cutting disc and needle files to add more grooves above the face, and you can see in this photo that I began raising the middle panel with bondo. This was actually done by laying down foam sheets first to give it a little more height, then bondoing over it a few times and sanding it.

I added wire details to the smaller panels using actual wires, and the little vent in the middle panel was trimmed out of a small sheet of sintra with a dremel tool.

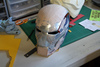
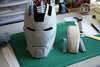
All the pieces were secured back to their designated places using superglue on the inside and plasteline (a type of modeling clay) to seal the edges and give it detail. The raised area that goes around the side was sculpted out of plasteline as well.

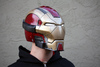
I then primed everything and sculpted the side vents/greebles out of plasteline. To get everything symmetrical, I first sketched out the shapes on a piece of cardstock, then rolled out a flat piece of plasteline. I cut out the shapes and placed them on the plasteline, and carved them out with sculpting tools. Making templates like that help a lot!


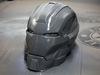
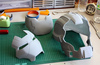
I sprayed the helmet with a couple coats of glossy paint then made a one piece glove mold with rebound 25, plaster bandages, and rondo.

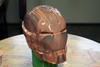
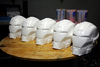
When the mold was done, I poured a bunch of these using smoothcast 300.

The details were captured quite nicely.


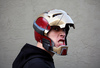
Since this was a one piece helmet and I wanted my personal one to have a removable faceplate, I trimmed out the faceplate and back piece from my personal one and used rare earth magnets to attach everything together.

I started by trimming off the chin area, since the heartbreaker has a more angular shape and less organic curves. I backed this with a 2 mm sheet of sintra (the yellow stuff) and began stripping off the details from the top and sides. I also flattened out the bottom of the helmet and cut out a frame from 2 mm sintra to act as the new rim.
Then bondo! The chin and grooves throughout the helmet were filled with bondo and then sanded down. I might've done 3-4 layers of filling, sanding, then priming, on and on.
The grooves on the faceplate were etched in with a cutting disc on my dremel tool, and I used a dremel sanding drum to get the nice edges by the chin. The raised details on the chin were made separately from 2 mm sintra and sanded to nice curved edges. This piece was then attached with super glue.
The next thing I did was cut out panels from the top, since these are recessed areas and/or raised in the helmet from the movie. It was easier to cut them out and modify them, then place them back in.
I used the dremel cutting disc and needle files to add more grooves above the face, and you can see in this photo that I began raising the middle panel with bondo. This was actually done by laying down foam sheets first to give it a little more height, then bondoing over it a few times and sanding it.
I added wire details to the smaller panels using actual wires, and the little vent in the middle panel was trimmed out of a small sheet of sintra with a dremel tool.
All the pieces were secured back to their designated places using superglue on the inside and plasteline (a type of modeling clay) to seal the edges and give it detail. The raised area that goes around the side was sculpted out of plasteline as well.
I then primed everything and sculpted the side vents/greebles out of plasteline. To get everything symmetrical, I first sketched out the shapes on a piece of cardstock, then rolled out a flat piece of plasteline. I cut out the shapes and placed them on the plasteline, and carved them out with sculpting tools. Making templates like that help a lot!
I sprayed the helmet with a couple coats of glossy paint then made a one piece glove mold with rebound 25, plaster bandages, and rondo.
When the mold was done, I poured a bunch of these using smoothcast 300.
The details were captured quite nicely.
Since this was a one piece helmet and I wanted my personal one to have a removable faceplate, I trimmed out the faceplate and back piece from my personal one and used rare earth magnets to attach everything together.
Attachments
-
 8736542885_c35cc7cccf_z.jpg203 KB · Views: 609
 -
 8737662468_ff16e8a590_z.jpg181.8 KB · Views: 474
 -
 8884458185_3e59a862fd_z.jpg123.8 KB · Views: 494
 -
 8974439711_b2b3a0946d_z.jpg166.1 KB · Views: 361
 -
 8974418661_884c17d049_z.jpg237.1 KB · Views: 429
 -
 8974427089_f63ae8b2f4_z.jpg162 KB · Views: 429
 -
 8975627622_bf1d717559_z.jpg187.5 KB · Views: 421
 -
 9020172147_503f333491_z.jpg195.5 KB · Views: 607
 -
 9045724316_c5ec3f6aa7_z.jpg176.9 KB · Views: 409
 -
 9126958055_f82bfc0efa_z.jpg169.2 KB · Views: 419
 -
 9129153852_f3f107f87b_z.jpg141.2 KB · Views: 411
 -
 9128128675_1ce51e8673.jpg70.8 KB · Views: 401
 -
 9128132125_5560c8f403.jpg131.5 KB · Views: 391
 -
 9480694603_a16342c8fc_z.jpg181.8 KB · Views: 398