Ironman Armor Build for My 5yr-old's Halloween Costume 2011

Status
Not open for further replies.
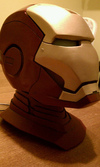
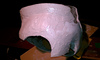
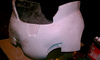
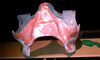
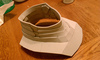
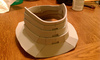
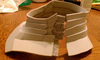
More old electronics have given their lives for the Voice System in Mikey's Ironman Helmet.

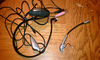
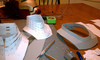
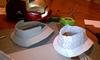
First up... An old gaming headset with a boom mic... I grabbed the boom mic and scrapped the rest.

5674008033_9df261d9d3.jpg


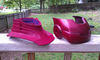
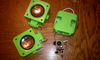
Next up... One of many battery-powered external speaker sets for ipads and such. It's got a small amp, but it comes with a power button and volume control. Circuit board and speakers kept -- everything else chucked!

5674007519_310e44848f.jpg


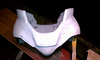
I spent last night installing the boom mic and then connecting it to the voice-changer board (and 9v). The speaker output from the voice-changer now exits to the external speaker board (which gives me power and volume control (while adding a little bit of further amp). All the parts are now wired and installed in the helmet.

Video Tour of the new additions:


*again, I have to apologize for the crappy audio... I'm not sure what's up with my EVO, but the mic has sure been jacked up lately. You can hear how bad my voice sounds throughout, so it's not just the cheap speaker I'm using in this demo... it's my camera phone's mic.
 

Attachments

  • 5674008033_9df261d9d3.jpg
    5674008033_9df261d9d3.jpg
    225.9 KB · Views: 159
  • 5674007519_310e44848f.jpg
    5674007519_310e44848f.jpg
    180.6 KB · Views: 153
Oh, and I also got a bit of sanding and more bondo applied to Mikey's waist unit (cod piece). Here are some pics in progress...

5674576650_b06eb1078b.jpg


5674576358_304a0c7a05.jpg


I'm still fighting a nasty sinus infection, so I'm heading to bed... nite all!
 

Attachments

  • 5674576358_304a0c7a05.jpg
    5674576358_304a0c7a05.jpg
    81.5 KB · Views: 158
  • 5674576650_b06eb1078b.jpg
    5674576650_b06eb1078b.jpg
    82.6 KB · Views: 155
Lots more sanding...

5683583072_fced69a63d.jpg


...and some glazing putty applied.

5683016739_feda7f7e4a.jpg


5683583370_7a90cf2c2c.jpg


I think I've got a couple places that still need some depth added (especially on the sides where I added the extra space). I haven't decided if I'm going to go ahead and hit this with a filling primer after hand-sanding the glazing putty tonight, or work another layer of filling bondo in first... I guess it will depend on my mood when I get home. lol


** I've also received the 3mm foam sheets I ordered via ebay. I had originally tested some Hobby Lobby 1.5mm sheets specifically for areas of Mikey's suit that definitely NEED to be flexible (neck collar, abs, etc). But I've been SO impressed by Graphic Jordan's work over at RPF in 4mm foam that I'm now hoping I can get the collar to come out decently in 3mm, so I can justify working more with this material. For example, I'd LOVE to do Mikey's Arms and Legs in foam; however, I really need to prove to myself that I can adequately work in this material before I feel comfortable enough to move that much of the build to foam.

/crosses finger
 

Attachments

  • 5683583370_7a90cf2c2c.jpg
    5683583370_7a90cf2c2c.jpg
    111.1 KB · Views: 164
  • 5683016739_feda7f7e4a.jpg
    5683016739_feda7f7e4a.jpg
    105.5 KB · Views: 157
  • 5683583072_fced69a63d.jpg
    5683583072_fced69a63d.jpg
    92 KB · Views: 157
Despite being busy at work I still managed to get a bit of work done on Mikey's costume. I have sanded and applied more glazing putty on the cod piece. It looks almost the same, so no pictures necessary. I'm hoping it's smooth enough tonight (when I sand it down again) to apply a couple coats of filler primer - fingers crossed.

The other piece I'm working on is Mikey's collar (or neck seal). I pepped one full neck piece this week, but it was too small to fit. So, I pepped a quick size-test version once I bumped up the scale and that one fit ok.

The plan is to print out another set of pep pages at the best scale I've found. And then use those pieces as templates as I modify and construct this piece out of 3mm foam sheets. Jordan pointed me toward picking up a blade that will cut exactly 45 degree angles, and now I've got that blade, the sheets and a workable scale.

The only thing to do now is start cutting and gluing.

Here is a picture of both the complete (and quick scale test) peps of the neck/collar piece, as well as the 45 degree cutting blade and one of the 9" x 12" sheets of 3mm foam rubber I'll be using.

5688765645_64934ee79d.jpg
 

Attachments

  • 5688765645_64934ee79d.jpg
    5688765645_64934ee79d.jpg
    181.5 KB · Views: 154
Foam Construction Update!!!

I began (nervously at first) my first foam construction last night, and although I don't have much to show for it (visually), I learned a LOT!

I started out with a fresh set of scaled pep print-outs that I am using as templates to cut out the foam. For the neck at Mikey scale I got all the pieces to fit easily on two pages. I reviewed the card-stock pep construction I built earlier this week and worked out how best to foam-ify the pieces. This was mostly a mental exercise, but it helped to get my head thinking in 3D foam terms rather than virtually 2D paper terms. :unsure

With a plan in place, I started to slowly and carefully cut pieces and glue them together with my trusty mini-hot-glue-gun.

Here is what I learned during the evening... After spending a lot of time meticulously cutting the foam pieces with metal rulers and special knives that assist with 45-90 degree angles, I ended up moving to just cutting the pieces out with a good pair of scissors.

...I know, I know, you're thinking that a pair of scissors isn't going to provide you with a nice flat edge (as it should 'pinch' the foam as it cuts and give you a nasty odd-angled edge)... not the case. I got very crisp edges with scissors (and it's MUCH faster than exacto knife work). As a disclaimer, I am using the much less popular 3mm foam for the neck piece. I'd imagine that even 4mm thickness foam might respond differently than the thinner stuff I'm cutting with scissors.

I also found it easy to shave a bit of an angle on edge pieces I wanted to attach at an angle - again with scissors. Cutting the sharp edge off the back side of a connecting piece gave me the ability to hot-glue that piece at several different angles with ease.

At the end of the evening my method for construction was this...

  1. Cut out the paper pep piece (modified for foam if necessary)
  2. Lay the pep template on the foam and trace it with a ball point pen
  3. Use scissors to cut out the piece in foam (checking it against the paper piece for accuracy)
  4. Cut this piece into multiple pieces (again if necessary for sharper angles than simple bending would produce)
  5. Slice the sharp back edge off any pieces I wanted to attach at an angle
  6. Hot glue the piece to the construction along it's edge
  7. Re-enforce the edge glue with a thicker layer of hot-glue on the inside of the construction.

Here are a couple pictures of the work I did last night... not very impressive so far, but after the steep learning curve last night, this should be QUICK to finish up!

5692710709_2c8b313cf4.jpg


5692712471_24dd4d6511.jpg
 

Attachments

  • 5692710709_2c8b313cf4.jpg
    5692710709_2c8b313cf4.jpg
    168.5 KB · Views: 170
  • 5692712471_24dd4d6511.jpg
    5692712471_24dd4d6511.jpg
    154.2 KB · Views: 151
Some Weekend Updates....

First off - I finished the neck seal - 3mm foam & hot glue build

5697881408_93a6724296.jpg


5697307121_a9e5b2b7de.jpg


And here is the opening (to allow Mikey to put it on) is along the side of the piece. I've hidden as much as I could along the side detailing. I built an overlapping flap (temp hash marks show the overlap), that will be fitted with velcro so Mikey can get in and out of it easily.

5697882198_f01c2e121b.jpg


After finishing up the build we did test fittings and then the piece went out to be painted...
 

Attachments

  • 5697881408_93a6724296.jpg
    5697881408_93a6724296.jpg
    181.7 KB · Views: 158
  • 5697307121_a9e5b2b7de.jpg
    5697307121_a9e5b2b7de.jpg
    181.9 KB · Views: 175
  • 5697882198_f01c2e121b.jpg
    5697882198_f01c2e121b.jpg
    172.8 KB · Views: 179
The first three coats of paint was Plasti Dip (red). This was very easy to apply and (although it looks dimpled here) when it dries, it looks very smooth and even - although it's entirely the wrong shade of red! :)

5697883472_a62a103f4f.jpg


After that dried, we did a final test fitting... It might look like Mikey is uncomfortable in this picture, but I had him wear it for a while and he promised me it felt great.

5697306159_05b36c54fe.jpg
 

Attachments

  • 5697306159_05b36c54fe.jpg
    5697306159_05b36c54fe.jpg
    172.4 KB · Views: 144
  • 5697883472_a62a103f4f.jpg
    5697883472_a62a103f4f.jpg
    196.4 KB · Views: 141
Then, I painted it with two coats of the vinyl/fabric paint (designed for spray painting car seats - if you can believe it). This paint is the closest I've found to the Dark Cherry Metallic color I'm using for the hardened pieces.

Here is a side-by-side color comparison between the foam rubber collar piece and the back of the helmet which is a hardened bondo/fiberglass piece.

5697880130_c50ab5526f.jpg


I hand-painted some weathering (what you'd call 'black wash' if you weren't using fabric paint). And then I stuck it quickly under the helmet just so you can see it in rough position.

5697960229_06433be586.jpg


This neck seal came out well enough, that I'm seriously considering doing the arms and legs in foam. I still still probably construct the chest, back and boots in hardened fiberglass/bondo, but the arms and legs might be better suited for this foam building stye. Special thanks to both STEALTH and Graphic Jordan over at RPF. Both are inspiring to watch as they build with this material!
 

Attachments

  • 5697960229_06433be586.jpg
    5697960229_06433be586.jpg
    83.6 KB · Views: 168
  • 5697880130_c50ab5526f.jpg
    5697880130_c50ab5526f.jpg
    218.2 KB · Views: 147
And, lastly, I also finished up my last two layers of spot bondo and glazing putty on the Cod Piece and hit that with three layers of a filler primer. It's not as smooth as I'd like it, but it will certainly do. Tonight I plan to finish this piece off with a few coats of Dark Cherry Metallic auto paint.

5697881046_ecd78438b9.jpg
 

Attachments

  • 5697881046_ecd78438b9.jpg
    5697881046_ecd78438b9.jpg
    158 KB · Views: 143
Here is an unimpressive picture of the cod piece on Mikey... he REALLY didn't want to stand still for pictures, so this was the BEST pic I got! lol

5709692567_4f3bc90dcd.jpg
 

Attachments

  • 5709692567_4f3bc90dcd.jpg
    5709692567_4f3bc90dcd.jpg
    171.1 KB · Views: 149
A brief update...

Here are the 3mm closed-cell foam forearms I've built for Mikey. The Neck Seal came out SO well in this material, that I plan on using it as a base for some of the other hardened pieces (like the arms). I'm building both arms at the same time to keep them consistent.

5724313628_7c742de4ac.jpg


5724316372_bf29279b60.jpg


I finished up the elbow pieces last night... easy pieces compared to most. So, tonight I start in on the biceps.
 

Attachments

  • 5724313628_7c742de4ac.jpg
    5724313628_7c742de4ac.jpg
    123.1 KB · Views: 150
  • 5724316372_bf29279b60.jpg
    5724316372_bf29279b60.jpg
    142.7 KB · Views: 150
GREAT PLACE TO BUY CLOSED CELL FOAM SHEETS:

Just a quick plug for Caroline's ebay store - Wandy Foam. I try to pass on info related to either products or services that have been helpful during my Ironman Build.

GraphicJordan pointed me to Wandy Foam, which sells a variety of EVA Closed-Cell foam via ebay. It was a GREAT referral, as Caroline has been wonderful to deal with!

I have tried some of the craft foam (3mm) that Hobby Lobby stocks, and I found their foam less flexible (and even a hair thinner) than Wandy Foam's 3mm product. It also didn't seem to cut as cleanly. I've now purchased foam from Wandy Foam twice and they have responded very quickly to all of my emails and are VERY fast shippers.

All the foam I've used for final pieces on Mikey's armor came from here, so I definitely recommend them. :thumbsup

Product links:

4mm Craft Foam (package of FIVE 12"x18" sheets) = $6.00 (5/19/11)

3mm Craft Foam (package of FIVE 12"x18" sheets) = $5.00 (5/19/11)
 
To simplify things, I'm moving my build thread over to RPF. I know many of you are also on that forum as well as 405th, so I'll see ya over there.

Thanks to all the 405th members for your help and encouragement. Your resources and support have been essential to my build. I'll still be lurking around here and staying up to date with all your WIP.

Take Care!

LINK TO THIS THREAD ON RPF
 
Status
Not open for further replies.
Back
Top