- Member DIN
- S556
So heres a little back story:
I vaguely remember when a friend showed me this site many many years ago (I think the membership was invite only or limited open periods at the time). It all looked like magic and way outside my skill/budget. Then a couple of years ago I got excited and started a mkV build with the old low res. files, got the waist upwards pepped, resined and mostly glassed (using cloth, cant remember the weight). I got lazy, lost motivation etc and put it down...
Sometime last year (2014) my (now) wife introduced me to a whole bunch of costumers and I got motivated again to have my own top notch costume, together we made a goal to have a spartan suit each before the next big con here in Perth. I went back to the pieces I had in the garage but found the heat of summer (Western Australia, brick oven for a garage) had not been kind and some were deformed, particularly the half glassed chest piece which had collapsed on itself. Disheartened I shut the door and forgot about it again.
October 2014 came and went, wedding was out of the way and the better half mentioned that she was going to start looking at pep files and planning for her foam build, I did a small count of the months to go...April 11...holy crap given the time it took for the last one to stop smelling I had to get onto it!
fast forward to today, 2 months worth of every spare moment and I am filling and puttying my armour. I didn't want to do a build thread until I was sure I wasn't going to give it up again... here's my photo journey. old helmet next to start of new hemet
 new helmet nearly done
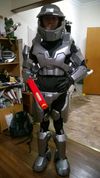
 helmet at work like a boss
 chest pepped, sized about right
 I short-cutted and slush cast the helmet before resining. resined the outside later while resining the torso, I found it kept its shape best when suspended from the shoulders, hence the steel bar. I didn't get any pictures of it the next morning because I was in a hurry to get somewhere and was too angry, but the resin had not kicked overnight (old resin, old catalyst, cool moist air came in just as I was applying). The result was that the card had been to damp for too long and lost its strength, becoming a wet soggy mess. To make things worse, the bar drooped on the box it was siting on overnight so it was no longer supported.... hence the angry. Later that afternoon I spent a couple of hours with the Heat gun bringing it back to; a) a chest shape and b) at least symmetrical. Every flat panel still horribly warped and wrinkled
 test fit with the wonky torso
 shoulders resined and awaiting slush casting
 laid out top half
 excitement when you see those first pieces connect up
 A foot!
 so many bits made
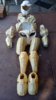
full layout with my helmet (H4 mkV file as is most of my armour)
 full layout with wife's helmet (Reach mkV MC version)
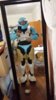
 helmet visor made from $3 chip bowl, hot knife and boiled water
 beginning to fill the poly's on the helmet
 test run with colouring the visor, I didnt listen to the voice in my head that said clean the plastic before painting, also broke it removing it from the helmet so not too worried that it didn't paint well. I used a technique I read about on here using a light silver coat, buffing then orange clear (mixed with yellow clear)
 beginning of the 10 tons of filler needed to straighten the panels on the torso
 cod all puttied, was actually particularly happy with how well defined the panels are on the back
 helmet puttied
 back of the torso nearly flat now
errr so i was replacing sideways photos with right way up and cant get rid of the old ones from thumbnails, help?
I vaguely remember when a friend showed me this site many many years ago (I think the membership was invite only or limited open periods at the time). It all looked like magic and way outside my skill/budget. Then a couple of years ago I got excited and started a mkV build with the old low res. files, got the waist upwards pepped, resined and mostly glassed (using cloth, cant remember the weight). I got lazy, lost motivation etc and put it down...
Sometime last year (2014) my (now) wife introduced me to a whole bunch of costumers and I got motivated again to have my own top notch costume, together we made a goal to have a spartan suit each before the next big con here in Perth. I went back to the pieces I had in the garage but found the heat of summer (Western Australia, brick oven for a garage) had not been kind and some were deformed, particularly the half glassed chest piece which had collapsed on itself. Disheartened I shut the door and forgot about it again.
October 2014 came and went, wedding was out of the way and the better half mentioned that she was going to start looking at pep files and planning for her foam build, I did a small count of the months to go...April 11...holy crap given the time it took for the last one to stop smelling I had to get onto it!
fast forward to today, 2 months worth of every spare moment and I am filling and puttying my armour. I didn't want to do a build thread until I was sure I wasn't going to give it up again... here's my photo journey.
old helmet next to start of new hemetnew helmet nearly donehelmet at work like a bosschest pepped, sized about rightI short-cutted and slush cast the helmet before resining. resined the outside later while resining the torso, I found it kept its shape best when suspended from the shoulders, hence the steel bar. I didn't get any pictures of it the next morning because I was in a hurry to get somewhere and was too angry, but the resin had not kicked overnight (old resin, old catalyst, cool moist air came in just as I was applying). The result was that the card had been to damp for too long and lost its strength, becoming a wet soggy mess. To make things worse, the bar drooped on the box it was siting on overnight so it was no longer supported.... hence the angry. Later that afternoon I spent a couple of hours with the Heat gun bringing it back to; a) a chest shape and b) at least symmetrical. Every flat panel still horribly warped and wrinkledtest fit with the wonky torsoshoulders resined and awaiting slush castinglaid out top halfexcitement when you see those first pieces connect upA foot!so many bits madefull layout with my helmet (H4 mkV file as is most of my armour)
full layout with wife's helmet (Reach mkV MC version)helmet visor made from $3 chip bowl, hot knife and boiled waterbeginning to fill the poly's on the helmettest run with colouring the visor, I didnt listen to the voice in my head that said clean the plastic before painting, also broke it removing it from the helmet so not too worried that it didn't paint well. I used a technique I read about on here using a light silver coat, buffing then orange clear (mixed with yellow clear)beginning of the 10 tons of filler needed to straighten the panels on the torsocod all puttied, was actually particularly happy with how well defined the panels are on the backhelmet puttiedback of the torso nearly flat nowerrr so i was replacing sideways photos with right way up and cant get rid of the old ones from thumbnails, help?