1st Build Kaz's ODST Build

Status
Not open for further replies.
This is turning out really well! Don't feel bad about losing motivation, when you've got nothing to work towards (cons) it can be tricky to find the drive to keep goin'. Slow and steady is better than no progress though. And I'm sure as you get more done, that excitement will all start to rush back.
 
Oh look...I found a little motivation.

Finally got around to getting the lower left arm fully assembled and wearable. I'm not 100% happy with how it fits at the moment. Might gut the foam I put in and made some better foam inserts. But it's wearable and gives my a little bit of good brain juices. Just letting the final coat of black dry before detail paints and any more fitting.

119258538_10223340542205782_1303476356362990235_o.jpg


Started on the right lower arm now. Had these prints sitting around for a while. We had been having an issue with layer adhesion so we did the forearms in 5 pieces. Turns out it was just a bad spool of filament. For making them wearable I just put some elastic strap on the sides. Once the foam insert is in there, and I put my arm in its a decent fit. I do feel like its going to move about though, but once I have an under suite I can add some buckles or something to better hold them in place.

4o7yqs.jpg
4o7yna.jpg


Need to hit up Home Depot for more filler primer, but should have these sanded and primed, and sanded and primed a second time soon.


In other talks. Told my therapist about this build and how I've been feeling about it. He thinks its good that I have such creative outlets and can see why with the rona killing conventions and closing Millennium Fandom, the place I was most looking forward to wearing this, has really dragged me down so much.

But yea, I'm trying. I'm also super hard on myself. IDK....time to scrape bondo out of my beard. I'd like to add that anytime I am working on this I have the Halo sound tracks playing because I feel it would be a crime to listen to anything else.
 
Small update on this build and what’s been going on.

So I started this build with all the drive and motivation! I had a dream to wear it at conventions and at outings to my local nerd bar.

But with COVID shutting all that down I had struggled to keep going. And then shortly after the new year I had a slight medical issue that ended up me having surgery. Nothing major and I am healed up. But during that time I also got sick with COVID. After all that recovery time sort of became a blur. It just got to work then sit at home, rinse and repeat. Even may days off don’t feel like days off. Like I don’t have that reset time. It got hard to even enjoy the things I like doing. It doesn’t help that I also battle with anxiety and depression that make the act of committing even an hour to a project hard. All my hobbies stalled.

Last Saturday my favorite nerd bar, Millennium Fandom, reopened after over a year of being closed. So me being fully vaccinated I decided to make a trip out there with at least my helmet. Boy did I need that. It’s one thing to post a photo here and in discord and get feed back from all you amazing people. But to hand my bucket to someone else, have them hold it and see it in person. To see the defects and not notice them. Man, that was a morale boost for me. I feel as though my motivation is building back up. My mana is recharging and I have the spoons to dedicate some more time to building my suit.


42BD7C9F-0EEF-442D-8A2B-1DCC1FE10179.jpeg


Photo of my bucket on a table.
A27150CB-EE39-4721-9BC6-217D44B89150.jpeg


Also I need to line this with some foam inside. It’s all 3D printed but it’s super loud with out anything absorbing sound. But it’s so fun to wear and get that in person feedback. Made a week that was rough due to other things feel all right.
 
Small progress report. I've gotten a little back into the swing of building. Setting aside a few hours once a week to build and even stream building ON TWITCH seams to be helping recharge my drive to build. On top of having my favorite cosplay bar back open.

image0.jpg


Last 2 streams I have done the following.

1. Foam insert into the helmet to add sound dampening which so far has worked well.
2. Started doing some detail paint on the helmet.
3. Left forearm has had the ugly super bright grey that I was unhappy with removed.
4. Detail paint has stated on left forearm. And to be ffaaaaaiiirrrrrr......the new "pavement" grey is killer in my opinion.
5. Primer has started on right forearm. Need to get new bottle of glue so I can finish assembly of the upper side of the right forearm.

I need to make more changes to my streaming set up as audio sucks at the moment. But interesting at least. I also am porting the streams to my YouTube HERE if you want to take a quick look at my sloppy skills. The Impostor syndrome is real and I am fighting it every step of the way.

Thing to work on still.
1. Touch up all the detail paints
2. Everything else
3. Start chest 3D print as I am not happy with the foam?
4. World domination?
 
Nice Act II shirt.

I saw them live in Vegas a few years ago with my GF. We both got shirts and we dont do it intentionally, but it seems like every-time I wear mine, she wears hers.
Also this:
image3.jpg


Moving on, I can say that the left forearm has hit the 90% mark. It passes my 10 foot and 5 foot low light rule. Yes there are imperfections. But due to my work schedule I dont foresee myself going to any cons with it anytime soon. I just want to wear my kit at my local cosplay bar that isn't very brightly lit up, so this is perfect for that.

image5.jpg

image4.jpg


I have foam on the inside to get a sung fit around my arm. I also have an elastic strap that allows the forearm to open and close a little as I put it on, or if it needs to flex when moving. I want to put some more foam on the inside to clean up some of the exposed internals. And I want to add a buckle that will clip to the under suit, once I sort that out, to keep the forearm from moving around too much.
 
In other talks. Told my therapist about this build and how I've been feeling about it. He thinks its good that I have such creative outlets and can see why with the rona killing conventions and closing Millennium Fandom, the place I was most looking forward to wearing this, has really dragged me down so much.
Really cool build so far. My wife and I also go to the Millennium Fandom (Only once so far, but it's awesome)! Once we finish the builds we should meet up there some time, think it would be cool.
 
Really cool build so far. My wife and I also go to the Millennium Fandom (Only once so far, but it's awesome)! Once we finish the builds we should meet up there some time, think it would be cool.
I took just the helmet there when they reopened a few months back. It's going to be go to place for cosplaying and wearing my kit.
 
Really cool build so far. My wife and I also go to the Millennium Fandom (Only once so far, but it's awesome)! Once we finish the builds we should meet up there some time, think it would be cool.
Kaz has already convinced me to check out Millennium Fandom a couple of times haha. I was also saying I'd be interested in going with my armor once it's done. It's cool seeing we could actually get a group going!
 
Kaz has already convinced me to check out Millennium Fandom a couple of times haha. I was also saying I'd be interested in going with my armor once it's done. It's cool seeing we could actually get a group going!
Id be down to help organize a Vegas 21+ event. Maybe in the evening after a some sort of other event that's more open to everyone. But I feel like thats a conversation for another topic and after this second or 3rd round of rona.
 
So here is where I am stumped. The back plate is a part of why I stalled out last year. I cut, shaped, and glued the foam and what quite happy with it. That in until I reached the next step. See I wanted to use Worbla to smooth out the seams, as well as give it some extra rigidity. And the Worbla would make it not look and feel like foam, as well as protecting the foam from any sharp objects.

I have a shield that I made out of foam and plastidip, and I know how quickly just grass eats away that foam and paint. So the last thing I want is to make armor that is going to have paint chip or wear off if I want to sit on a couch. And I have full intentions of being active in the armor. Like, come home from work, put it all on, get in the Uber, and go somewhere. Typically MFB where its more compact and they have places to sit or I may be posing for photos and moving around a lot. Or, and this is the dumb idea I have but will likely never pull off, DIY lazer tag system. (I totally love the idea of integrating lazer tag into some armor and having lazer battles but I don't see that happening anytime soon.)

Unfortunately the Worbla just wouldn't shape right. It help creasing or ripping and over all looked like trash. I did two attempts before running out of material. I don't want to do fiberglass for several reasons. I just don't have the work space for it, and doing it outside is out of the question because its 100°F+ outside. It's also a material I just don't want to work with.

A few people suggested just hiding it with a rucksack. But again, with the nature of how I want to wear this, that is out of the question. Maybe after everything else is done I'll make a ruck, but not now, not to hide this piece. Not to mention that a ruck would add more to the over all size making sitting in a car or moving though a tight packed bar difficult.

So I talked with my roommate and I mentioned that I think we should just 3D print this part. We'd have to slice it a lot, as well as modify the files we have. Or just straight up model a new one. She suggested using some calking to fill the gaps. That I could smooth it out and then sand it down.

I then thought of my favorite builder on YouTube, Martian Molin. If you are unfamiliar with who he is, hes the builder of the Marble Machine X as well as the leader of the bad Wintergatan. I forget his exact wording but the idea stuck with me. He was building the MMX very much in a form over function way. Making parts that looked good and how he wanted them to be, but not having the reliability he wanted. After all, he wants the machine to play 1,000,000 with 0 fails. And after about 2 1/2 years of this he found that he would never hit his goal of a million marbles with out issues if he kept to that path. He'd end up with a very nice looking machine that couldn't play music. But if we sacrificed some artistic vision for more sound mechanical designs he could hit that goal. And so he tore down the MMX and rebuilt large portions of it. Blending solid engineering designs with some artistic flair to make a machine that has so far played 80,000 marbles in one session with out fail.

And that's what I thought about. "Maybe I'll have to forgo the Worbla for now til my skills improve. Maybe working with other materials is what I need to get the project moving from this sticking point. After all, its what Martian would do."

So I tried the calking. I went into it like I would with body filler (Bondo). I put a bead down, then using my finger pressed it into the seams. I did this a few times in a few layers till I had a good build up laid down. The idea being put more on that I need and sand down to where I want.

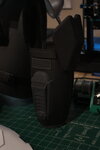
Well here's where I am at with that.

image6.jpg


And I'm not happy. Only after I put this all on did I read that the calking she handed me is no paintable. AND, its not sanding, just pealing like a sunburn.

But, I'm not giving up yet. I have one more thing I am willing to try. Im going to get some roll craft foam and see if I can shape that over the back. Then use plastidip and a few other tricks to get it exactly how I want it.

And if all else fails scored earth fire up the 3D printer and take over the world that way.
 
I really good trick with foam is to cut "V' lines on the armours inside, before using a heat gun to bend/shape the foam.
Once you get some of the shaping right, you use glue in the 'V' gap to help support the new shape.

Craft foam is also really great for smaller details and smoothing too!

Builds can be rough sometimes, but just got to stick with it!
You can do it we believe! :D


I'll have to try that V groove trick. My current method is just heat the foam and shape it. I currently have the back shaped and keeping its shape with some painters tape. I picked up some rolls of craft foam and some foam putty. The idea I have at the moment is to use the craft foam to do a layer over this foam, then fill in any gaps with the putty. Then a few layers of plasti dip to seal it and prep for paint.

I also this week want to start on ether the chest plate, or the shoulders. I think chest plate first because I have some idea regarding what i want to do moving forward with that part after the build is all done.

I've also talked to some people who run a local maker space and they have offered to help me vacuform the visor once the maker space reopens. It's closed because they are moving locations.
 
Burnt fingers update at 1:30 am because I totally didn't stay up late working on for this for no reason other than I can sanding and heating foam.

So I got the back plate looking mostly okay with the foam. Way better than with the Worbla that was giving me a hard time. The front plate, on the left is Worbla, the back on the right is craft foam. I also attached left shoulder strap at this point.

image7.jpg


I was just going to call it a day there....but then I kept going!


image8.jpg
image9.jpg


There is a lot still to do. Most of the straps are to lose and I need to move the side ones. But at last I can at least put it on and not having it fall around my ankles.


I sleep now.
 
After a few hours sleep, some progress. Moved the lower straps to the front to make them easier to reach. They will be hidden by the belt once thats made. Put some filler panels in the back, now its nice and snug. No more flopping around. Need to tweak the shoulder straps a bit to get them a little lower. And I need to add some strap keepers. Next should be the chest plate and I want that to be 3D printed. Once that is printed I can get all this assembled and then paint.

image12.jpg
image11.jpg
image10.jpg
 
Small update.
Back panel has been assembled, sanded, filled, and plastidipped. I’m not 100% happy with it. But I’ve taken the mind set up “just get it done and come back later to make it better.”

144E7EA2-6B11-411B-8DFD-4FE109D94326.jpeg


I also got the right forearm 75% done. Only to screw up and by the wrong black paint. I want to use flat black but bought satin. So need to sand and repaint it. Then detail painting.


On the good news side of things, I’ve started to learn from my roommate how to slice things and work with the 3D printer myself. So soon I should be able to just start knocking things out left and right! I have this idea of printing multiple chest plates. The idea being have one for every day use, and have a few for special events. And I wanted to paint one up for the local Battlebot Jackpot since I’ll been going and seeing that live soon!

On the bad side, the 3D printer broke again. I highly doubt bill have that chest plate ready in time which bums me out. But I have other things to hold up and show off my support for that team. The printer should be fixed by the end of the week.
 
I had to take a bit of a break because of this little thing called BATTLEBOTS was filmed here in Vegas and I just had to go. And then in-turn started working on my own ant and fairy weight combat robots.

IMG_2196.JPGIMG_2207.JPGIMG_2211.JPGIMG_2215.JPG

But now I know how to work the 3D printer! I know how to work the slicer! I...sort...of....know...Blender... IM UNSTOPPABLE!

So I split the chest in half to print it. I am still sticking with my plan to have multiple chest plates for different events. But I want to get at least ONE done. But here is where the chest sits as of now:
IMG_2233.JPG

IMG_2234.JPG


I split the print in two to make it better fit in my printer. Yes I could have printed it as one large piece, but my roommate suggested splitting it to reduce the over all risk of it failing, like what sort of happened with my helmet. (The printer itself failed, not the print)

I even have video of the first half getting printed: VIDEO HERE!

IMG_2233.JPG


Second half is 65% done, so far its taken 19 and a half hours to get this far. Oh look, my GoPro is still GoProing. Using Trees as supports had the funniest side effect last night. At one point the print head and its cooling fan was hitting the tops of the trees and making this hooting/whistling sound. At first I thought something was wrong with the printer and my girlfriend thought I was playing a space game with some heaving breathing.

And last, ODST 12th anversy, had to lay everything out.

IMG_2230.JPG

IMG_2231.JPG


PS. This is my 50th post!
 

Attachments

  • IMG_2235.JPG
    IMG_2235.JPG
    812.3 KB · Views: 90
It took around 47 hours to print, but I got the chest plate printed and started prepping it. Body filler, primer, and sanding. Then my normal work space was taken over so I could do more sanding. But I too this time to moc up how I want to mount it to the torso. I want something that allows me to quickly remove it to take the armor off, or to swap out plates. As it stands, where my buckles are I need to removed the place to get to them.

odst1.jpg
odst2.jpg
odst3.jpg


So I made this work by building a small box with some EVA foam. I then glued 4 magnets to the box. Then I lined up 4 more magnets with foam EVA spacers on the plate. With everything glued in place its just a matter of clicking the plate on. However I found that with this, and only the magnets, the plate can slide a little. I'll fix this with some indexing tabs on the plate to "hold" it in place with the box.

Alternatively, my roommate suggested using strips of Velcro. This would give me a larger surface area for everything to grip, as well as a stronger grip. But again, the magnets are just a moc up to see if it would work. I'm going to sit on this design and ideas for the next few days and see if anything else comes to mind, unless anyone has suggestions? By Sunday I'll be free in the evenings again to tinker on it more, unless I do battlebot stuff.
 
Status
Not open for further replies.
Back
Top