I've typically only made props for my own use at conventions, but I'm hopefully going to start selling resin and aluminium casts soon, so I've been looking for smaller props that would have a lower production cost and post production time.
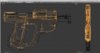
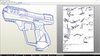
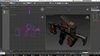
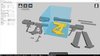
I decided on the M6 Series, but wanted something more unique than the more popular M6H and M6G's (M6H2 would have been nioce, but I'm nowhere near experienced enough to try making that from scratch yet). I took a closer look at Halo Online's M6H variants and noticed the DMG version has an interesting skeletonised grip, complemented by a similarly styled upper shroud.
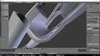
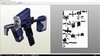
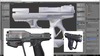
The lack of the lower barrel attachment reveals what seems to be a standard sized picatinny rail, but without an overhang. There was also the issue of all the separate components being open shells and intersecting without any shared vertices:


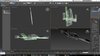
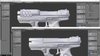
I've begun the arduous process of cleaning up the interior so that all the parts that should be a single piece can be printed as such, and the magazine channel much more closely resembles the actual magazine shape to make removal and insertion possible. I've also modelled a picatinny rail to match the profile of the front of the gun, but without the block at the front, so it could be usable for 3rd party attachments, or if I decided to model the default M6H lower attachment to be compatible with picatinny rails. I'll add some details in like the angled grooves on the main body and screws on the outside, but here's how it currently looks:


I decided on the M6 Series, but wanted something more unique than the more popular M6H and M6G's (M6H2 would have been nioce, but I'm nowhere near experienced enough to try making that from scratch yet). I took a closer look at Halo Online's M6H variants and noticed the DMG version has an interesting skeletonised grip, complemented by a similarly styled upper shroud.
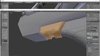
The lack of the lower barrel attachment reveals what seems to be a standard sized picatinny rail, but without an overhang. There was also the issue of all the separate components being open shells and intersecting without any shared vertices:


I've begun the arduous process of cleaning up the interior so that all the parts that should be a single piece can be printed as such, and the magazine channel much more closely resembles the actual magazine shape to make removal and insertion possible. I've also modelled a picatinny rail to match the profile of the front of the gun, but without the block at the front, so it could be usable for 3rd party attachments, or if I decided to model the default M6H lower attachment to be compatible with picatinny rails. I'll add some details in like the angled grooves on the main body and screws on the outside, but here's how it currently looks: