Meatwad's Grenadier Build (WIP and Pic Heavy)

Status
Not open for further replies.

Meatwad

Jr Member
I know abandoning a project is frowned upon here, but having gotten into it, i found the MK VI really wasn't the right project for me. Seeing as I'm a pretty bid dude, i fugued I'd look a lot better in bigger armor. This build will be very Jorge-esq. However, i plan on using the security shoulder on my right arm, instead of the one Jorge uses. So, that being said, i give you the birth of my custom grenadier build!

20150818_224540-1_zpswfqhoo7f.jpg
20150818_224514-1_zpsngfgxn30.jpg
20150818_224521-1_zpsp5nbw05g.jpg

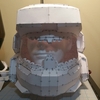
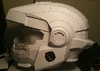
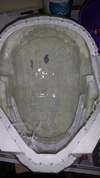
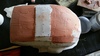
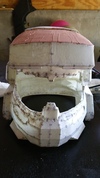
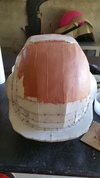
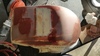
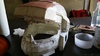
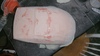
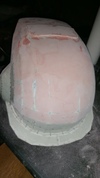
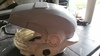
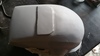
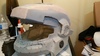
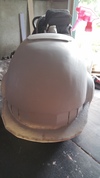
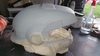
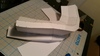
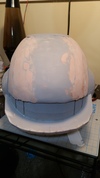
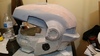
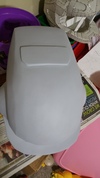
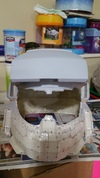
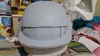
I have the helmet fully pepped, including the visor which wasn't included in these pics. I have the outside resined and will be doing a nice thick coat on the inside with a filler tonight. I plan to start glassing it tomorrow. The attachment is on my to-do list. I've also started on the torso.

20150820_222535_zpscgv6slta.jpg

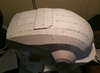
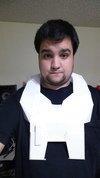
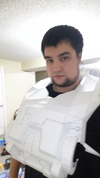
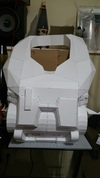
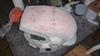
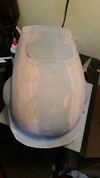
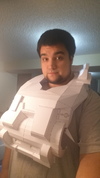
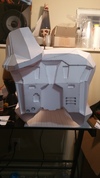
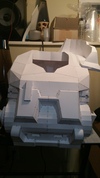
Not sure if it's too early to tell, but I'd love some feedback on the fit of this thing. I measured in pepakura viewer and based the size on the width of my shoulders using the measure point to point tool and reference pictures of Jorge. I should be able to knock out most of this over the weekend, assuming the cylindrical part of the chest doesn't kick my butt.

Let me know what you guys think! Your feedback is always appreciated.
 

Attachments

  • 20150818_224540-1_zpswfqhoo7f.jpg
    20150818_224540-1_zpswfqhoo7f.jpg
    603.6 KB · Views: 256
  • 20150818_224514-1_zpsngfgxn30.jpg
    20150818_224514-1_zpsngfgxn30.jpg
    393.6 KB · Views: 268
  • 20150818_224521-1_zpsp5nbw05g.jpg
    20150818_224521-1_zpsp5nbw05g.jpg
    363.6 KB · Views: 247
  • 20150820_222535_zpscgv6slta.jpg
    20150820_222535_zpscgv6slta.jpg
    478.4 KB · Views: 276
Re: Meatwad's Custom Grenadier Build

It looks great! I hope the best for your work. I'm definitely subscribing to this thread! Keep up the work man.
 
Re: Meatwad's Custom Grenadier Build

The pep looks good. I look forward to seeing it finished up and with the rest of the armour.
 
Re: Meatwad's Custom Grenadier Build

So I've been hard at work with this build. This new resin I've been using is amazing. On the inside, I put a layer of thick resin (thickened with corn starch), then i fiberglassed it (which is not as easy as i thought it would be lol), and just did another thick layer of resin just to be sure is nice and hard. It's already crazy strong, but i just want to make sure that nothing happens to it. Tomorrow i start the body filler process for the first time. Wish me luck! Here's a pic:
20150823_002227_zpsrhr97zmb.jpg

I've also been hard at work on the torso. This thing is sexy. I can't wait to finish it. Here's a couple pics of that as well:
20150823_002338_zpszxb0injn.jpg
20150823_002442_zpslv0yugtk.jpg

I'm also going to sand off all the pokey fiberglass on the inside tomorrow with my dremel. I can't wait to get started.

Hopefully I'll have some sweet pictures for you guys tomorrow.
 

Attachments

  • 20150823_002338_zpszxb0injn.jpg
    20150823_002338_zpszxb0injn.jpg
    519.2 KB · Views: 267
  • 20150823_002227_zpsrhr97zmb.jpg
    20150823_002227_zpsrhr97zmb.jpg
    469.1 KB · Views: 264
  • 20150823_002442_zpslv0yugtk.jpg
    20150823_002442_zpslv0yugtk.jpg
    440.5 KB · Views: 267
Re: Meatwad's Custom Grenadier Build

A question about the torso. Is the left shoulder sitting higher than the right? Or is that just a weird angle with the camera? (One side appears to be sitting higher.)
 
Re: Meatwad's Custom Grenadier Build

A question about the torso. Is the left shoulder sitting higher than the right? Or is that just a weird angle with the camera? (One side appears to be sitting higher.)

It's just the way it's propped up against the box. The whole thing is pretty floppy right now. It'll get a lot more sturdy when the back and sides are put on.
 
Re: Meatwad's Custom Grenadier Build

It's just the way it's propped up against the box. The whole thing is pretty floppy right now. It'll get a lot more sturdy when the back and sides are put on.
Gotcha. Just wanted to make sure it was caught early if there was an issue. Tbh I haven't even finished up the helmet stage let alone move down to the next piece of armor.
 
Re: Meatwad's Custom Grenadier Build

Day 1 of bondo work done. This was quite the learning experience. I'm very happy with how it's coming along. I also cut out the visor, which had to be done with the dremel because there was too much resin on it -_- Now here, have some pics!
20150823_165004_zpsicqqxnop.jpg
20150823_165013_zpsg9krulc9.jpg
20150823_165027_zpsynifugiv.jpg
20150823_170450_zpsvxpfuscg.jpg
20150823_181642_zps2hlvshhs.jpg
20150823_181649_zpspuhrbcsi.jpg
20150823_181658_zpsfmdoktvl.jpg

And this is how it stands as of right now.
20150823_194459_zpslazkqhuw.jpg
20150823_194504_zpsmkbelpuh.jpg
20150823_194515_zpsc9iwwavk.jpg

Hope you guys enjoy the progress shots. This part is waaay more fun than gluing paper together.
 

Attachments

  • 20150823_165013_zpsg9krulc9.jpg
    20150823_165013_zpsg9krulc9.jpg
    240.7 KB · Views: 261
  • 20150823_165027_zpsynifugiv.jpg
    20150823_165027_zpsynifugiv.jpg
    586 KB · Views: 265
  • 20150823_170450_zpsvxpfuscg.jpg
    20150823_170450_zpsvxpfuscg.jpg
    523.7 KB · Views: 257
  • 20150823_181642_zps2hlvshhs.jpg
    20150823_181642_zps2hlvshhs.jpg
    216.1 KB · Views: 251
  • 20150823_165004_zpsicqqxnop.jpg
    20150823_165004_zpsicqqxnop.jpg
    207.3 KB · Views: 275
  • 20150823_194504_zpsmkbelpuh.jpg
    20150823_194504_zpsmkbelpuh.jpg
    216.1 KB · Views: 267
  • 20150823_194515_zpsc9iwwavk.jpg
    20150823_194515_zpsc9iwwavk.jpg
    398.2 KB · Views: 257
  • 20150823_194459_zpslazkqhuw.jpg
    20150823_194459_zpslazkqhuw.jpg
    214.7 KB · Views: 268
  • 20150823_181658_zpsfmdoktvl.jpg
    20150823_181658_zpsfmdoktvl.jpg
    553 KB · Views: 253
  • 20150823_181649_zpspuhrbcsi.jpg
    20150823_181649_zpspuhrbcsi.jpg
    623.2 KB · Views: 261
It's looking really good! I like how clean your pep work is.
This almost makes me want to give fiberglass a shot.
 
Great job man! Its ok to abandon a build to get into somthing that is "more you". I know the big guy struggle as well and i will be doing another larger armor once i finish the mark VI.
Amazing work with the bondo, thinner is better and sanding looks smooth. For fiberglass, lay in the resin and coat the whole inside then place the fiberglass pieces into the resin and push down with a brush so it pushes all the air bubbles out of the resin. the fiberglass will go from white to a almost see through look, that means its fully impregnated with the resin. you did a great job with your helmet. just a quick hint from a long time fiberglass tech.
 
It's looking really good! I like how clean your pep work is.
This almost makes me want to give fiberglass a shot.

I'm jealous of you foam users lol. This process takes sooo much time, but it's fun and i enjoy doing it. Thanks for the compliment. It's not perfect, but i strive to get it as neat as possible.

Great job man! Its ok to abandon a build to get into somthing that is "more you". I know the big guy struggle as well and i will be doing another larger armor once i finish the mark VI.
Amazing work with the bondo, thinner is better and sanding looks smooth. For fiberglass, lay in the resin and coat the whole inside then place the fiberglass pieces into the resin and push down with a brush so it pushes all the air bubbles out of the resin. the fiberglass will go from white to a almost see through look, that means its fully impregnated with the resin. you did a great job with your helmet. just a quick hint from a long time fiberglass tech.

Thank you man. That's what i did with the fiberglas, but there are quite a few areas on the inside with ridges that the glass wouldn't stick to. I got most of the pokey parts sanded down with my dremel. The helmet feels super sturdy. And yes, I've done plenty of research on the body filler lol. Layers, layers, layers. It's time consuming, but worth it.
 
dude the helmet is looking awesome! keep up the great work! cant wait to see more progress
 
So, I've been slowly working on shaping the top of my helmet. I shot it with some filler primer to see where i was at.

20150826_190024_zpslyio4fxf.jpg
20150826_190045_zps3ptx4ugk.jpg
20150826_190053_zps9u2jejxm.jpg
20150826_190057_zpswqfquaqr.jpg

I'm no Cereal Kill3r, but i don't think I'm doing too shabby. I put another layer of body filler on where i didn't like the shape and sanded it. It still needs a lot of work, but I'm liking how it looks.

20150826_213200_zpsoehwl4rw.jpg
20150826_213209_zpskdp6hosb.jpg
20150826_213235_zpsm4sotoit.jpg
20150826_213249_zpsbr1zwhev.jpg

I bought a new rotary tool with a flex shaft that will be here tomorrow. That will help immensely when sanding the recessed areas. I also started to pep the grenadier collar. One of my favorite parts of this whole set.

20150826_214010_zpsjphp8kpr.jpg

Let me know what you guys think! Your all awesome and i love hearing from you.
 

Attachments

  • 20150826_190053_zps9u2jejxm.jpg
    20150826_190053_zps9u2jejxm.jpg
    185 KB · Views: 262
  • 20150826_190057_zpswqfquaqr.jpg
    20150826_190057_zpswqfquaqr.jpg
    146.2 KB · Views: 254
  • 20150826_213200_zpsoehwl4rw.jpg
    20150826_213200_zpsoehwl4rw.jpg
    181.9 KB · Views: 255
  • 20150826_190045_zps3ptx4ugk.jpg
    20150826_190045_zps3ptx4ugk.jpg
    530.8 KB · Views: 274
  • 20150826_190024_zpslyio4fxf.jpg
    20150826_190024_zpslyio4fxf.jpg
    192.6 KB · Views: 272
  • 20150826_214010_zpsjphp8kpr.jpg
    20150826_214010_zpsjphp8kpr.jpg
    154.3 KB · Views: 241
  • 20150826_213249_zpsbr1zwhev.jpg
    20150826_213249_zpsbr1zwhev.jpg
    449.7 KB · Views: 252
  • 20150826_213235_zpsm4sotoit.jpg
    20150826_213235_zpsm4sotoit.jpg
    471.5 KB · Views: 249
  • 20150826_213209_zpskdp6hosb.jpg
    20150826_213209_zpskdp6hosb.jpg
    191.7 KB · Views: 272
Aw man that is sooo cool! I agree the collar is definitely one of the coolest bits. Although i don't like the helmet, you have made it look absolutely great!
Cant wait for this to be finished!
Kal
 
Looking great man! i gave up on one now I am pumping out my ODST as well. never give up just give it time.
 
Thank you guys for the words of encouragement. It definitely helps keep me going. I got my new rotary tool and flex shaft yesterday and went to town on my helmet. I have a lot more body filler work to do, but this thing is amazing. If anyone is looking to pick up an affordable one, this was $25 with the flex shaft and heads. It's called a Wen and i got it on amazon (free shipping because i have prime). It seems just as nice as a dremel.

Anyway, here's a small update. I finished the grenadier collar. I'm quite happy with it. Hopefully i can get most of the way done with the torso this weekend, but most of my time will be devoted to my helmet. I really need to get this thing done.

Here's a picture:
20150827_211136_zpsieslhgjj.jpg

I know it's a small one, but I'll post a bigger one on Sunday after I've had a full weekend to do stuff. As always, you're all awesome. Keep up the good work.
 

Attachments

  • 20150827_211136_zpsieslhgjj.jpg
    20150827_211136_zpsieslhgjj.jpg
    508.6 KB · Views: 246
Looks good!

Thank you man. I really appreciate it.

Quick update. After a ton of bondo and a ton of spot putty and a ton of sanding... i am left with this!

20150828_204500_zpsv7ltfzbj.jpg
20150828_204439_zpsbkvsy8f8.jpg
20150828_204423_zpsrs7dm9lx.jpg
20150828_204410_zpsozmzui3z.jpg

I was getting discouraged earlier this week because i couldn't get the shape i wanted, but after a lot of work and determination in very happy with how it turned out.

Let me know what you guys think!
 

Attachments

  • 20150828_204439_zpsbkvsy8f8.jpg
    20150828_204439_zpsbkvsy8f8.jpg
    481.8 KB · Views: 314
  • 20150828_204500_zpsv7ltfzbj.jpg
    20150828_204500_zpsv7ltfzbj.jpg
    524.9 KB · Views: 261
  • 20150828_204410_zpsozmzui3z.jpg
    20150828_204410_zpsozmzui3z.jpg
    204.6 KB · Views: 247
  • 20150828_204423_zpsrs7dm9lx.jpg
    20150828_204423_zpsrs7dm9lx.jpg
    209.1 KB · Views: 245
So i didn't get much done on the helmet this weekend. I was so humid that my bondo and spot putty weren't curing. So, i worked on my torso. I made the more detailed grenadier collar and attached it to the torso. I'm also almost completely done with the torso. I only have 1 side of the cylinder to finish. The collar is a little big, but i like big, and i really like how it looks.

20150830_222120_zpsk6s9jaqp.jpg
20150830_222135_zpslqhtcjim.jpg

Let me know what you guys think.
 

Attachments

  • 20150830_222135_zpslqhtcjim.jpg
    20150830_222135_zpslqhtcjim.jpg
    475 KB · Views: 242
  • 20150830_222120_zpsk6s9jaqp.jpg
    20150830_222120_zpsk6s9jaqp.jpg
    416.9 KB · Views: 223
Status
Not open for further replies.
Back
Top