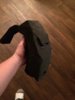
I still have a number of pattern pieces to cut out, and the appendages to size and print, but I started the torso last night! I believe that this piece is the small stomach plate
Sorry I've been so quiet! I've been busy on a few other things. Getting back to this build at long last; I've got the inner part of the chest plate and its sides done, and I'm hoping to prep pattern for the outer chest plate tomorrow and possibly begin cutting as well if I can get more foam!
Got more foam, then realized that my scaling is still off and I did the inner chest plate too steeply angled Back to the drawing board! Thank goodness I can get foam cheap from Harbor Freight... I'm starting to wonder if I can get by on default scaling for the foam chest template; I'll still have to sort something out to get the appendages from the full armor foam template, too, but I can work on the chest while I do that
I'm not sure how exactly, but if you take a picture of yourself next to a measuring tape and import that into blender you can scale the armor directly to your body
Confirmed that the template's viable, but made some beveling errors that were gonna keep the right heel from coming together; gonna cut a new piece tonight after work and bevel it tomorrow with my dremel. Thinking about skipping foam folding and just dealing with a ton of seams instead, too; it might be easier lol
I hope it does! Fortunately, it looks like beveling with my dremel is something I needed to be doing all along; such smooth faces, I'm still kicking myself over not trying it earlier lol
I hope it does! Fortunately, it looks like beveling with my dremel is something I needed to be doing all along; such smooth faces, I'm still kicking myself over not trying it earlier lol
I myself felt this same way after I had finished my first chest piece, but after practicing I found I got better cuts with the knife than the dremel. The dremel looks smooth but is actually rough.
I myself felt this same way after I had finished my first chest piece, but after practicing I found I got better cuts with the knife than the dremel. The dremel looks smooth but is actually rough.
Well, bepends on the sand paper used, if I need to strip the foam a layer or two the regular (drum? stick? The small sanding cylinder) works fine, but for smooth finishes I have a special one that gets rid of the rough tiny gashes that the other one leaves.
As promised, progress! Decided to pick back up on the chest piece, and figured the safest bet for that was to begin with the left side back. I've made more progress than this pic shows, since I took it last night.
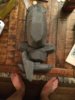
And we have a completed thruster! Finished construction last night; most of the seams need filling, but gonna worry about that later, once more's been built
Anyone have tips on how to assemble the center back? Those bottom two pieces in particular; I feel like they're supposed to be attached to each other, but if so it's definitely not at an edge

 Back to the drawing board! Thank goodness I can get foam cheap from Harbor Freight... I'm starting to wonder if I can get by on default scaling for the foam chest template; I'll still have to sort something out to get the appendages from the full armor foam template, too, but I can work on the chest while I do that