KadstaBlitz
New Member
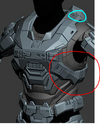
Hello everyone! only a select few of you in this massive community have met me, so for the people that haven't met me yet I'm KadstaBlitz. I've been in the 405th just after halo infinite's release date but I haven't been active in the community until NOW! So, to get you all up to date I've recently bought a 3d printer (Ender 3 Max) and have started my journey of pain and suffering of learning new things. I bought a LEGENDARY file made by nerdforgedesigns and printed it which it came out better than expected! I've only gotten so far as sanding the raw print, applying putty and sanding it smooth. I'll put images below so you guys can have a look! I have a rough idea of what the final product should look like so soon ill post my ideas. I'll keep this nice an updated every time I cross a new milestone!