You are using an out of date browser. It may not display this or other websites correctly.
You should upgrade or use an alternative browser.
You should upgrade or use an alternative browser.
My First Halo ODST Armor Build
- Thread starter Hockeygoalie92
- Start date
- Status
- Not open for further replies.
einherjarvalk
New Member
Wow, you really flew through on your build! You did in like, 3 weeks what took me close to 8 months, lol. Don't worry about the Plasti-Dip covering scored lines; if you look at my thread I put an example photo of raw foam, spray Plasti-Dip foam, and PD'd/painted/washed piece. The score lines are plenty clean in all of them; at most you may need to use some tweezers to pull off stray strands when you're done.
One other thing I'll recommend doing - one of the other posters advised using high grit sandpaper to knock down rough edges. I had really good results using a Dremel with a fine sanding wheel and slowly going over my bevel cuts (which were SUPER rough before I bought a dedicated angle cutter) to smooth them out. Take the Dremel wheel and move in one direction with light touches until you get the hang of it; might be worth practicing on some scrap first, but the end result is worth it. I'll also suggest picking up some foam putty (I bought a jar of Woodland Scenics putty from HobbyTown) for the same purposes it was recommended to me, as filling in small gashes and seams with it can really smooth out a piece, even if the seam is still visible when it's all said and done. I ended up applying something like 6 coats of the stuff on the chest plate bevel and on the gaps at the top of the shoulders and it really helped smooth it all out.
One other thing I'll recommend doing - one of the other posters advised using high grit sandpaper to knock down rough edges. I had really good results using a Dremel with a fine sanding wheel and slowly going over my bevel cuts (which were SUPER rough before I bought a dedicated angle cutter) to smooth them out. Take the Dremel wheel and move in one direction with light touches until you get the hang of it; might be worth practicing on some scrap first, but the end result is worth it. I'll also suggest picking up some foam putty (I bought a jar of Woodland Scenics putty from HobbyTown) for the same purposes it was recommended to me, as filling in small gashes and seams with it can really smooth out a piece, even if the seam is still visible when it's all said and done. I ended up applying something like 6 coats of the stuff on the chest plate bevel and on the gaps at the top of the shoulders and it really helped smooth it all out.
Hockeygoalie92
New Member
Hockeygoalie92
New Member
Kyle1538
New Member
Invest in a hot knife, it cuts through EVA like butter leaving clean lines!What I found works really well for closing up the back of the helmet on a DFT pattern is to cut it to size before gluing it in. If you are building the adult template, I have found that the end space is approximately 2.5 inches +/- in width where the top meets the back of the helmet. By cutting off the excess material that he leaves on the pattern then measuring 2.5 inches it should help significantly in tying in to the side pieces. From there I usually measure about 3.5 inches on either side of the top piece then try to match up the curves. Once measurements are in place, one smooth cut front front to rear, a little bit of shaping, and the piece should "slot" right in. Of course, this all depends on using the templates as is and it they haven't been scaled at all.
Hope this helps.
View attachment 279336View attachment 279335
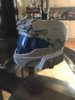
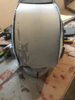
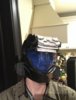
looking good, id recommend taking the visor back out so you can paint it thoughHeck Yeah. Helmet 2 is done.
Hockeygoalie92
New Member
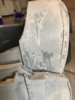
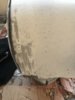
I have a problem everyone. I sealed the helmet and chest piece with Plasti-dip, but on some parts it dripped and has bubbles. What can I do to fix this issue? Clearly I applied the plasti-dip to heavily. Is there any way to fix it that does not involve peeling it all off?
Attachments
- Member DIN
- S434
use some 320 (or 220) grit sand paper to bring it down. or low as you need to go. Then you will have to probably re-apply some plasti-dip. I did this in a spot or 2 with my leak seal but luckly the chest plate covered over it..I have a problem everyone. I sealed the helmet and chest piece with Plasti-dip, but on some parts it dripped and has bubbles. What can I do to fix this issue? Clearly I applied the plasti-dip to heavily. Is there any way to fix it that does not involve peeling it all off?
edit: just make sure you use 320+ grit before re-applying
Last edited:
- Member DIN
- S068
Unfortunately white PlastiDip just does that some times. I'm not sure if it's the pigment or a change in formula between different colours but a lot of the white "Dip" products (Plasti-,Flexi-,Gumi-) are just inconsistent.
Hockeygoalie92
New Member
I’ve only got 400 grit, will that work fine?use some 320 (or 220) grit sand paper to bring it down. or low as you need to go. Then you will have to probably re-apply some plasti-dip. I did this in a spot or 2 with my leak seal but luckly the chest plate covered over it..
edit: just make sure you use 320+ grit before re-applying
Fallen
DTO and RCO
Division Staff
Midwest Regiment
405th Regiment Officer
Longsword
Community Staff
Stream Team
- Member DIN
- S922
I had the same thing happen on my calf plates recently (using black PlastiDip that was left outside overnight and got cold). I rubbed some Mineral Spirits over it with a gloved hand, and it rubbed right off. Just had to recoat with more PlastiDip.
Hockeygoalie92
New Member
- Member DIN
- S434
I want to say they will, Going over with a light pass should be enough to get the coverage you need though. But it's your choice if you're willing to risk it, I can't say i've done that before.Right so i’ave sanded down parts of the armor, and the bubbles have gone, just little circles in its place. Will these circles show up in painting?
Hockeygoalie92
New Member
I think i’m Going to sand it down best I can, buy some more plasti dip, then paint over it. Since most of it will be painted black, I doubt many of the bubbles will be seen.I want to say they will, Going over with a light pass should be enough to get the coverage you need though. But it's your choice if you're willing to risk it, I can't say i've done that before.
einherjarvalk
New Member
I'm going to suggest not using the paint-on Plasti-Dip if you can. The spray version seems much more consistent and you get a better idea of how much it's coating as you go. It's notably more expensive, but given how much time you've invested in this already, I think it's worth it.
Hockeygoalie92
New Member
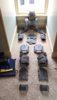
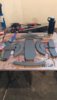
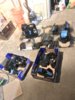
It is time to paint!
Hockeygoalie92
New Member

Hockeygoalie92
New Member
Hockeygoalie92
New Member
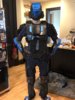
Well last night I took the suit out for a test run, and I figured out a few things that needed to be fixed, but over all, i’m VERY happy with the end result.
(Yes i somehow managed to put the forearm pieces on the wrong side .-.)
(Yes i somehow managed to put the forearm pieces on the wrong side .-.)
Attachments
Looks good dude!
- Status
- Not open for further replies.