Foam My second build (Mk7)

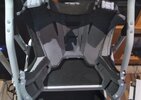
Got to finish the shins and the boots. The shins gave me some trouble with the scale and took a couple of tries to get it right. So now I just need to redo the helmet and to do the knee and hand plates
1661538844346.png
1661538883035.png
1661538933896.png


Also I just realized that I only have a week left to finish everything before I move out for school so yeah.
 
I am now finished the construction phase! It is now about 98% complete as I am missing some details on the chest, thighs, and helmet. This will be my last update for a while as I am starting school away from home so I will not be able to work on it. I do have a week off in October where I will try to finish everything before Halloween but only time will tell.
1662412805927.png
1662412829988.png
1662412865161.png
 
Oh all of this looks so amazing!
Gotta say such a shame you won't be able to work on it and finish it anytime soon.
I'm looking forward to more progress in October.
 
Well as you can see from the lack of updates, I was not able to complete it for halloween. But at least now I can take it slow and take my time with painting. I also rethought the strapping of the plate carrier and just went with full magnets instead of magnets + buckles. Here are some pics of my progress and a vid showing how I attached the bicep and shoulder pieces together

20221029_153612[1].jpg
20221031_000921[1].jpg
 
Unfortunate you didn't finish it to your goal but I think you'll benefit from now taking time to finish it in peace. Looks great.
 
Hey guy, its been a while since I did any updates on this but I did manage to finish my suit for Fan Expo and got to meet some amazing people from here. Anyway lets see where I left off.
TLDR: First attempt things broke, took a break, redid a few things, got a second problem, and concrunched at the end but it worked out all fine.

Why did it take longer than expected?

As seen from my last update I was in the process of painting but sadly I did not apply enough leakseal to a few places and the paint cracked on multiple places. On top of that, the magnet system that I was using to attach the chest together was not aligning properly and put too much stress on the bottom part that is sticking out and it ripped. Another thing was that the bicep-shoulder attachment as the shoulders did look out of place. One more problem was that I just did not know how to use an airbrush and resulted to manual brushing which was giving me more headaches than needed.
1693447265456.jpeg

This is an example as to where the chest ripped

So it was then I decided to take a break from the suit.

Rebuilding the suit

So come May 2023, school was done and seeing how the Canadian Regiment was going to have a booth at Fan Expo Toronto, I was determined to finish the suit. Now originally I wanted to rebuild the entire thing but once I examined everything again, I decided to redo only the chest, boots, biceps, shoulders, forearms, hand plates, knees, and shins since the helmet, thighs, and cod piece was salvageable. I rethought my attachment system for the chest and bicep-shoulders as well as learned to how to use an airbrush for painting.

1693447601724.png
1693447645626.png
1693447831911.png
1693448094460.png
1693448295616.png
1693448461863.png
1693448394525.png
1693448198784.png
1693448655266.png
1693448737980.png
1693448832890.png
1693448910900.png
1693448986204.png
1693449060482.png


Now everything was going to plan except something had to happen on the last week before the con.

Problem #2 Electric Boogaloo

So silly me. When I was cleaning the airbrush for a blockage, I was unscrewing the nozzle but then dropped it and it cracked. This was like 7 days before the con and I was kinda panicking since I don't have many hobby shops near me that sells airbrush parts. Now I got lucky and found a place that had Iwata airbrush nozzles but as I was screwing it back in I accidentally screwed too much and snapped it (whoops). At that point I just gave up on the airbrush and decided to do the remaining secondary colours manually (good thing I already did the base coat with the airbrush).

Concrunch Conclusion

So with 4 days remaining I finished the painting in 2, reinforced with shoegoo on the 2nd night after the painting, and did the weathering and made the visor with the remaining time. All of this was finished at 2 am the day of the con just like in concrunch fashion. I did wanted to do a blackwash but couldn't because of time so the weathering was just using a silver paint pen and went over the exposed edges.

1693449314342.png

In the end it did work out. Even with all the doubts I had with how it turned out, meeting the other members of the 405th and them saying how great it looked and even receiving all of the complements at the con made my doubts fade away.

1693449387882.png
1693449465988.png
IMG-20230825-WA0000[1].jpg
(Credit goes to Benton for the sniper)
What's next?

So after the con, I discovered that I need to fix the strapping of the back boot cover because it kept coming off. I did use velcro as a temporary solution but I might make it permanent. I also want to redo the cod piece to make it smaller and modular as it is currently a bit big and one piece. Oh and I need to find a better ammo pouch for my thigh. Also need to make props because I need a weapon.
 

Attachments

  • 1693447705057.jpeg
    1693447705057.jpeg
    865.9 KB · Views: 68
The base of the thighs are done. I ran out of thinner foam so the inner thigh will have to be done at a later date.

View attachment 321670
those look CLEEAANNN. Im debating commissioning my thigh armour because i want my thighs to be foam so i can sit without fear of cracking something. Im certain with paint that those will look indistinguishable from 3D prints or resin!
 
WOW no THIS is what we call con crunching! I didn't realize how close you cut it! If you ask me, it was 100% worth it because you suit turned out incredible! Love the colours! and the foam work is incredible! Not going to lie dude, I genuinely thought you had 3D printed pieces before you told me it was all foam. And I know from experience that making that torso section is not easy! Kudos to you!

I think you need to build yourself a sniper... that photo of you holding the sniper looks sick! Suits you really well.
Thanks! It was great seeing your in person as well, the boots you made were amazing!
I was thinking of doing a heavy weapon. It will help me stand out amongst you tall people with my 5'6" height.
 
The build looks great! Your magnet idea is one I've been throwing around for my current and my new build. How strong are they? Would you say you could run in it and they won't come apart?
 
The build looks great! Your magnet idea is one I've been throwing around for my current and my new build. How strong are they? Would you say you could run in it and they won't come apart?
They are really strong! I'm more worried about them tearing the foam when I pull them apart so I reinforced the back with tons of shoe goo. The magnets on the bottom connection is a little weaker since I used smaller magnets and may come off if I stretch too much in one direction.

Here is a video of me climbing in armor to show they wont come off (the bottom ones came off but were easily reattached and the clip magnets stayed in place)

View attachment 339350
That's legit
Do you know the poundage of the top magnet? For the ammo pouch I recommend a saw utility pouch or something that's similar.
 
Last edited:

Your message may be considered spam for the following reasons:

If you wish to reply despite these issues, check the box below before replying.
Be aware that malicious compliance may result in more severe penalties.
Back
Top