OpticChief
New Member
Noble Six Helmet Build Thread:
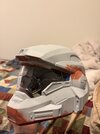
This thread documents my ongoing build of a Noble Six helmet, focusing on clean assembly, surface finishing, and a realistic painted result. I’ll be updating this thread with progress photos as I continue through paint, detailing, and interior finishing.Files & Printing:
- Model: Noble Six Helmet – Galactic Armory
- Printer: Bambu Lab P2S
- Material: PLA
Due to the P2S being a medium-sized printer, the helmet was printed in multiple sections. Once printing was complete, all parts were lightly sanded to clean up edges and prep for assembly.
Assembly:
- Adhesive: Loctite Super Glue Pro Gel
The printed sections were glued together using Loctite Pro Gel, which held exceptionally well and allowed precise alignment. Once assembled, the helmet was structurally solid and ready for seam reinforcement.
Seam Reinforcement & Initial Sanding:
- Seam filler: JB Weld Plastic Bonder
- Initial grit: 120 grit
JB Weld Plastic Bonder was applied along all seam lines. After fully curing, the helmet was sanded using 120-grit sandpaper, alternating between hand sanding and a corner sander to level the seams and knock down high spots.
Filler Primer Stage:
- Product: Seymour PBE Filler Primer
Once the seams were fairly level:
- Applied 3–4 coats of filler primer
- Allowed 10–15 minutes between coats
- Let cure for 3–4 hours
After curing, the helmet was sanded again to further smooth the surface.
Spot Filling & Detail Work:
- Product: Bondo Spot & Glazing Putty
A thin layer of spot putty was applied to the remaining problem areas, especially:
- The brim
- Bottom edge of the helmet
- Areas with heavy support scarring
After curing (about a day), the entire helmet was sanded again, gradually working up through grits until reaching 600 grit, using a mix of hand sanding and the corner sander.
Final Primer & Wet Sanding:
- Primer: Rust-Oleum Flat Black Primer
- Applied 2 coats of flat black primer
- Once fully cured, performed a wet sand at 1000 grit, hand-sanding only
- Used lukewarm running water to keep the surface clean and prevent clogging
This step significantly refined the surface and prepped it for color.
Base Color:
- Paint: Rust-Oleum Dark Forest Green
After drying the helmet completely:
- Applied 2 coats of Dark Forest Green
- Allowed proper flash and cure time before masking
Masking & Secondary Colors: (In Progress)
Currently in the masking stage:
- Using green multi-surface FrogTape to outline panel edges
- Next step is applying Rust-Oleum Satin Black
After the black areas are complete:
- Remaining areas will be masked off
- Rust-Oleum Metallic Aluminum will be applied to accent sections
Once all colors are finished, I plan to seal everything with either:
- Matte clear (for realism), or
- Gloss clear (to enhance metallic depth and shine)
Final choice will depend on how the metallic sections look after paint.
Visor Build:
- Visor buck: Custom 3D printed Noble Six visor buck
- Vacuum former: DT2 Desktop Vacuform
- Material: Clear PETG
- Forming temp: ~150°C
Initially, I ran into issues where the PETG heat softened the buck, causing support patterns to imprint into the visor. To solve this:
- The buck was fully sanded smooth
- Then frozen 15 to 20 mins prior to forming
Freezing the buck prevented heat deformation and resulted in a clean, smooth visor pull.
(Noteable that the filler paint part to the sanding of it and smoothing the buck came off a little bit with the pull. I would love feedback on how to avoid this. I just had to pretty much scratch it off with my finger and wash it out with mineral spirits by klean strip brand.
Visor Finishing Plan:
- Dye visor using iDye Poly
- Apply mirror chrome on the inside using an airbrush to achieve the mirrored visor effect
Interior Padding (Planned)
Once exterior work is complete:
- Thin EVA foam will be used to line the interior
- Velcro points will be added for adjustable padding
- This will improve comfort, fit, and wearability
Possible Future Customization:
Depending on how the helmet looks once complete, I may add:
- A dark crimson red accent stripe
- Minor custom detailing or panel accents
These are optional and will be decided after the base build is finished.
Conclusion to this initial post pending any further updates and responses:
This is my first Noble Six helmet build, and it has been a great learning process so far. I’ll be posting progress photos throughout the thread and updating as I move forward with paint, visor finishing, and interior padding.
Feedback, suggestions, and constructive criticism are always welcome.
Once everything is fully finished helmet-wise, the armor and weapons to go with it will follow, which will obviously be further considered when the time comes.
Attachments
Last edited: