Foam N8TEBB's Foam MA40 Halo Infinite Assault Rifle

N8TEBB

Well-Known Member
Member DIN
S410
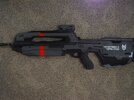
I recently made a 3D printed MA40 with magnets so it could mount to my back. It worked super well! Right until I bumped the AR off my back and it fell 3 feet, breaking it in to 4 pieces :/

IMG_3625.JPG

3D printed MA40

IMG_3661.JPG

You can see how it stuck to my back before it broke.


IMG_3785.JPG

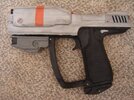
Currently in the process of gluing it back together. You can see where it broke.

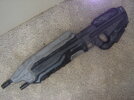
So now I'm remaking it! Out of foam this time. That way I don't have to worry about a brittle 3D print falling off my back. There aren't really much templates to go off of for making this gun. Andrew DFT has a template that may be helpful, but there's no instructions nor tutorial to go with it, so I'm mostly on my own. Luckily I have that 3D printed one and I also have the nerf one to base the geometry off of. So far I've printed and cut out the guide.

IMG_3784.JPG

Andrew DFT Template
Andrew DTF Guide can be found here.
I'll also be using this thread by bajk02 to help me along.
I plan on putting in 2 1" neodymium magnets to stick it to my back and possibly a metal rod down the middle for extra support.
Tips, comments, questions, and suggestions are welcome!
 
what you could do is use some of the nerf parts for the foam ma40. like the canister shaped grip up front, the light, barrel, magazin & ammo counter. would save u some work
 
I could also just paint my nerf gun haha

I haven't made any props from foam before, so this will be an interesting challenge for me! If it doesn't work out then I'll just paint the nerf gun
 
I could also just paint my nerf gun haha

I haven't made any props from foam before, so this will be an interesting challenge for me! If it doesn't work out then I'll just paint the nerf gun
u could but the nerf will still heavyer more fragile than the foam one :D
i´d just mix em both together :D
 
Excited for this one , I personally love doing foam props. Theres a bunch of great tutorials on youtube for them too , I'm a big fan of Kamui Cosplays Videos for Foam Props , she has some gun ones as well that could be helpful research.

I personally always went with the "layering" method when it comes to Foam Props like having the base shape of and then layering with multiple thicknesses of foam on top. I also suggest getting High Density foam for any layering work , I found that HD 2mm foam will be muuuch nicer than any soft foams like craft foam for details.
 
I have done several foam props. and my suggestion would be to use a polystyrene core and build out with more standard Eva or craft foams.

If you cannot handle the "screech" of polystyrene then doubling up either 3/8 or 1/2 inch foam mats should be enough of a core.

I will caution with the polystyrene one big thing.
Polystyrene needs to have a primer coat of paint from a more traditional paint method other than spray paint. (you also cannot use plasti-dip in either spray or "dip" forms)
I used a standard acrylic paint from any craft store as my primer. but after the primer then spray paint or plasti-dip is perfectly usable.

Also, dowel rods and PVC are your friends for making gun barrels or flashlights. Cutting EVA floor mats thin for the texture is a great handle gimmick. (I will link a couple of my guns here for reference on how my builds panned out.)

I used Andrew as a resource when I started too. so I look forward to your build.
 

Attachments

  • 11402645_997462243620372_5054127101254880796_o.jpg
    11402645_997462243620372_5054127101254880796_o.jpg
    242.5 KB · Views: 25
  • 11234045_997462236953706_8241958637980234266_n_zpsh4dr9nou.jpg
    11234045_997462236953706_8241958637980234266_n_zpsh4dr9nou.jpg
    100 KB · Views: 27
  • DSC01968_zpsgtqtlm36.jpg
    DSC01968_zpsgtqtlm36.jpg
    360.1 KB · Views: 32
  • IMG_0476_zpsfv4t0xcy.jpg
    IMG_0476_zpsfv4t0xcy.jpg
    358.4 KB · Views: 29
I highly recommend the layering method. I personally use a long wooden dowel to support my foam props. Also, the dremel is your friend, You're going to want to use it to even things out basically everywhere. 2 mm foam is also really good at covering up seams without adding too much extra bulkiness. To get round parts, You can actually sand PVC pipe, and use contact cement to stick foam directly to it
 
I could also just paint my nerf gun haha

I haven't made any props from foam before, so this will be an interesting challenge for me! If it doesn't work out then I'll just paint the nerf gun
I'm painting a nerf one right now. But I'm sure the foam one would be easier to carry on your back
 
Update

I've gotten the main shape made out of foam. There's still a few main pieces I have to make, but soon I'll be able to start doing layering. I've put a wooden dowel down the middle of the gun for strength that will double as the barrel. I'm not sure why I cut two holes where the hand sits, the smaller one needs to be filled in lol

IMG_3814.JPG
IMG_3815.JPG

use a polystyrene core and build out with more standard Eva or craft foams.
If you cannot handle the "screech" of polystyrene then doubling up either 3/8 or 1/2 inch foam mats should be enough of a core.
I decided to stick to doubled up EVA mats because it's a bit more familiar to me. I think it'll be strong enough. Thank you for the suggestion!

I also suggest getting High Density foam for any layering work , I found that HD 2mm foam will be muuuch nicer than any soft foams like craft foam for details.
Hmmm, I've never used high-density foam before. I'll look into it. I may only be able to get a hold of craft foam, but I'll take this into consideration!

the dremel is your friend, You're going to want to use it to even things out basically everywhere.
Yessir! I couldn't have made my suit without my trusty Dremel! You may be able to see that I used it to get the round grip at the front of the gun. I'll use 2mm foam as you suggested to cover over my uneven sanding job and make it look a bit more uniform.
 
Last edited:
Nice. You going to paint it like Halo Infinite MA40? Or Reach MA37?
I couldn't decide so I am doing both haha
Or custom paint like the rifle that broke?
 
Nice. You going to paint it like Halo Infinite MA40? Or Reach MA37?
I couldn't decide so I am doing both haha
Or custom paint like the rifle that broke?
I'll be trying to get closer to the infinite paint job. That's what I was going for with the printed one too, but I only had light grey! haha
 
I'll be trying to get closer to the infinite paint job. That's what I was going for with the printed one too, but I only had light grey! haha
I spent hours in both games' Forge mode looking at all angles of each rifle, in many different maps for light sources, and I can say its pretty tough to find the right grey/blue tint for the upper railcover/optic color. So I'm going to opt for Charcoal instead because any darker spray paint that's blue is wayy too blue. You might have better luck if you intend to airbrush because you can mix paints.
 
IMG_3846.jpeg

Ammo counter is done and I’ve started layering. I’m using 2mm and 5mm foam to try and build up the deets. It looks a bit wonky in the photo but irl is looks better. There’s a lot of squiggly markings that I used to put the glue in the right place which look weird in the photo, but once Plasti dip is on this sucker it will look better. I put magnets in it so it can stick to the back of my armour. Progress is good! Gonna add some more details, probably a bit more layering
 
Those parts above the trigger area that look like they're inset (on the light colored part), how did you manage that? almost looks like it was done with a soldering iron set on low, or something, and dragged across the lines there. Maybe the picture or lighting just makes it look like that and it's just marker for now?

If that's hand-cut or something with an exacto and a steady hand then WOW
This is super simple! Just score the line, and then go over it with a heat gun. The heat will cause the score to open up like that.
Looking good! I just watched your video of the assault rifle and I am impressed how well rub and buff did. May use that for my foam build
I also used rub n buff for my hammer. It works quite well!
 
This is super simple! Just score the line, and then go over it with a heat gun. The heat will cause the score to open up like that.

I also used rub n buff for my hammer. It works quite well!
NO WAY. I hadn't even thought of that! That's such a cool technique. I may have to try that on something sometime.
 
NO WAY. I hadn't even thought of that! That's such a cool technique. I may have to try that on something sometime.
This works especially well on any kind of grid detail, grip serrations, even vents. Heat will spread the foam while softening the 90' edges.
You'll figure out you can use this technique in many instances.
 

Your message may be considered spam for the following reasons:

If you wish to reply despite these issues, check the box below before replying.
Be aware that malicious compliance may result in more severe penalties.
Back
Top