Hello VocableGold,
It's very brave of you to come here and be judged by your peers and ask for critiques and help to improve your cosplay to the next level. Everything that I say here is to provide
constructive criticism and try to help you achieve the look
you want. I tell people, the only person my armor needs to please is me! I've only read some of the above replies above so I may duplicate some stuff already said.
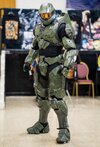
A little background about myself, I only recently got into cosplay fabrication. I started back in September 2022 when I decided I wanted to do the 405th with my son Pipninja and I wanted to build my own Spartan outfit. Because of my build and stature, I'm 6'4" and 260 lbs, I decided to do Jorge S-052 from Halo Reach. I finished my build the morning of October 13, 2023 the day of the HCS cosplay contest when I finished painting Etilka, Jorge's gun. I won that contest. I have deployed as a Tier 3 Spartan in the405th. So that said, I hope some of the advice and techniques I recommend below help you achieve your goals in the 405th and your cosplaying adventures.
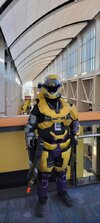
The first thing I noticed on your pictures were your print lines and seams. I know these are a bitch to fix, but they should be addressed. They should be filled and sanded. I've used bondo and sandable filler primer on my print lines. SpartanJohn uses XTC-3D resin for print lines and I'm sure other can recommend other types of fillers. That said, you should really spend the time to fill and sand your seams and print lines.
The next thing I noticed was your undersuit. I am not a fan of the plain black undersuits many of the 405th guys use. I bought one of body suits that has a Halo-esque pattern/designs printed on the suit. Here is a link to the one I got. I bought the 3x for my size and it was almost too big:
From top to floor. Thigh Circumference. The length from left shoulder to right shoulder. Shoulder Width. The inseam length from crotch to ankle.
www.ebay.com
I made some modifications to this suit.
- It comes with full finger gloves built in. I cut the fingers off so I could put my gloves on over top of them and be able to feel my fingers better.
- I cut the heals and toes off leaving just a stirrup . It's a spandex type material and was really slippery in my shoes. My shoes are slip-ons and I slipped right out.
- I replaced the back zipper with a heavier duty zipper. I left a tab at the bottom of the zipper to hold and put a long pull string on the zipper tab (like a wetsuit) so I can zip it myself.
- I added a zipper in the fly. This is so I don't have to totally disrobe to go to the bathroom!!! Very Important!!!
- I bought some cheap kids knee and elbow pads on Temu. I removed the actual padding, painted them to match the color, and sewed the plastic elbow cups onto the suit directly
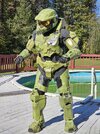
As you can see in the below pic, I also made and ab-wrap. I have seen two ways to do this that I like. Mine is made from 10mm foam glued together with no ventilation. It is rather warm and I do have a little issue with over heating. I split mine on the Right side as with Jorge's gun, I would be facing most pictures left side forward. I attached my spine plates directly to my ab-wrap. I'm rockin a dad-bod so it also acts as a bit of a girdle for the fluffy midsection. You can also look to Pipninja's way of doing an ab-wrap in the next link. He is the gungnir spartan in the pic below. His has some ventilation and looks beautiful but zips up the back where I wanted to attach my backplates directly to the ab wrap. I may still make one like his one day...
So finally the time has come where I show my process of making my Reach undersuit!! First and foremost, I want to give initial credit to WandererTJ , Because He is the one who made the pepakura model of the undersuit that I used to make my patterns, and KitKatGoose , Who I originally got the...

www.405th.com
Finally, the last thing I see is the paintjob. In some areas it looks really good, but others, in my opinion, the paint chipping and scratches could be better. The dirt wash in the yellow areas looks good, but the robot arm doesn't look like you did any dirt/grime wash. My process was quite intense to get the effect I wanted. In the second pic of your arm, there is a couple of dabs of silver for chip/scratches, that in my opinion (respectfully) do not look realistic. There is no grime from use or battle. Again, this is not to judge you, but to help you.
My painting process all starts with primer for 3d prints or sealer for foam. After that, I used just simple metallic zinc craft paint and go over everything. To do the chipping effect, I used liquid latex masking fluid on on the raised areas that would get worn or scratched in normal use of the armor. IMO the latex mask gives a much more realistic chipped/scratched paint effect later in the process. After masking I applied a number of base coats as needed for uniform coverage of whatever base color I wanted. Next was a dirt wash of 25% black, 25% burnt umber (thank you Adam Savage for recommending that color), and 50% water. I liberally apply the wash to my part. The process of rubbing off the excess wash also removes the latex masking goop. From there, I go over the chipped areas (the now exposed metallic zinc) with some shimmering silver to highlight the scratches and give it a two tone metallic look. I put a final coat of DecoArt DuraClear Matte Varnish on top to seal the paint.
Here is a link to my whole build process photos if you want to see how I built my kit:

drive.google.com
Here is a good, up close video of my suit:
Jake Lucky on LinkedIn: #gaming #halo #esports #news #creative #innovative | 19 comments
So again, my critiques are to help you achieve
your desired outcomes. If you have any questions about anything I did or how I did it, please feel free to reach out to me.
PapaBear271
View attachment 341346