New year, New suit

::update:: 3/4/23

Helmet is complete! SSGLordErne and SSGLordElmo can over today and helped nail out a few things with their armors, so I took advantage of working on the details. Here is the completed helmet. Just need to add the chrome visor.

0B869DA7-DF5C-4B2F-A8EE-7FDD9460FADC.jpeg
CC64D598-1643-4444-9C59-D33F0920ADD6.jpeg
D6AE79FC-D522-4889-A826-FBF382EDAB17.jpeg
 
::update:: 3/6/23
Alright with the helmet done (printing and forming the visor still), I’ve moved on to concepting the legs and chest. Trying to keep with the blue power ranger theme.

I started with the shins. Being that the boots of the original power rangers were tall, I decided to use the shins to make up for that. Hear the concept. Thoughts?(all coloring has been done with procreate on my iPad.)
CA49F14A-E041-41F9-96CA-4AD1B68E114F.jpeg

1FEB1448-40F0-478C-B327-49C6AD1D75DF.jpeg


Then here is the chest concept minus the attachments. Attachments will be gunmetal like in game.

2F05B5CD-1C0F-4369-A008-3FEA2B8C5546.jpeg


Let me know if any ideas or tweaks you guys think of.
 
Ok - unrelated - but how do you have your Lego Millennium Falcon wall mounted like that?
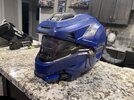
 
::update::: 3/10/23

Well the helmet is complete minus foaming the inside for fit. But all the painting and visor work is done.

The visor is a smoke black resin print, sanded all the way to 7000 grit to give it a see through finish. Coated with high gloss clear coat on the outside and then a thin layer of mirror paint on the inside. I then finished the side attachment last night. It is not a glued on attachment. I wanted it to be swappable, so I used the post method. That way I can put any attachments I wanted in its place.

3EAF659A-6DD5-4F7B-BF6A-D2B361B80D31.jpeg
1721C043-432B-46DA-950A-4F30FADFEB62.jpeg
 

Attachments

  • E0D30FE2-5EA3-4ADD-94FB-06D333E4242D.jpeg
    E0D30FE2-5EA3-4ADD-94FB-06D333E4242D.jpeg
    2 MB · Views: 74
Now that is one hot shade of blue! What's the visibility like from the visor? I like the texture but my initial thoughts would be it's hard to see out of
 
::update:: 3/29/23

Been a min. But I’ve been busy with my kiddo. Also planet Comic-Con was a blast!! Love hanging out with my Midwest peeps. Hope we can get together again!

Chest update!

Chest is painted and drying!! The next stage is adding some service straps on the inside so I can install backpack straps on the back. Being I’m an electrician I thought I’d use what I have on hand. Lol. I also have some single wall 0% infill undersuit rings printed that I’m gonna use. Not going to attach them. Just have them loose for comfort. Got the idea from slender dummy. He actually supplied me with the files for the undersuit. Great guy.

Here’s a few photos of the paint work and stuff

A053BA06-AC38-49A3-84BA-34F30177F418.jpeg
53DFFFBC-DE8A-4A89-82D0-490C85A0A1B9.jpeg
28A1CD4E-75E0-4C81-B8EC-608A6EBE3BC4.jpeg
409022AB-B3B6-43F3-84AC-038C2E7F8607.jpeg


Waiting on the clear coats to dry and they will be done. I’m going to paint the chest attachments separately since they are just attached via magnets.

No here’s the next piece I’m working on. The space diaper. I wanted to capture the look of the power ranger belt and power morpher. After I drew up and colored the concept, I actually went in shaper 3D on my iPad and made an actual morpher that will mag to the belt front. Pictures of that will come once I have it printed and magnets are installed. But here is the concept.

A1E8466E-2972-4F09-85FB-F91107C9E50D.jpeg
39568B31-D28D-4D8D-B40E-13A3BC102099.jpeg
C4A1CBDD-A7EB-4D5A-8E96-A43E283C8092.jpeg
 

Attachments

  • D278D01B-462F-43DB-8CB6-2FCEF54A6777.jpeg
    D278D01B-462F-43DB-8CB6-2FCEF54A6777.jpeg
    2.6 MB · Views: 74
::update:: 4/3/23

Just a small combo update. The belt is drying with the fiberglass resin and stuff. I printed a new morpher on my resin printer and it looks a lot better than the first iteration. Pictures of that will come once the belt is complete.

But I did get the undersuit rings plasti dipped in grey and fitted for test. Not sure at this moment how I’m going to get them on. I’m trying to do a solo suit. But I might not accomplish that. On the backpack unit I made some makeshift backpack straps using synch straps so that I can adjust comfort. They are attached around some electrical two hole straps in (shhhhhhh) stole from work. I used pan head screws coated in JB weld to attach them to the back. Then coated the attached point in more JB weld for stability. I’m thinking that once I have the back pack on I have someone help me slide the undersuit rings into place.

There will be a matching neck seal for this as well, but couldn’t display it in the pictures yet. But here is some photos of progress
D22DC665-A118-41D1-8C9E-7223AE34F292.jpeg
7070DFED-487A-4021-9706-021FA10D1D04.jpeg
DE8DC365-CD15-4D81-882B-704218241F58.jpeg
8E31B868-C451-41B0-AF0D-0177FA63FC88.jpeg
1F0F31FD-4714-4E5E-AB1C-2C6FF6EAE7D4.jpeg
 
That's awesome mate! Loving the blue and silver contrast. How are u smoothing your prints, because I'm using acetone, high gloss enamel, and spray paint to combine and melt the pla on my helmet build.

Ps. AWESOME rakasha/elite shoulder!!!
 
That's awesome mate! Loving the blue and silver contrast. How are u smoothing your prints, because I'm using acetone, high gloss enamel, and spray paint to combine and melt the pla on my helmet build.

Ps. AWESOME rakasha/elite shoulder!!!
Thank man! I actually use a combo of fiberglass resin, bondo glazing putty, and filler primer. Using the fiberglass resin cuts down in sanding significantly. I do a 120grit sand the. Apply the resin. Let the resin dry then sand with 120 again. Spray filler primer and let dry. Use the spot putty to fill and imperfections, sand those areas when dry. Then recoat with primer. Repeat if necessary but move up to 240 grit. I got my helmet done only doing the steps once maybe. I only sanded three times and it was golden. The resin also helps with rigidity.
 
Been awhile since I made a post. But I’ve been really busy. Baby on the way, getting a new job, and football season (lol).

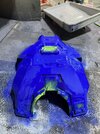
But I have been busy on the side… working on my next Mk7 armor!!

Got a few things in the works. Updated printing. Better filaments. Better tuned printers. And overall I’ve learned a lot from my first armor. With ideas from SlenderDummer and theMakyr, I’ve combined some thoughts and progressions into my next set.

Here’s a taste.View attachment 327555View attachment 327556View attachment 327557View attachment 327558View attachment 327559View attachment 327554

::update:: 2/3/23

Decided to do a little crossover with this set. Drew some things up on my iPad and designed some resin stuff. Here’s the concept colors. Note: this is just colored with my Apple Pencil, no actual painting has been done yet.

View attachment 327674

And if you still haven’t quite put your finger on it… lol

View attachment 327676
View attachment 327675

::update:: 2/5/23

Another concept coloring done. Check it out.

View attachment 327695

::update:: 2/15/23

I keep forgetting to put my updates in an edited post instead of a straight reply lol. But here is the finished product of the shoulder piece. I’m super satisfied with it.

View attachment 327948
View attachment 327950
View attachment 327949
i like the color you have for it so far, this armor is going to be great i will be watching this thread again awesome job
 
::update:: 4/7/23
This post is an update and a question for anyone that knows. If you have ideas on my upcoming question let me know!

Update portion.

Not a huge update. But the belt or space diaper is done. Well the back half is drying. But the first half is 100%. Magnetic power morphed and all! Check it!!
F170446C-2F77-4C61-B6C8-6B0E25C47B44.jpeg

F83F9698-4584-48E0-BF11-45B988CD51EC.jpeg

I’m really loving the effect that the graphite powder puts in the armor. I’m probably going to go back over the whole suit with minimal highlights just to accent some of the edges. Haven’t fully decided on that, so that’s why I’m waiting until the very end of the project to make that decision.

ok question time…

So I’m wanting to put audio in the helmet so that I can hear my surroundings better. Not I’ve watched a couple videos on some ideas and have a list of Amazon purchases that I’ve made to prepare. I’m wanting to use a 5v system so that I can power it all off of a power pack usb. So here are all the things I’ve bought:

A9A66245-9FF4-420F-8040-D6135CF419DD.png
0568FBA3-A1D9-45DC-A09D-B987F5E03E34.png
C8071EE8-6935-4CE1-92BF-989E798432AF.png
D1388A6D-C5EB-4A34-9CE8-662231A0F3A9.png


Now instead of the speakers, I thought about using headphones and just cutting them up and reworking them. But I then looked it up and headphone speakers are only like 1 volt and shitty ohms. Any opinions on that? I’m putting a mini mic on each side of my helmet so that I get stereo in the helmet and can tell which way sound is coming from. Any further ideas or better solutions for this?

I also bought a voice amp so people can hear me. I’ll put the speaker in the chest and the mic inside the helmet. I definitely have CrimsonViper97 to thank for this one. Best purchase I’ve made.

Thanks guys. And as always more updates as them come.
 
::update:: 4/21/23

Been a hot min since I’ve made an update. But I have been doing some things…. Good news… my helmet idea works!!! Just getting all the internals installed and then foamed to hide. The volume control is insane on it. Very happy with it.
DFFB3D9E-6A41-402F-A0DB-534847A55815.jpeg


Then a small weapons update.

So I took a small break from the armor portion on my blue ranger. Just so I can rethink some color scheme on certain pieces. Mostly to work on more flow of color and how everything will blend. But also how I can attach things without straps. Velcro and magnets are my big thing right now. Lol.

But for all my power rangers fans, besides the power weapons they carried, what was their other range attack? The blaster!! Now I didn’t printer a replica. Since this is halo cross over I didn’t want just straight power rangers stuff. So I took a great print file from OddWorks3D, the side kick pistol!
672C2D07-1B18-4CED-9550-CD1FC1D26028.jpeg


I added a high strength iridium magnet to both sides, so they I can stick it to either thigh plate. Which I JBWelded a square sheet metal piece right where it blends in with the thigh. Pictures of that later. But then I needed to get the pistol to match the color scheme of the original blaster.
587C8DEA-894A-46AC-B5AF-62431928F411.jpeg

And then test the mechanics

More updates to come as I progress. My daughter takes up most of my time but I don’t work on my stuff when she sleeps.
 
::update:: 5/1/23

Small and lengthy update. Lol. Got a lot of little things done. Got the biceps painted and Velcro-ed so that they will attach to my shoulder harness. Which I was given the idea by a fellow 405th member at planet Comic-Con. I apologize for not remembering his name. A lot has happened since then.

IMG_1997.jpeg

IMG_2004.jpeg

IMG_2020.jpeg

IMG_2019.jpeg

IMG_2022.jpeg

IMG_2023.jpeg


Then I got the magnet setup and painting done on my thighs. I can attach the pistol to either thigh with no problem. I’m think about printing grenades to attach to the other hip. Like how they were displayed in halo 3.
IMG_1996.jpeg
IMG_2003.jpeg
IMG_2006.jpeg
IMG_2014.jpeg


And with that the wrists are the next thing in the works. I can’t 100% decide if I want to do the grapple attachment for it or not. I have an idea on how I would get the magnets to work for it, but can’t decide if I want to right now.

More updates to come
 
Small and lengthy update. Lol. Got a lot of little things done. Got the biceps painted and Velcro-ed so that they will attach to my shoulder harness. Which I was given the idea by a fellow 405th member at planet Comic-Con. I apologize for not remembering his name. A lot has happened since then.
I believe that is HoundOfMeath. Velcro for the attachment wrapped around the bicep is a good idea. I was wondering if I wanted to do strapping or something else if I used that harness.
 

Your message may be considered spam for the following reasons:

If you wish to reply despite these issues, check the box below before replying.
Be aware that malicious compliance may result in more severe penalties.
Back
Top