Pepakura Novel Approach to Helmet Construction (Completed Build)

Contrapaul

New Member
This thread will detail the process for how I built my Mark V (ish) helmet, using a novel 'all paper and glue' method. This build also features laser cut parts, but no 3D printing, fiberglass, or resin cast elements. Album link without commentary includes many more photos not posted in this thread.


IMG_1544.jpg


Youtube video of the build- abbreviated. I put this together for my school/students, so it speeds past details that are more relevant to this community.

Materials used:
250gsm Cardstock
150gsm Cardstock
Green Stuff Epoxy Putty
Visor
Titebond 2 Wood Glue
Some 1mm and 2mm card for filling vents
A small amount of super glue
A small amount of extra strength hot glue (visor install)

Tools:
Hobby knives
Triangle rule (very useful for applying pressure during initial construction)
Sculpting Tools (great beyond just sculpting such as tape application/removal, scraping)
Scoring tool
Steel rule
Laser cutter (a big Thunder Laser Nova35- overkill by a lot)
Adobe Illustrator

Paints:
AV Vallejo Acrylics
Citadel Stormhost Silver
AV Vallejo Matt Varnish (and a little satin)
Chinese brand cheap spray paint
Chinese brand automotive spray paint
Vaseline for masking

Commentary:
A few months ago I wasn’t planning to make a Spartan helmet. I’d been brainstorming ideas for projects I could film and share with my students, and had actually been thinking about making a custom Catan set. I also had to produce a small takeaway craft and needed to test some laser-cut yardstick ideas. A few simple tests later I really wanted to test using the laser cutter for a prop. I poked around a bit before stumbling across a ‘Halo Reach helmet’ file.

A bit of background- in September-October 2010 I built a set of Mark V armor (images dead) and have always been partial to this style of Halo armor. Back then the helmet was created following the standard method- cardstock > resin > fiberglass mat > bondo. The armor was made with EVA foam floor mats, and was one of, and possibly the first of it’s kind. At the time foam floor mats were just beginning to get some notice for costume armor, and I’d seen a cool set of Mass Effect armor and wanted to try the material for Halo. With Halo Infinite’s launch I checked out the state of Halo costuming and toed with the idea of making armor again, but hadn’t really thought about a few months after finishing the game. I’d been looking for a much simpler project to laser cut back in February but figured I’d give the helmet a try.

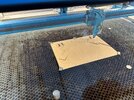
Using Illustrator I modified the Pepakura output for laser cutting, and I wanted to try using 1mm card. I assembled the cut pieces with hot glue, and my rough draft was pretty messy- but useful. 1mm card was not a good material for this project, being too chunky for flaps to work properly, and also not very flexible without creasing or kinking. My laser cutter is awesome for cardstock, but not great for scoring the material. I could use the machine to cut the outlines of pieces, but it would have been a pain to score each piece without printed lines. Because of this I chose to print the pattern onto 250gsm cardstock and cut and score it by hand.

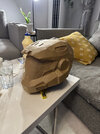
Very early into assembly things were coming together very cleanly, and I think that experience is what motivated me to dive all the way into this project. I used thinned Titebond 2 wood glue for assembly, and began adding extra glue to joints and the backside of flaps for strength. As the helmet came together I began considering whether I could avoid using fiberglass or other unpleasant materials entirely. I began painting thinned glue throughout the interior of the helmet, and as construction wrapped up I did the same to the exterior. This helped to make the helmet much more rigid, though it was clear it would still need to be much stronger.

IMG_0309.jpg


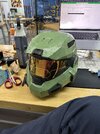
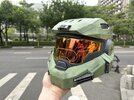
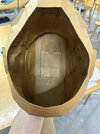
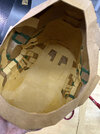
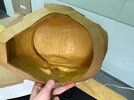
Unfortunately I didn’t take any photos of the assembly until it was nearly complete. The first photo of this project shows a gap at the top of the visor, but other than that everything is in place. The process was mostly smooth, though The details around the visor were a pain, and as you’ll see later- a waste of time. I began documenting the helmet while adding layers of cardstock to the interior for reinforcement. At some point during this process it became clear that my idea of avoiding fiberglass would be possible, as the helmet became rigid enough that I felt sure it could hold a visor.

IMG_0330.jpg


IMG_0810.jpg


IMG_0842.jpg

IMG_0858.jpg


The extra layers I added thickened up the shell, though there was still a bit of flexing. To counter this I added some green epoxy putty to areas in need of support. After this I wanted to clean up the interior while also adding a further strength element, and opted to overlap layers of thinner cardstock. This took some time, but resulted in a smoother interior that also added strength. The entire process of reinforcing the interior was made much longer as I worked to make the weak components around the visor strong enough to accommodate a visor. As noted before, this ended up being a waste of time, but at least I didn’t have a deadline.

I'm not sure how long threads can get here, so I'm going to break this post into pieces.
 

Attachments

  • 95y5W2.jpg
    95y5W2.jpg
    2.2 MB · Views: 709
  • 9UouKi.jpg
    9UouKi.jpg
    1.9 MB · Views: 82
  • 9Uo584.jpg
    9Uo584.jpg
    1.9 MB · Views: 88
  • 9UofIL.jpg
    9UofIL.jpg
    1.6 MB · Views: 97
  • 9UolMx.jpg
    9UolMx.jpg
    2.8 MB · Views: 81
  • 9UopuX.jpg
    9UopuX.jpg
    2.5 MB · Views: 84
Last edited:
Following this I had my 2nd ‘now I’m almost done’ moment, when I removed the cardstock visor. Once removed I began test fitting the visor. I quickly realized that I needed to make some changes to the elements around the visor, and cut out some parts. The angular bits on the sides of the visor needed to be entirely removed, and I did this after taking a closer look at the models for this helmet in Halo Infinite and Halo Reach.
IMG_0870.jpg

IMG_0865.jpg


If I did this project again I’d locate a good model from Halo Infinite to modify to be printable. I didn’t do that, and the model I *thought* was from Halo Reach was actually relatively close to the Mark V helmet worn by Noble 6, but missing details, and including some weird changes. I made it up to the visor removal without needing reference images, and really should have reviewed those earlier.

IMG_0926.jpg


After reviewing reference images I wanted to make some additions to the helmet that would bring it’s final appearance more in line with it’s model in Halo Infinite. The first steps involved modifying some of the template pieces in Illustrator to add details like arrows and cutouts. I laser cut these, glued them together, and added them to the exterior of the helmet. In the end I added 18 armor pieces, 2 cylindrical filter elements, 2 vents, a rear seal, and a number of pieces to the central mounting point above the visor. I also used Green Stuff to fill some gaps and also to smooth out the edges around the bottom of the helmet.

IMG_0928.jpg

IMG_0930.jpg

IMG_0937.jpg


IMG_0936.jpg


IMG_1288.jpg


Those with prop experience know this, but these kinds of details are what sell a prop as real. Theses add complexity to a prop, help to break up otherwise simplified geometry, and look fantastic when painted. In order to help blend these new pieces into the exterior I carefully shaved edges to add ‘wear’ or to make new elements appear to have been present from the start. My hope was that once painted it would be challenging to pick out which pieces had been added later, or where I’d combined several pieces to represent one bit of armor. Slightly beveled edges go a long way toward selling a finished prop, and also retain paint far better than sharp edges.

IMG_1289.jpg


After this I began to work on the design of the visor seal. The helmet isn’t perfectly symmetrical, oops, and required some tinkering to determine the fit and sizing of elements around the visor. In the end most of the visor seal pieces were designed in Illustrator and laser cut, though a couple were hand cut. I made a mistake with the far right and left lower elements, and intended to have a cutout in the center of the larger 5 sided shape, but forgot to modify the shape after testing the size. The final result looks perfectly fine without the cutout, but it wasn’t a stylistic choice. Lastly I used epoxy putty to fill gaps around the visor, sculpting and cutting the putty to add to the armor around the visor.

IMG_1297.jpg


First draft visor images in album, all work removed by the end and repainted.


After this I decided to go ahead with adding the pattern the visor. I designed a pattern in Illustrator based on the visor from Halo Infinite, and laser cut a stencil for this. I traced this onto masking tape I’d applied to the visor and removed, and cut the pattern by hand. I reapplied the tape and sprayed the visor, but less heavily than I wanted, and went back to add more the next day. I tried a non-game style based on something I’d seen on someone else’s project armor online, but after briefly liking the results, felt that it was too clean and began removing it. The visor I purchased is actually one of the most paint resistant things I’ve ever seen, and caused a lot of extra work in repainting and repairing the detail due to chips or tape touching the wrong bit of paint.
 

Attachments

  • IMG_0929.jpg
    IMG_0929.jpg
    3.7 MB · Views: 71
Once the seal and visor pattern were complete I again felt ‘almost done’ with the helmet, and was again wrong. I sprayed a light coat of white paint on to help spot or fill imperfections and issues, and it also helped to stress that the front ’nose’ seal element was wrong. Wrong enough that it stood out right away when comparing to the models from the games, and even without that comparison I knew it would look weird when painted. The rest of the seal elements were notably flatter, and as they were laser cut, appeared manufactured, while the front part didn’t match. I opted to do a bit of rhinoplasty and build a new ‘nose’ from scratch. After removing the offending element I measured the space available and worked with the pieces I’d already made in Illustrator to ensure everything would fit together.

IMG_1328.jpg


IMG_1350.jpg


IMG_1351.jpg


IMG_1352.jpg


IMG_1357.jpg


IMG_1358.jpg


IMG_1364.jpg


My plan was to add all the card elements and use green epoxy to sculpt the ‘armor’ part that touches the visor seal. I built up the inside of the helmet to secure and support the changes, and for a time debated trying to use card for the armor as well. Ultimately I did stick with the epoxy putty, and was able to sculpt and cut it into a shape that blended seamlessly with the card armor plating when I tested it with a quick application of white paint.

IMG_1366.jpg


IMG_1368.jpg


IMG_1369.jpg


Now that the exterior was actually complete I gave the helmet it’s first official paint, a layer of dark grey.

IMG_1377.jpg
 
This was a fairly thick coat, and I wet sanded the helmet before the next coat. After this I sprayed it black and dark grey.

IMG_1384.jpg


IMG_1385.jpg


IMG_1390.jpg


I masked the dark elements and sprayed a the armor with a medium gray, allegedly a brownish gray. Had the color been a little different, or had I gone with a different scheme this could have been the ‘raw’ material under paint for weathering, but in the end it is not visible.

IMG_1391.jpg


IMG_1410.jpg


When I started the project I’d considered red armor, then changed my mind and planned on darker gray armor. I consulted my wife around this step, who actually much preferred Infinite’s ‘Olive Recruit’ coloring, and I agreed. I’d hesitated to go with green tones based this not being Masterchief’s helmet, but ultimately realized I just needed to stop being pedantic and let people call it what they want to call it.

I bought 3 colors of automotive spray paint that appeared to match the tones in the olive armor. I’m not sure the middle layer ended up adding anything, but I won’t really know unless I make additional armor pieces. I started with a lighter green, which would be visible in places the paint had been scuffed or damaged through wear.

IMG_1446.jpg


I used Vaseline to mask these chipped areas. On future projects I now know to use larger blobs of vaseline, and I’d add many more areas as well. The less vaseline I used, the more tedious it was to remove after 2 layers of paint. One layer was considerably easier for this type of weathering, as 2 layers with thicker paint was resistant to easy removal.

Screen Shot 2023-05-16 at 10.16.54 AM.png


Video screenshot of middle layer. My thought was that this brighter green would help make the final tone more dynamic- as I could pick out similar tones in the Infinite texture. In the end it's very hard to tell, as the paint was much more opaque than others I'd used. I'll find out if I make the rest of the armor and test pieces without this layer.

IMG_1466.jpg


The final green wasn't quite what I'd planned, but I thought that weathering would probably bring it much closer to my vision. After removing all the vaseline and masking tape, it was time to move on to weathering.
 

Attachments

  • IMG_1466.jpg
    IMG_1466.jpg
    1.8 MB · Views: 72
My basic formula for weathering was to paint on a mix of black and brown paint, and quickly wipe it off. Depending on the texture of the green paint it sometimes took a few passes to get the effect right. Direction and strength also affected the finish when removing this paint, and allowed me to leave more grime in places to accentuate the helmet geometry. This work was done in small sections at a time, typically only about 25-40cm squared.

IMG_1481.jpg


IMG_1483.jpg


IMG_1486.jpg

Once I was happy with the weathering on the green armor, I moved on to highlights. The vents and mount received dry brushed silver paint, which brightened the edges but also added a worn metal appearance to the flat areas. On the green armor I added some thinned ivory edge highlights. For the “rubber” visor seal I highlighted a few times with grays, lighter each pass. I also added very thin black ink/wash to the recesses to up the contrast. I used the same colors for the ‘rubber’ element on the back of the helmet, and also drybrushed some of the flat areas to break up the color.

I feel like the single most important step in this project was the application of lots of thinned AV Vallejo Matt Varnish. This is an acrylic resin that protects the paint, but also removed the glossy finish from much of the paint. The varnish also removed any stickiness or roughness from the paint, resulting in a much better feeling in hand. The finish after removing gloss is dramatically changed- taking on a worn metal look rather and unifying components. It’s really impossible to overstate how critical this was in making the helmet a believable prop.

IMG_1548.jpg


IMG_1545.jpg


IMG_1546.jpg


IMG_1547.jpg


IMG_1549.jpg
 
Last edited:
A final note before moving to padding- the visor was a struggle. As mentioned, it was highly resistant to paint- and the original visor paint became chipped and damaged to the point that I knew I wanted to respray it with better paint. I purchased 2 colors of higher quality gold, intending to produce a slightly more dynamic tone. I’d experimented with using the laser cutter to make stencils with tape, using backing paper from some decals I had in the workshop. I’d removed the decals and added blue 3M masking tape strips that overlapped one another by 3-4mm. I turned the power way down, and used this method to cut stencils for the visor and also circle masks for the ears. (The center of each ear was masked during dry brushing, leaving a darker circle in the center- to match the texture in Halo Infinite). I sprayed the visor, and added a thin layer of sprayed on varnish as well. Even with better paint and varnish the design wasn’t perfectly smooth. I carefully taped the edges of the visor seal, masked the newly sprayed design, and added some paint to the edges of the visor as well- to be chipped in to replicate the detail from Infinite. I thought I was finished, again, but discovered another chip when showing my work to a colleague. In an attempt to hopefully stave off further damage, I touched up the design by hand with gold acrylic paint, then painted it wish satin varnish. Hopefully this will keep the visor detailing safe from routine handling, but we’ll see. If I had a vinyl cutter handy (or wanted to try it with the laser cutter) I’d use gold vinyl for the visor detail and avoid all the trouble. Lessons learned.

IMG_1471.jpg


Inside I mixed some white and black paint to make a very dark gray. In my experience adding a bit of white makes the black more opaque, and allows for fewer layers. After everything was uniform I added a liberal application of varnish for protection and feel. I bought 2 sets of helmet padding to test, and ended up using some functionally and some cosmetically. I will be creating a couple extra pads for my cheeks from scratch with mesh cloth and some foam I had in the workshop- but don't have mesh on hand. I Everything is attached with velcro, and there is room for future additions like a fan, battery, or microphone.

IMG_1593.jpg


One extra detail I added was some mesh to the front vents. I had some computer dust prevention mesh in my workshop, and wanted to do something to add depth and detail to the vents. I cut the mesh to size, put in a few drops of super glue, then added black wash on the edges and matt varnish to get rid of shine and blend them in place.

IMG_1521.jpg


IMG_1523.jpg

(Picture above from prior to wash and varnish)

So that’s everything. A lengthy, tedious, fun, educational process, and a very cool addition to my workshop. With what I learned doing the helmet I’m sure I could crank out the rest of the armor expeditiously, though I plan on taking a break before thinking about that.
 
Last edited:
Lessons Learned and Takeaways:

1. It's totally possible to skip fiberglass and body filler.
Epoxy putty was a useful material for finishing and adding some strength to joints, but I could also have only used it as a visor fit and fill material and been ok with card supports inside. I cared about making the inside of my helmet as smooth and clean as possible, but wouldn't need to do this for armor pieces- allowing for speedier/chunkier support materials like cardboard, foamboard, and whatever else I have around the shop.

I don't have loads of experience with fiberglass resin, though I have used it for 4-5 projects since my first Halo helmet. In my limited experience through the years it's been an annoying material to work with, and is a struggle to apply smoothly. The clean, sharp exterior of my helmet was the biggest driver to see if I could skip resin, followed by a desire to do this project with less dust/fumes.

2. Laser cutting is an MVP. A craft cutter like a Cricut or Silhouette could produce similar results, though are more annoying to use. (Sticky cut boards, 'weeding', blades, etc). Being able to modify parts in Illustrator and cut them out perfectly meant that creating layered details, precise fit details was possible. Without this I would have had considerably fewer details, and the already tedious and time consuming process of rebuilding the visor seal would have been much longer. As noted, it is also possible to use this to cut out all pattern pieces- though not advisable for scoring.

3. Matt varnish is the other MVP. Even more than weathering, the varnish is responsible for the dull, worn appearance I achieved. It's a bonus that each layer adds protection. I applied thin coats of thinned varnish, as if I was painting Warhammer models, and as a result there really aren't visible brush strokes or inconsistent areas.

4. Save visor details for later. I could have saved a lot of time in masking and painting had I waited to do the visor details until the very end. Constant paint chipping off also meant that I had to brush off flecks of gold to prevent getting it stuck in layers of varnish.

5. Check models before starting. I don't really understand the model I used for this. It's close enough to the reference that it's recognizable, but some of the changes make little sense. If it was only a case of reduced detail I'd totally understand, but some elements, such as the ears/sides have notably different geometry than any reference game model. Given that I can add details with the laser cutter a smoother model is fine, but much harder to get around fundamentally 'off' elements.

6. Use Contact Cement for Velcro. I may not need this for some of the flatter velcro pieces, but came into my shop 36 hours after adding velcro and found that the 2 most 'stressed' pieces had been pulled off by the flexed padding.

7. TBD
 
Last edited:
Been a while since I've seen someone do this method, and I do say you did a great job! Very well done sir!
 
Thanks for the kind words folks! I had a request from elsewhere to take pictures through the visor, and I'm sharing those here as well. I need to clean off both sides, as it looks a little smudged, but otherwise visibility is excellent.

IMG_1607.jpg

From the interior back of the helmet, ultra-wide .5x lens.

IMG_1608.jpg

From closer to front, ultra-wide .5x lens.

I've been toying with the idea of making Mark VII armor to go with this, but haven't found paper models. I'm going to test a foam bicep piece with flaps to see how it comes out. I have a ton of EVA foam and could go that route, but would prefer to avoid it if I can help it. I live in a very warm place, and foam armor can be pretty insulating. (Footwear, spine, butt plate, and other elements might be best for mobility).

I also have the ability to 3D print pieces, will probably test some pieces to check weight and quality.
 
i second and third with planet alexander and N8TEBB on the great write up on this and i think you did an awesome job from start to finish with it all. Well done!
 
This thread is more than 11 months old.

Your message may be considered spam for the following reasons:

  1. This thread hasn't been active in some time. A new post in this thread might not contribute constructively to this discussion after so long.
If you wish to reply despite these issues, check the box below before replying.
Be aware that malicious compliance may result in more severe penalties.
Back
Top