ODST for my kids WIP Completed (more photos Page 13)

Status
Not open for further replies.
You have some nice work going here. I'm looking forward to seeing how it all comes out. I def. like the weathering and fan set up.
 
I'm almost done. Or not. I noticed that the shoulder pieces were warped when I resined them because I was not careful when they were resin-cured. I had to redo 3 of the shoulders. They are all resined and rondoed. Need to paint them soon.

In the mean time, I completed ODST helmet.

My kids were always careful not to be scratched by the edges of the helmet. To reduce the cuts, I took some rubber tubing from the sprinker system that I have. I cut right in the middle and hot glue it to the edges of the helmet.
b6378469.jpg


I received the Nite Shades today. Can't resist in trying it out.
533d18a2.jpg


I searched everywhere for the right material for the visor. The best I could find is to use the plastic packages from toys. They look like these. They best part is they scratch-proof. I find that Barbie toy has the thickness that I want. So I used my daughter's toy package to complete the visor.
61de9806.jpg


Here's a trial of the Nite Shades. Quite tricky to get it right.
2e431588.jpg


Using ZakuAce method, I cut the visor and spray it with Nite Shades. I sprayed too much and now this is useless. Too dark. Doh!
74d4b613.jpg


Here is the ODST with the fan, tubing on the edge and a redo visor installed.
bb80d213.jpg


Final ODST helmet. All painted and weathered. The only thing missing is some padding.
689b2981.jpg
 

Attachments

  • b6378469.jpg
    b6378469.jpg
    86.2 KB · Views: 162
  • 533d18a2.jpg
    533d18a2.jpg
    93 KB · Views: 165
  • 61de9806.jpg
    61de9806.jpg
    82.9 KB · Views: 160
  • 2e431588.jpg
    2e431588.jpg
    89.7 KB · Views: 160
  • 74d4b613.jpg
    74d4b613.jpg
    90.9 KB · Views: 169
  • bb80d213.jpg
    bb80d213.jpg
    95.3 KB · Views: 153
  • 689b2981.jpg
    689b2981.jpg
    112.3 KB · Views: 155
I'm almost done. Had to do one chest piece because it was way too small and it warped. After finishing my home project, now I can focus on finishing these 2 suits.

Can't resist having my 10 year old son trying it out. Nothing has been strapped, except the belt. So he looks kind of messy. Plus he is missing his chest piece. After all said and done, I noticed that his suit is a tad too big. Hopefully with all the straps in he can still have mobility. Too late to change anything now.
IMG_1657.jpg


Here is the back view. The thighs are twisted back and the helmet needs more padding.
IMG_1661.jpg


The straps and buckles should be here in the next 2 days. Hopefully I can post more updates in the next several days.
 

Attachments

  • IMG_1661.jpg
    IMG_1661.jpg
    73.8 KB · Views: 166
  • IMG_1657.jpg
    IMG_1657.jpg
    94.9 KB · Views: 148
This week I was able to do a little bit more. One of the suits is almost done. Have a problem with the shins. I need to restrap it.

Here is a photo how I strap the shoulder. The red stripe nylon is something I bought from dollar store. It is a thin strip about 10 feet long with velcro. The black nylon strap will be used for buckles. A screw was used to put the two pieces together. Finally, I glued a foam to cushion the shoulder.
504defb4.jpg


The chest piece was redone and completed. Will need to detail it and weather it. The torso is all strapped and ready to go. The helmet looks oversize because it is for a 11 year old.
785f443d.jpg
 

Attachments

  • 504defb4.jpg
    504defb4.jpg
    98.8 KB · Views: 150
  • 785f443d.jpg
    785f443d.jpg
    103.3 KB · Views: 164
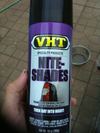
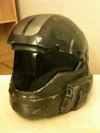
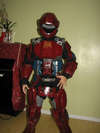
Gotta love this, the color looks very nice.

Thanks. I think so too. Still needs more weathering.

Well, here is the final product, minus the visor and weathering.

He actually looks bulk up. He can't bend his arm so I had to do some minor cut. Should be done within a week. In the mean time, I'm working on my younger son ODST.
IMG_1708.jpg


Recon ODST ready for duty.
IMG_1713.jpg
 

Attachments

  • IMG_1713.jpg
    IMG_1713.jpg
    91.9 KB · Views: 153
  • IMG_1708.jpg
    IMG_1708.jpg
    94.2 KB · Views: 160
Did you use a template for the foam torso piece for just freehand it?

I used a photo as a reference and free hand it. It was my first foam build so it wasn't my best or my last. I also freehand the inner thigh pieces. Took two tries but finally got the shape I wanted.
 
I can finally report that I am done with both of my kids' ODSTs, with mixed feelings. I was able to complete them a few days ago, but after putting the armor on, the hot glue on some of the pieces came off. The hot glue sticks that I bought was defective because I tried it on multiple surface it peels off easily. I need to go to Lowe's and get some stronger epoxy. And I also have the visor for Recon, but still waiting for a better epoxy to glue it in.

My 10 year old with is Recon.
Complete3.jpg


My 7 year old son and his ODST. Notice the blue tape where the hot glue failed.
Complete2.jpg


Another photo op.
Complete1.jpg


I will post more photos after I finish the assault rifles that are on my to-do list.

Enjoy!
 

Attachments

  • Complete3.jpg
    Complete3.jpg
    79.3 KB · Views: 152
  • Complete2.jpg
    Complete2.jpg
    94.8 KB · Views: 156
  • Complete1.jpg
    Complete1.jpg
    111 KB · Views: 153
OK. Now I completed both suits, I can focus on the weapons. Last year I made several weapons out of pepakura. I wasn't too happy with the results because of the details (or lack of).

So this year I decided to modify a Nerf Recon. Unfortunately, I don't have much progress with it.

Looking at some of the excellent scratch build cardboard weapons, I decided to try this method. Here is what I have so far.

A plan from Juliet76 helped started the project.
352a6f7b.jpg


The barrel will be done out of a water bottle cap and my kid's toy.
1965dfac.jpg


Side view of MA37 Assault rifle, kiddie size. Once this is resined, I'll add more details using foam.
b9571d70.jpg
 

Attachments

  • 1965dfac.jpg
    1965dfac.jpg
    92.9 KB · Views: 160
  • 352a6f7b.jpg
    352a6f7b.jpg
    136.8 KB · Views: 145
  • b9571d70.jpg
    b9571d70.jpg
    96.8 KB · Views: 165
Getting bored waiting for Hurricane Irene to arrive, I decided to work on the rifle. Here is the rifle resined and with foams glued. Finally, it is painted satin black. Looks the right size for my 7 year old.

a32ee4b1.jpg


Up close and personal. Now just some finishing touches this gun is done.
687c15ac.jpg
 

Attachments

  • a32ee4b1.jpg
    a32ee4b1.jpg
    89.6 KB · Views: 156
  • 687c15ac.jpg
    687c15ac.jpg
    76.2 KB · Views: 155
Dude you have got some of the luckiest kids on earth to have a dad like you. These look even more awesome than last years set. Keep up the sweet work can't wait to see the pics of them all suited up and tearin' it up in october.
 
Wow I guarantee every single kid that sees your sons are gonna be sooooooo jealous and whine to their parents to make them a costume too lol

If I can offer some constructive criticism: I don't know if you noticed but those shoulders were designed so that you could put a bolt or screw sideways through both pieces that way the piece actually bends like a hinge when you move your arm, just thought you should know, and also you have the side stomach plates reversed, in other words the left plate should be on the right side and vice versa, I mean in reality you can put them however you want and it still looks cool that way, just letting you know. But yeah stellar job! :D
 
@ODST Blue - thank you for the pointers. Good thing ODST is modular. I can fix the stomach plate easily. In my haste trying to get it done I messed up this part.
 
You should be proud C, you've done a great job with the suits and the AR. Nice one man.
 
I have been impressed with some of the foam armor that were done by some members. Instead of pepping the torsos, I decided to try my hands on foam. Here is what I've done on my day-off from work.

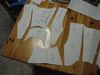
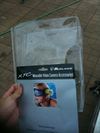
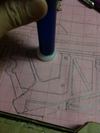
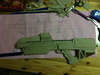
I first draw out the pattern after sizing it. I used Hugh's torso as a guide. I fold it in half to get symmetrical cut.
Foam01.jpg


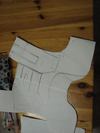
I continue to finish drawing the pattern.
Foam02.jpg


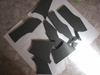
Now I cut them into pieces so I can use them as templates.
Foam03.jpg


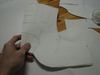
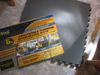
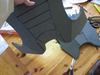
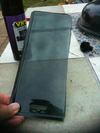
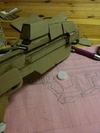
Got the foam board out.
Foam04.jpg


All pieces cut.
Foam06.jpg


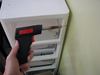
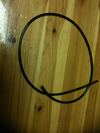
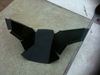
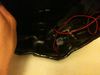
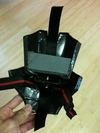
I'm using a hot solder gun to create several lines.
Foam07.jpg


Here is the result.
Foam08.jpg


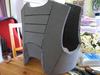
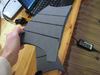
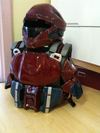
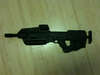
Start gluing with hot glue gun.
Foam09.jpg


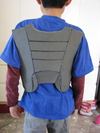
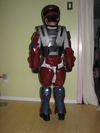
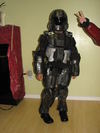
Almost done. Here is the back view.
Foam10.jpg


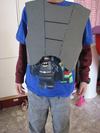
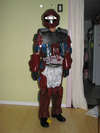
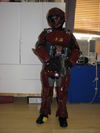
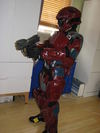
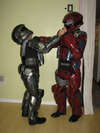
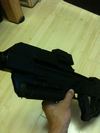
Here is my son trying it out.
Foam12.jpg


May look a little big. Need to trim the top and then add in the shoulder pieces.
Foam13.jpg


Let me know what you think.

DUDE THESE COSTUMES LOOK SICK! As soon as i can, I am doing the pepakura, and as for weapons, nerf guns work great! I was wondering how much that foam was because i will need to use something like that for my chest piece. I have motocross armor for padding underneath and i will put ODST armor over it, but i need the chest piece or at least the foam shoulder-straps. thanks
 

Attachments

  • Foam03.jpg
    Foam03.jpg
    61.2 KB · Views: 148
  • Foam02.jpg
    Foam02.jpg
    29.3 KB · Views: 162
  • Foam01.jpg
    Foam01.jpg
    30.6 KB · Views: 150
  • Foam10.jpg
    Foam10.jpg
    68.9 KB · Views: 151
  • Foam04.jpg
    Foam04.jpg
    79.5 KB · Views: 153
  • Foam06.jpg
    Foam06.jpg
    44.2 KB · Views: 144
  • Foam07.jpg
    Foam07.jpg
    30 KB · Views: 155
  • Foam08.jpg
    Foam08.jpg
    70.8 KB · Views: 159
  • Foam09.jpg
    Foam09.jpg
    65 KB · Views: 159
  • Foam12.jpg
    Foam12.jpg
    34.1 KB · Views: 144
  • Foam13.jpg
    Foam13.jpg
    38.9 KB · Views: 138
Status
Not open for further replies.
Back
Top