You are using an out of date browser. It may not display this or other websites correctly.
You should upgrade or use an alternative browser.
You should upgrade or use an alternative browser.
ODST MKIII. I'M BACK, BABY
- Thread starter OTSDerpy
- Start date
- Status
- Not open for further replies.
- Member DIN
- S118
they look good it did not take much if any detail away from what i see.Just Plastidipped my 5-6th layer on SOME pieces. I think the added layers do them good; giving them a GREAT sense of firmness. Even my helmet was less flimsy before it's 5th layer. Gonna do some caulking opening seams and give it one last medium coat. I'll see what alcohol needs to be used to give it more of a smoother finish. I remember it being SOME sort of acidic alcohol, but can't really remember.
View attachment 336700
- Member DIN
- S360
It definitely looks like it’s coming together. I like how you did the boots.
Been a while, but I've been busy with a LOT of other things at the moment with some upcoming conventions, and life. But I THINK I might be able to complete this build before the end of the year. Even the end of the month if I REALLY push it. Got nearly ALL the pieces plastidipped. But here's a photo of ALL my pieces that have around... 6-7 layers of Plastidip. And here's them in a large tote! SO MUCH SPACE IN THERE! Just need to work on getting some color on them in the future.
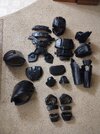
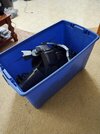
The only thing I'm working on now is the V.II of the shin pieces and they're coming a bit more easily than I have anticipated. Just have to work some magic on having it fit without me needing to bend and reshape the the thing to have my foot slide through. Creator's Creep is a TERRIBLE thing to have. Lol
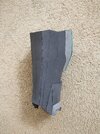
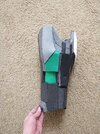


The only thing I'm working on now is the V.II of the shin pieces and they're coming a bit more easily than I have anticipated. Just have to work some magic on having it fit without me needing to bend and reshape the the thing to have my foot slide through. Creator's Creep is a TERRIBLE thing to have. Lol


- Member DIN
- S149
Ahhh this looks amazing so far Derpy! Please, please tell me you're making it to Colossalcon North with this, I need to see this beauty in person!Been a while, but I've been busy with a LOT of other things at the moment with some upcoming conventions, and life. But I THINK I might be able to complete this build before the end of the year. Even the end of the month if I REALLY push it. Got nearly ALL the pieces plastidipped. But here's a photo of ALL my pieces that have around... 6-7 layers of Plastidip. And here's them in a large tote! SO MUCH SPACE IN THERE! Just need to work on getting some color on them in the future.
View attachment 338098 View attachment 338099
The only thing I'm working on now is the V.II of the shin pieces and they're coming a bit more easily than I have anticipated. Just have to work some magic on having it fit without me needing to bend and reshape the the thing to have my foot slide through. Creator's Creep is a TERRIBLE thing to have. Lol
View attachment 338100 View attachment 338101
- Member DIN
- S410
Wait why so much plasti dip? Am I supposed to put more than 1 layer on??6-7 layers of Plastidip
Very nice progress btw
I wish SO much that was the case, but sadly I had other engagements towards another convention at that same weekend that's been in the planning stages since a year ago. ^^;Ahhh this looks amazing so far Derpy! Please, please tell me you're making it to Colossalcon North with this, I need to see this beauty in person!
If you come to Anime Milwaukee, I WILL be able to take this along.^^
I 'unno I just sprayed until the can said "I'M EMPTY!!" Then proceed to YEET.Wait why so much plasti dip? Am I supposed to put more than 1 layer on??
Very nice progress btw
V.II are ALMOST done! Just gotta do some caulking and sanding. so... about another week of work before they can be plastidipped.
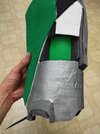
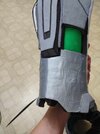
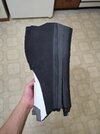
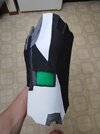
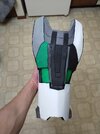
BUT... the overall build is done! Slimmer! Lighter! More magnetic and adjustable!
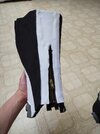
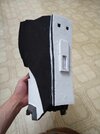
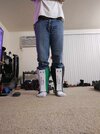
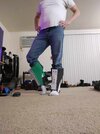
Here it is compared to the V.I. Are the magnets and zipper a bit overkill? Maybe, but the foot hole was SO small that a good effort of stretching and shaping was needed to fit my foot through. and twice as much to take it out. I think I did a decent job in creating a solution.
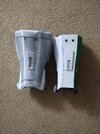
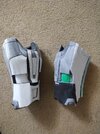
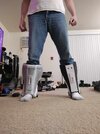
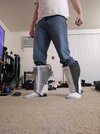


BUT... the overall build is done! Slimmer! Lighter! More magnetic and adjustable!


Here it is compared to the V.I. Are the magnets and zipper a bit overkill? Maybe, but the foot hole was SO small that a good effort of stretching and shaping was needed to fit my foot through. and twice as much to take it out. I think I did a decent job in creating a solution.


Got the shins all primed there are some areas that I still need a few coats or I simply forgot, but here's the majority of the suit ready for painting.
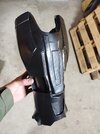
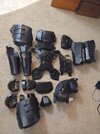
Over the weekend I was able to apply some paint on some armor pieces. Some of it is done with fine paint, but most of it was applied with a sponge brush for less stroke lines.
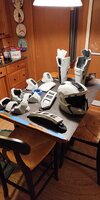
Hard part is color scheming to see which areas would go great where and not be too much or too little.
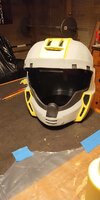
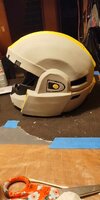
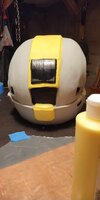
Now to add Light Grey base to the rest of the build.


Over the weekend I was able to apply some paint on some armor pieces. Some of it is done with fine paint, but most of it was applied with a sponge brush for less stroke lines.

Hard part is color scheming to see which areas would go great where and not be too much or too little.


Now to add Light Grey base to the rest of the build.
Here is the process so far with the holiday break.^^
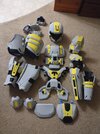
So far so good. Though I've noticed some things aren't as detailed as the armor in the H4 model pic, but there's still the white lettering and the weathering to take in consideration. And that's when it turns this okay paintjob with some details to a WONDERFUL looking set of armor. Just need to cut out the lettering from this paper and be used as templates to apply the white paint to the desired areas.^^
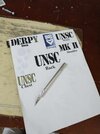
It's a slow process, but worth it. Not to mention I don't know an area the can cut out this custom style for vinyl stickers to make it easier. Lol

So far so good. Though I've noticed some things aren't as detailed as the armor in the H4 model pic, but there's still the white lettering and the weathering to take in consideration. And that's when it turns this okay paintjob with some details to a WONDERFUL looking set of armor. Just need to cut out the lettering from this paper and be used as templates to apply the white paint to the desired areas.^^

It's a slow process, but worth it. Not to mention I don't know an area the can cut out this custom style for vinyl stickers to make it easier. Lol
Looking awesome dude! That's some clean foam work.
- Member DIN
- S410
OH MY GOSH THAT LOOKS AMAZING!!Here is the process so far with the holiday break.^^
I legit forgot that this was foam until I re-read your older posts. Very clean form work and outstanding paint job! I love it!
Thanks, I try my best.^^OH MY GOSH THAT LOOKS AMAZING!!
I legit forgot that this was foam until I re-read your older posts. Very clean form work and outstanding paint job! I love it!
After getting this far I realized there are some things I wish I did before, some details I wish I added on, and some I just plain missed due to the pixels covering the spots up on the paper. But that all might be fixed with a MK III in the near future.^^
Ok, so a LITTLE bit of an update folks:
First off, progress on the suite has halted due to no stores selling a specific type of sealer that I am needing for the rest of the unsprayed parts. Only way to get this sealer is online and that takes about a week to wait for. Shame.
Second, life has kinda got in the way of a few things so I have to focus on them a bit more before anything.
Third, Only thing I'm focusing right now on the suite is the visor until further notice, gonna be doing some tests tomorrow and see how that goes with the materials I have.
Sorry that the news hasn't been suite-progressive as I had hoped, but this is the state as of this moment. but once the cans get in my possession, work will be going back to normal and the suite will be nearly complete.^^
MAJOR update!
So a few major things have happened since the last post:
I managed to get my pieces all whethered. This REALLY made the armor look more lively and less cartoony.
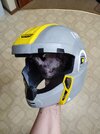
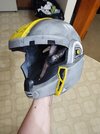
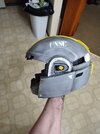
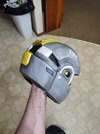
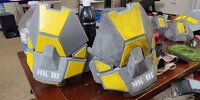
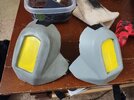
Another is that I implemented a new technique that a lot of Mandalorian creators do and window tinted my plastic sheet to creat the visor. A little see-through, but I'll make sure to get the reflective chrome for the MK IV.
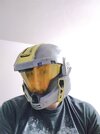
Now onto the bad news: to complete the process of window tinting, I had to sandwich everything together. This meant, from bottom to top, sheet, tint, tint, with the application of water between all three. As YouTuber Martincitopants always says: "This... was a terrible idea". Because the bottle that was sprayed was originally used to clean things. Which means this was water was contaminated with Dawn dish soap. Soap that, when dried, left this film residue in between the layers.
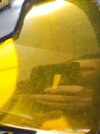
3 MONTHS of work, only to trip at the finish line. Oh well, it wasn't clear as I'd hoped, but it wasn't as bad as I thought. It was kinda like looking through a moderate dirty windshield. I'll be sure to create liquids from scratch so I know what's in them on my next suit. Lol
But that's the progress so far. I'll upload photos of the completed suit after getting some professional photos done next week.^^
So a few major things have happened since the last post:
I managed to get my pieces all whethered. This REALLY made the armor look more lively and less cartoony.


Another is that I implemented a new technique that a lot of Mandalorian creators do and window tinted my plastic sheet to creat the visor. A little see-through, but I'll make sure to get the reflective chrome for the MK IV.

Now onto the bad news: to complete the process of window tinting, I had to sandwich everything together. This meant, from bottom to top, sheet, tint, tint, with the application of water between all three. As YouTuber Martincitopants always says: "This... was a terrible idea". Because the bottle that was sprayed was originally used to clean things. Which means this was water was contaminated with Dawn dish soap. Soap that, when dried, left this film residue in between the layers.

3 MONTHS of work, only to trip at the finish line. Oh well, it wasn't clear as I'd hoped, but it wasn't as bad as I thought. It was kinda like looking through a moderate dirty windshield. I'll be sure to create liquids from scratch so I know what's in them on my next suit. Lol
But that's the progress so far. I'll upload photos of the completed suit after getting some professional photos done next week.^^
This ENTIRE process took about 1.5yrs. It WOULD have originally taken 1yr, but I then decided to redo the torso, back, side straps, and boots because they were too large. There ARE some things I want to improve on the MK III, but that can be done at another time. I took this suit out for a test run at Anime Milwaukee to see how it holds up. And despite a FEW things, the overall run was a success.
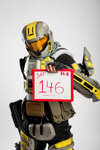
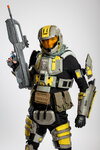
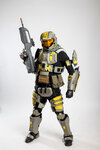
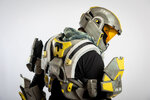
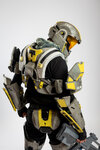
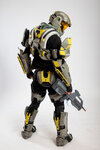
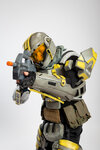
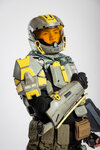
Professional Photos by Erik JAWS Photo
Future Upgrades:
- Bigger helmet. It's too snug, which means no air flow, which means it fogs up a tad quicker than my Doomguy helmet.
- Toe plates. They keep slipping off due to the constant contact of the floor under the shoe. Need to glue some straps to the middle armor pieces so they can stay in place.
- Chrome Visor. Need to find a way to obstruct my face. It doesn't look bad, but it does look a bit out of place if it's not reflective.
- Status
- Not open for further replies.
