First step is to take a well fitting shirt that you don't mind sacrificing. You put it on and mark your basic outline of the item that you are wanting to make. Sometimes having a friend help is a good idea.
Here you can see where I marked the armhole and I made a horizontal line where the top attachment point for the ODST chestpeice will be.
Here you can see where I did the same with the side seam and lower attachment point for the chest plate.
Now. I smoothed my basic lines and added my seam allowance. Your seam allowance should be on average 5/8th of an inch.
This is a close look of the front arm hole.
I had done basically the same steps to the back. Here is where I then found my centerline. I measured the width of the shirt in several places. Dividing the result in 2. This is my center line. I made a mark down the line both front and back.
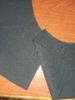
I finally cut along my seam lines and my centerlines. I chose where my shoulder seam would be and cut there. This gives me my basic pattern.
_________________________
The next step is to wash, dry, and then iron your fabric. You do this for a few reasons. One is to remove any finishing from manufacture from the fabric.
It will also cause any shrinkage or stretching the fabric might get to happen before you make your item. If you have ever bought clothes and they fit at the store, then when you washed them at home and they no longer fit. This would have been the cause.
After that you make a muslin, or test pattern. This is to make sure your basic idea fits together. And that it fits YOU.
You can use fabric that is called muslin, or any fabric that has about the same weight and stretch as your good fabric. You want to make any mistakes on cheaper material.
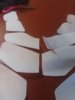
Here I traced out my pattern blocks onto my muslin fabric.
I had already added the seam allowances in the steps above.
Do not forget to add your registration marks.
Then you carefully cut out your pattern peices. The front and back pieces were cut on a fold line so they opened to the full width.
Here are the pattern prices played out like they will be when finished.
here you can see the kidney plate attachment to the front side. I have a good 3 to 4 inch over lap becaise i am adding Velcro and elastic here for easy removal and opening of the vest.
_____________________
Now to the fun part. Sewing.
You match your edges together. You then either clip or pin them together so that they don't move until you sew.
You then put it into your sewing machine. You will want to see right along the sew line you marked at the beginning
This should be 5/8ths inch inside he fabric.
Use a straight stitch at a mid length. You can see where I did a stitch length of 2 and a straight stitch.
Do not forget to reverse stitch a short section at both beginning and end of your seam. This locks the thread so that the seam does not pull apart.
Then clip all threads close.
Now we move on to part of finishing seams. You need to iron the seams open and flat. This help smooth it, as well as when you need to see fabric to your other seams they won't bunch up.