This is a build of the ODST Rucksack files sold by FromTheBrinkStudios on Etsy. The files were printed on a Longer 5k Pro with a 30x30x40 bed. I didn't have to cut any pieces or re-size so can't speak to the easy of that part but for a newbie printer like me they were easy to use.
This is the final piece of my ODST build found here: Finally Finishing the First Build
Here are the tools/materials I used:
TOOLS - everything was bought at local Lowe's/Ace
MATERIALS
Once everything was printed I did a test fit to ensure everything would go together and to mark off areas I didn't need to sand or paint. I then sanded everything with 120 to clean up the lines and rough areas. Wearing gloves I used the pan scraper to apply the bondo to all of the pieces. Once all the bondo had dried (turns light orange) I sanded everything with 240. For the edges, tight places and details areas I used handheld needle files. Once all the sanding was complete I washed everything to remove excess dust and allowed to dry overnight.


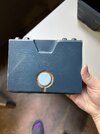
 <--final sanded product (ignore the grenades I did at the same time)
Once I was satisfied with the finish on everything I started the painting process. I painted during cold/wet weather so I allowed 90 mins before touching a piece and over night before moving onto the next paint layer. First coat is the 2-in-1 filler primer making sure to add extra coats to places that showed imperfections. Then I coated everything with the metallic paint making sure to use light passes from further back. This metallic paint can apply uneven leaving a texture behind if applied to heavily. This layer is needed if weathering by sanding away color, if you weather pieces by painting you can skip the metallic layer. Last of this stage is the color coats. Since I did two colors I started with the lighter blue detail and once dried I taped off those areas before adding the dark blue layer.
To weather the pieces I used 240 paper to lightly sand away the color from the edges and corners until the metallic shows through. You can also add additional scuffs or chips as you feel. If I sanded too far to the orange (bondo) then I toughed it up with silver sharpie. I added detail to some pieces using a bronze sharpie. Ensure all weathering detail and painting is complete before moving to the next phase.


To seal the work done thus far I hit everything with a matte clear coat before the oil wash. My oil wash is a 2:1 mixture of mineral spirits and black oil paint. I wanted a grime look so used black paint but if you want more of a dust/dirt look I would use a brown. Be sure to mix the spirits in a glass or metal container, I used a mason jar. Dipping the brush in the oil wash I painted small patches and then rubbed it off with the t-shirt. You'll need a smooth rag for this as a textured cloth like a wash cloth leaves weird marks. Once the oil wash was dry to the touch I did a final coat of Satin enamel to seal everything.


ASSEMBLY
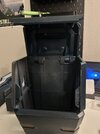
Brink Studios did provide a list of hardware they used but I ran into some difficulty finding things that fit. I think there may be some US/Metric conversion issues so there is room for improvement. The main body is two compartments I secured using M8 screws and nuts. The bottom flap and side doors are attached suing hinges.I couldn't find a size in my local store that fit the pre-printed area. I decided to use smaller 1.25" hinges and only used one screw hole. I used the M4 screws on the hinges instead of the wood screws that came with so there wouldn't be anything pointy. The top flap/door is a hinge system I used dowels for. I couldn't get a tight dowel fit so I sealed the ends of the dowels with hot glue. The side compartments print with pieces that fit into holes on the main body. The files include U-locks to secure the side compartments to the main body. Finally I added magnets with hot glue to the pre-printed spots.


Last I hot glued some EVA foam to the back and added 1" nylon straps to the back. There are several ways to thread the straps but I just did a basic loop so it would wear like a backpack.


All together I feel it came out really good and makes the ODST armor look more complete. The fit was nice and it's cool that all the doors are functional.


This is the final piece of my ODST build found here: Finally Finishing the First Build
Here are the tools/materials I used:
TOOLS - everything was bought at local Lowe's/Ace
- Needle file set
- 3M Respirator (the model for painting)
- Dust mask
- Spray painting tent
- Paint coveralls
- Safety glasses
- Vinyl gloves
- Pan scraper (same kind used to clean frying pans)
- Small bristle or sponge paint brush
- Glue gun
- Old t-shirt or smooth rag (no texture)
- Micro hand sanding tool (bought the handle at Lowe's and then extra strips on Amazon)
-
MATERIALS
- Bondo glazing putty (red kind in tube), I bought the 1lb tube
- 3 - 1kg spools of PLA
- Distilled Mineral Spirits
- Black oil paint
- Spray paint (all Rustoleum brand)
- 2-in-1 automotive primer
- Universal Matte Metallic paint & primer (Gunmetal Gray)
- Matte Clear Enamel
- Color Satin Protective Enamel (Midnight Blue & Peaceful Blue)
- Satin Clear Enamel
- Metallic sharpies (bronze & silver)
- M8 bolts and nuts
- M4 screws
- 1.25" hinges
- 1/4" and 1/8" dowels
- 3/8 disc magnets
- Black foam sheet
Once everything was printed I did a test fit to ensure everything would go together and to mark off areas I didn't need to sand or paint. I then sanded everything with 120 to clean up the lines and rough areas. Wearing gloves I used the pan scraper to apply the bondo to all of the pieces. Once all the bondo had dried (turns light orange) I sanded everything with 240. For the edges, tight places and details areas I used handheld needle files. Once all the sanding was complete I washed everything to remove excess dust and allowed to dry overnight.
<--final sanded product (ignore the grenades I did at the same time)Once I was satisfied with the finish on everything I started the painting process. I painted during cold/wet weather so I allowed 90 mins before touching a piece and over night before moving onto the next paint layer. First coat is the 2-in-1 filler primer making sure to add extra coats to places that showed imperfections. Then I coated everything with the metallic paint making sure to use light passes from further back. This metallic paint can apply uneven leaving a texture behind if applied to heavily. This layer is needed if weathering by sanding away color, if you weather pieces by painting you can skip the metallic layer. Last of this stage is the color coats. Since I did two colors I started with the lighter blue detail and once dried I taped off those areas before adding the dark blue layer.
To weather the pieces I used 240 paper to lightly sand away the color from the edges and corners until the metallic shows through. You can also add additional scuffs or chips as you feel. If I sanded too far to the orange (bondo) then I toughed it up with silver sharpie. I added detail to some pieces using a bronze sharpie. Ensure all weathering detail and painting is complete before moving to the next phase.
To seal the work done thus far I hit everything with a matte clear coat before the oil wash. My oil wash is a 2:1 mixture of mineral spirits and black oil paint. I wanted a grime look so used black paint but if you want more of a dust/dirt look I would use a brown. Be sure to mix the spirits in a glass or metal container, I used a mason jar. Dipping the brush in the oil wash I painted small patches and then rubbed it off with the t-shirt. You'll need a smooth rag for this as a textured cloth like a wash cloth leaves weird marks. Once the oil wash was dry to the touch I did a final coat of Satin enamel to seal everything.
ASSEMBLY
Brink Studios did provide a list of hardware they used but I ran into some difficulty finding things that fit. I think there may be some US/Metric conversion issues so there is room for improvement. The main body is two compartments I secured using M8 screws and nuts. The bottom flap and side doors are attached suing hinges.I couldn't find a size in my local store that fit the pre-printed area. I decided to use smaller 1.25" hinges and only used one screw hole. I used the M4 screws on the hinges instead of the wood screws that came with so there wouldn't be anything pointy. The top flap/door is a hinge system I used dowels for. I couldn't get a tight dowel fit so I sealed the ends of the dowels with hot glue. The side compartments print with pieces that fit into holes on the main body. The files include U-locks to secure the side compartments to the main body. Finally I added magnets with hot glue to the pre-printed spots.
Last I hot glued some EVA foam to the back and added 1" nylon straps to the back. There are several ways to thread the straps but I just did a basic loop so it would wear like a backpack.
All together I feel it came out really good and makes the ODST armor look more complete. The fit was nice and it's cool that all the doors are functional.