gazihsah
New Member
Thought I'd finally sit down and write up a thread for what I wanted to put together for late-April: a Rakshasa build themed around Vincent Valentine, from Final Fantasy 7, smooshed together! Somehow. I've sketched up a few initial ideas for what I had in mind, and for what I want it to generally look like.

I was originally thinking of just going with his traditional cloak design since I've already made that in the past , but figured it could potentially look out of place if I didn't redesign something to fit the overall look of the armor better.
The full build will (hopefully) be:
So, what's done so far?
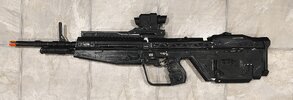
I've printed out the DMR in full! There's still pieces I need to glue together, and seams I'll be filling with epoxy resin, and I'll need to do more passes of filler primer + spot putty before I get going with the paint.

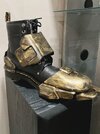
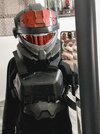
I'm still printing the last 2 pieces of the helmet, but I'm going to fiberglass reinforce the seams of the top bucket together ( the top bucket was too big to fit on the print bed if I hadn't slice it into smaller, printable pieces).


Aaaaand the other major milestones I still gotta hit are:
I was originally thinking of just going with his traditional cloak design since I've already made that in the past , but figured it could potentially look out of place if I didn't redesign something to fit the overall look of the armor better.
The full build will (hopefully) be:
- Rakshasa core (by Aguilar Workshop)
- Trailblazer helmet (by Aguilar Workshop)
- DMR (by OddWorks) [went with the DMR due to it being a personal fave, though, might make something smaller down the road that'll be easier to travel with]
- A red cloak that's reminiscent of the sniper veils that Jun wears (likely going to be 2 different textiles to match Vincent's silhouette, while still feeling military-esque)
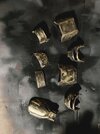
- Likely make some soft pouches (gotta have pockets in a cosplay.)
So, what's done so far?
I've printed out the DMR in full! There's still pieces I need to glue together, and seams I'll be filling with epoxy resin, and I'll need to do more passes of filler primer + spot putty before I get going with the paint.
I'm still printing the last 2 pieces of the helmet, but I'm going to fiberglass reinforce the seams of the top bucket together ( the top bucket was too big to fit on the print bed if I hadn't slice it into smaller, printable pieces).
Aaaaand the other major milestones I still gotta hit are:
- Size the Rakshasa pieces in Armorsmith to fit...
- ...Print and sand prep those pieces off
- Reinforce the pieces with fiberglass resin at the seams
- Paint All The Things™
- Make a visor (not sure if I'll either vaccum form it, or use a flat plastic sheet, or just buy it)
- Wire up fans and audio for the helmet
- Maybe add lighting for the armor where appropriate (depending on whether I con crunch too close to the sun)
- Find patterns for molle pouches, and sew them